GuglioLS
Administrator  Jinma354 LE
Posts: 1,276
|
Post by GuglioLS on Jan 31, 2008 22:13:29 GMT -5
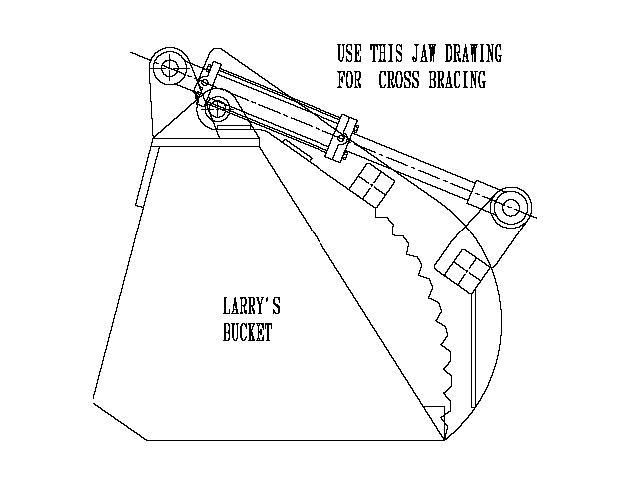
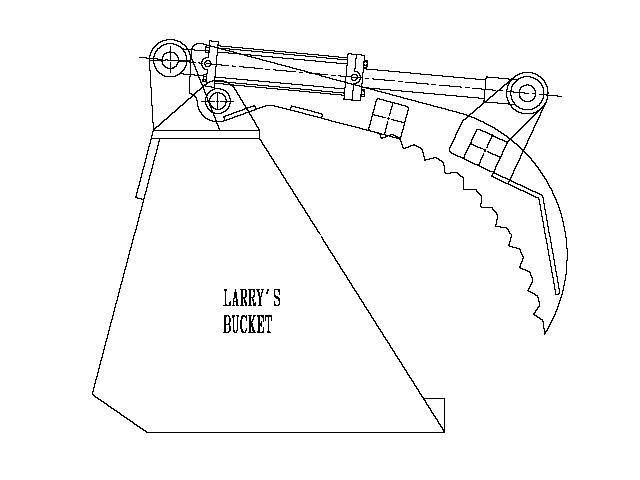
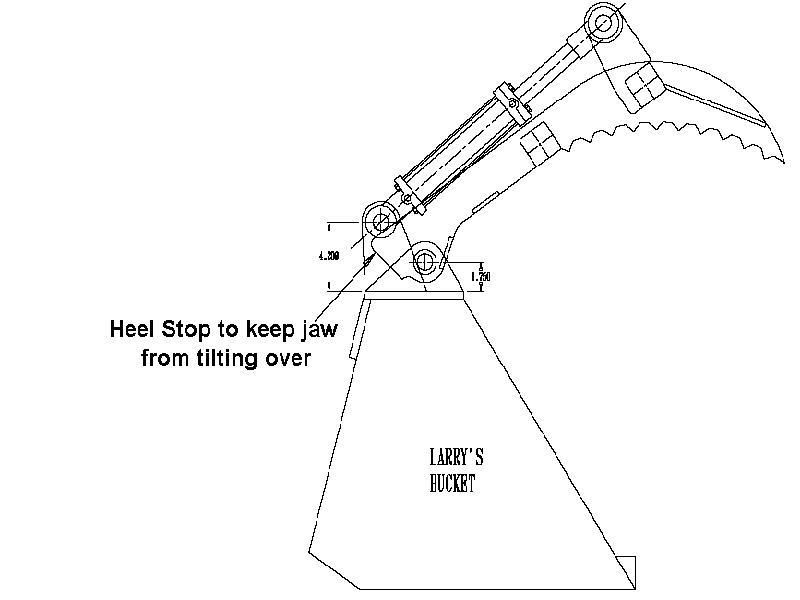
After Rob's visit to my home on the range. He said I had to install a grapple. Having no choice but to say yes, he has been behind the scenes, secretly designing a custom grapple to fit my Koyker FEL bucket from scratch  After a couple of design prototypes (I kept asking for the impossible) Here are some drawings Rob sent for my final stamp of approval. Notice he has designed in a stop on the end of the jaw to keep the jaws from going past TDC preventing locking up of the grapple jaws. What do you think of that? 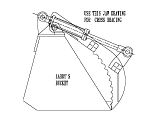  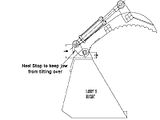 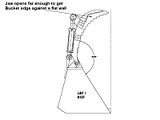 The tough part was I wanted the jaws to open far enough so that the jaw tips would be behind the vertical plane of the front cutting edge of the bucket. He pulled it off. Rob designed the fine detail of every single part. He supplied the drawings in an electronic format that I will take to a CNC plasma cutter, and have them cut from plate steel. Rob believes this is the final installment for 9 minutes of my time to fix the bad ground on his tractor  His gratitude keeps overflowing, even though he designed and built the gear box for my back blade, then flew out here as slave labor to rebuild my dozer, then plan, survey and help build my new road. Now he really feels sorry for me because I have suffered the misfortune of not having a grapple for such a long time it's pathetic - what a guy. Larry |
|
GuglioLS
Administrator
Jinma354 LE
Posts: 1,276
|
Post by GuglioLS on Jan 31, 2008 23:31:17 GMT -5
Here are the parts I got from Surplus center: 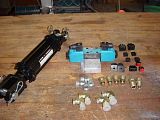 A cylinder, open center solenoid with sub-plate and connectors, some miscellaneous fittings and a few momentary rocker switches. I have been looking all over creation for a grapple joystick handle with a toggle switch. No luck yet, anyone know who makes / sells a joystick handle with a rocker switch? Maybe Rob should convince some plastic company to have him design a mold to make plastic joystick handles for hydraulic FEL levers? Larry |
|
GuglioLS
Administrator
Jinma354 LE
Posts: 1,276
|
Post by GuglioLS on Jan 31, 2008 23:33:35 GMT -5
I found just the ticket for the joystick handle: Home PageS series handleHandle specsMounting optionsParts ListI ordered a two button model without a trigger to keep it simple and cheap, and a 10mm X 1.5 thread pitch mount bushing. I told them what a PITA it is to find these things. I called every single hydraulic shop and tractor dealer in New Mexico, and they never heard of such a thing. Scorpion wants me to become a distributer. If anyone orders a handle PLEASE mention my name (Larry Gugliotta) for a discount and a small kickback for me ;D These are so cool, you could wire one up for rocket launchers or even have it make coffee for you. Maybe even an ejection seat for those extreme pucker factor moments  Larry |
|
GuglioLS
Administrator
Jinma354 LE
Posts: 1,276
|
Post by GuglioLS on Jan 31, 2008 23:36:52 GMT -5
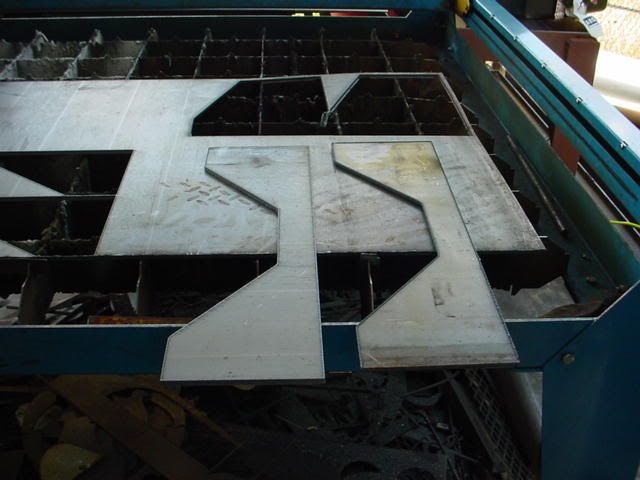
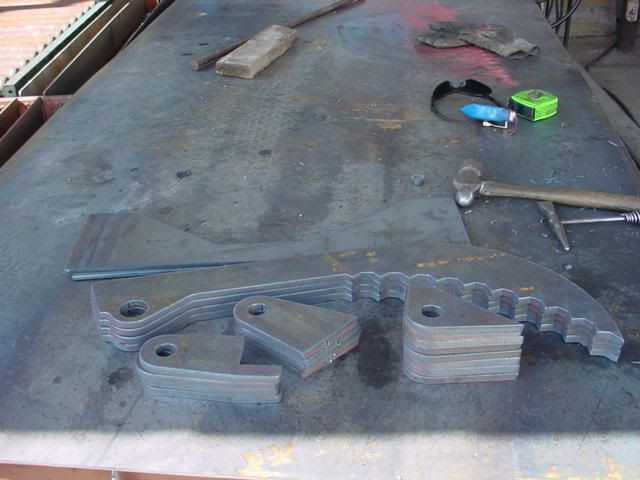
I took Rob's Auto Cad files down to the Plasma cutter, imported the file, verified all dimensions, then arranged the pieces in the smallest size possible. Here is the result:  They all fit in a 25"X48" footprint, this will keep material costs to a minimum. While I was there, I did quite a bit of work for them, I looked at all the equipment that was damaged by the lightning strike last week. I found what was fried on the Plasma Therm Plasma cutter. I will pick up the parts and fix it for them tomorrow. The computer that operates the X-Y-Z table for the cutter has a fried power supply. I moved the Hard drive over to a replacement computer and got all their old files restored. Then I filled out damage reports for them to file insurance claims for repairs and replacement of some other equipment. So I was in a good position to make a trade - all the labor and material is free. ;D Larry |
|
GuglioLS
Administrator
Jinma354 LE
Posts: 1,276
|
Post by GuglioLS on Jan 31, 2008 23:38:51 GMT -5
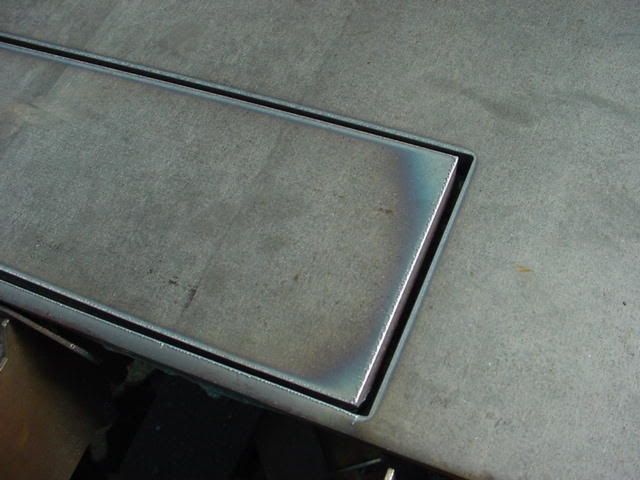
OK - update on todays progress, I got their Plasma cutter back on-line ;D They were so happy, they knocked out the grapple parts first thing to test it all out. Just look at the clean cut it makes in this 1/2" plate!: 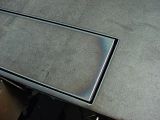 These are the Jaw tip braces cut from 1/4" plate:  Larry |
|
GuglioLS
Administrator
Jinma354 LE
Posts: 1,276
|
Post by GuglioLS on Jan 31, 2008 23:39:58 GMT -5
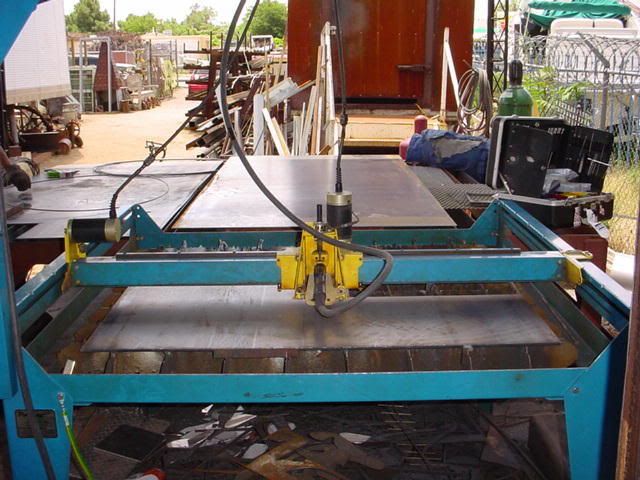
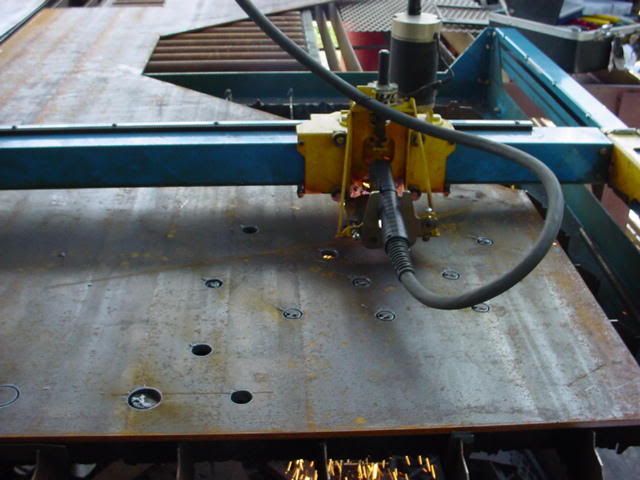
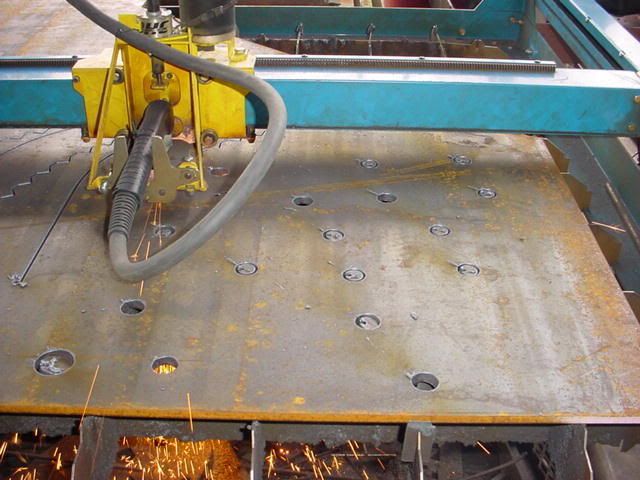
This is the Computer Controlled Plasma cutter, I uploaded Rob's CAD file onto the hard drive, then all the pieces were arranged to fit, Then set the burn through (start of cut) then tag the order they would be cut - inside holes first! 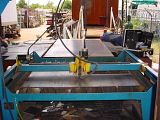 Here are all the inside holes being cut first: 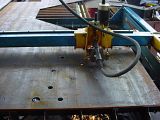 Larry |
|
GuglioLS
Administrator
Jinma354 LE
Posts: 1,276
|
Post by GuglioLS on Jan 31, 2008 23:40:57 GMT -5
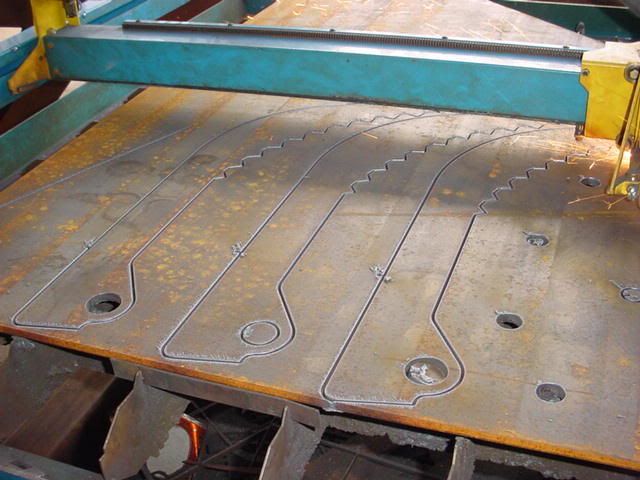
After all the internal holes were burned through, we proceeded to cut the outline of all the parts. Just look at that plume of flame and metal blowing out - it was awesome to watch it in action up close and personal.  That machine is making great progress, things are now starting to take shape:  Larry |
|
GuglioLS
Administrator
Jinma354 LE
Posts: 1,276
|
Post by GuglioLS on Jan 31, 2008 23:43:32 GMT -5
Here you can see the outline of the grapple jaws starting to take shape.  Just look how crisp the edges are coming out: 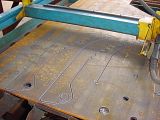 Larry |
|
GuglioLS
Administrator
Jinma354 LE
Posts: 1,276
|
Post by GuglioLS on Jan 31, 2008 23:44:25 GMT -5
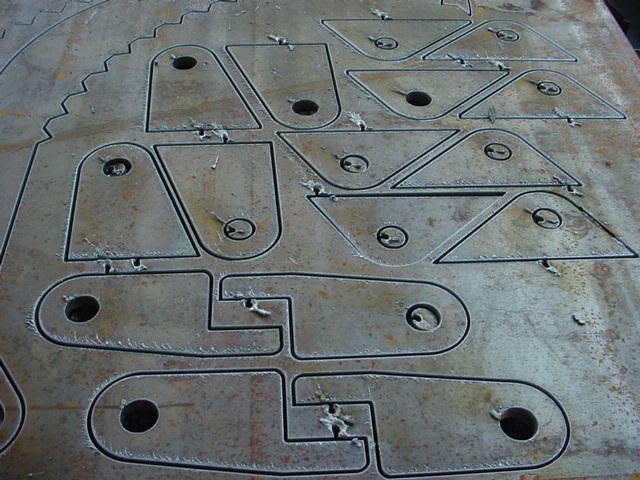
Three of the four jaws are are now complete. 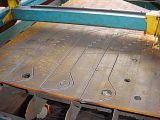 Now it's on to all small brackets: 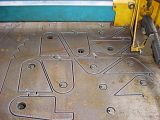 Larry |
|
GuglioLS
Administrator
Jinma354 LE
Posts: 1,276
|
Post by GuglioLS on Jan 31, 2008 23:45:12 GMT -5
All the small brackets are now complete, the last jaw is now being cut in the top of the photo. 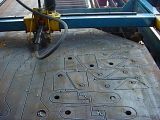 All done ! ;D 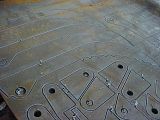 It took roughly 20 minutes to burn through all that steel. Larry |
|
GuglioLS
Administrator
Jinma354 LE
Posts: 1,276
|
Post by GuglioLS on Jan 31, 2008 23:45:51 GMT -5
This is a close up of the smaller bracket parts: 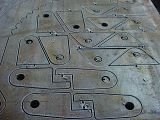 After all the cuts were complete, & while the metal was still hot, we tapped out all the parts and knocked off the slag. Here's the negative: 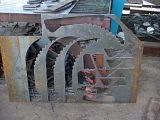 Larry |
|
GuglioLS
Administrator
Jinma354 LE
Posts: 1,276
|
Post by GuglioLS on Jan 31, 2008 23:46:36 GMT -5
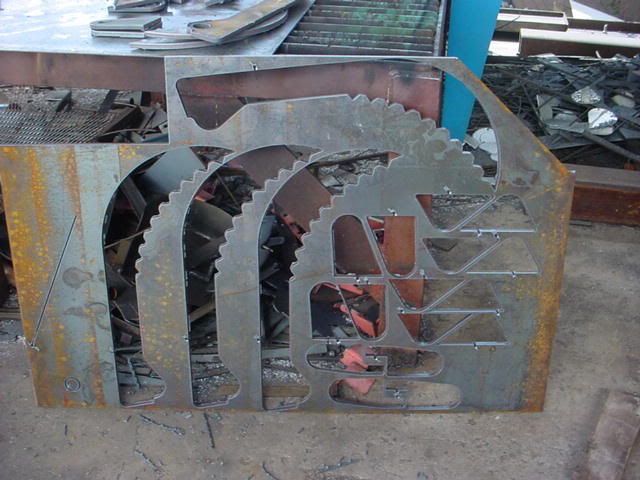
This is the final stack of parts, notice how the jaws stack up and overlay each other perfectly? I forgot to line up all the small parts, but they came out just as perfect.  Larry |
|
GuglioLS
Administrator
Jinma354 LE
Posts: 1,276
|
Post by GuglioLS on Jan 31, 2008 23:47:10 GMT -5
As a bonus, and to further enhance this experience, I took a few video clips of the plasma cutter in action. This one is cutting the outline of a jaw: 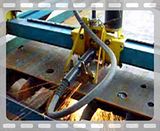 Larry |
|
GuglioLS
Administrator
Jinma354 LE
Posts: 1,276
|
Post by GuglioLS on Feb 1, 2008 0:02:47 GMT -5
In this clip, the last cut is completed, the torch raises and the table goes to the home position so we could remove the work piece and tap out all the parts: 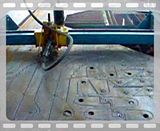 I need to cut a few more basic parts out in my home shop on the band saw, then bore out a few holes on the plasma cut parts so as to get a little closer tolerance. Other than that, assembly, clamping and test fitting should be pretty straight forward. Larry |
|
GuglioLS
Administrator
Jinma354 LE
Posts: 1,276
|
Post by GuglioLS on Feb 1, 2008 0:04:28 GMT -5
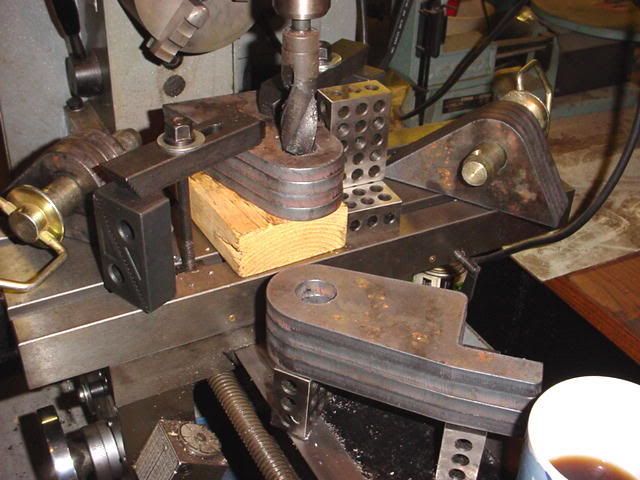
Progress report for today - First, Esther and I went wood cutting and chipping for two and a half hours. She was pooped and went in to do other things. I started working on the grapple. First was to drill out the 1" holes in all the cylinder and jaw brackets. The plasma cutter is not perfect, there is a taper to all the parts so a little clean-up was needed. I stacked all the similar bracket four at a time then drilled:  After completing the 1" holes, it was time to stack the jaws, then index them to center. The holes in the jaws are 1.5" dia so that a piece of 1.0" ID x 1.5" OD, DOM - Drawn Over Mandrel (seamless tubing) can be inserted then welded in place. This is a unique feature that Rob engineered into the jaw hinges, it improves strength and reliability. 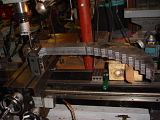 Larry |
|


 His gratitude keeps overflowing, even though he designed and built the gear box for my back blade, then flew out here as slave labor to rebuild my dozer, then plan, survey and help build my new road. Now he really feels sorry for me because I have suffered the misfortune of not having a grapple for such a long time it's pathetic - what a guy.