nuno
CTW Member

Posts: 26
|
Post by nuno on Aug 17, 2011 8:51:15 GMT -5
Hey Folks, the Wintertime is coming and for the coming up Snow-Removing Season i decide to build an Snow Blade. In the last Winter i removed the Snow with my Boxblade but now i have an Salt Spreeder powered by PTO and must look for an other option to remove the Snow. i am not really a fan of Snow Blades attached to the Front End Loader so i have to look for the conventional method to attach an Snow Blade to an Tractor. Chinese Tractors and Dealers in Germany are not common like in the USA. Here in Germany we have two Jinma Dealers with only a few Parts in Stock and it is more easy to find an really hot 30 Years old Virgin than the Stuff you need for your Tractor. on German Ebay i found two Dealers they sell Front Hitch for Lenar / Mahindra Tractors and i am sure that this Front Hitch will fit with a few Modifications also to the Jinma but i am not able to pay with shipping 915 Euro/ 1325 USD for an painted or 745 Euro/ 1080 USD fo an unpainted Front Hitch like this here cgi.ebay.de/Frontkraftheber-Fronthydraulik-Schlepper-Traktor-/180652954024?pt=Ersatzteile_Zubeh%C3%B6r_Landtechnik&hash=item2a0fc151a8cgi.ebay.de/FRONTKRAFTHEBER-FRONTHYDRAULIK-FRONTHEBER-TRAKTOR-NEU-/250858874478?pt=Ersatzteile_Zubeh%C3%B6r_Landtechnik&hash=item3a685aa66eso i decide to build my own Front Hitch, a raw copy of this shown in the Ebay Link and only with one Hydraulic Cylinder. Yesterday i start with the Modifications/Building. I will not have to remove the FEL Support when i have to use the Front Hitch and vise versa so i have to modify the the Front Bracket of the Tractor. here are a few Pictures of the Front Bracket before i start the modifications    and after welding the Side Plates  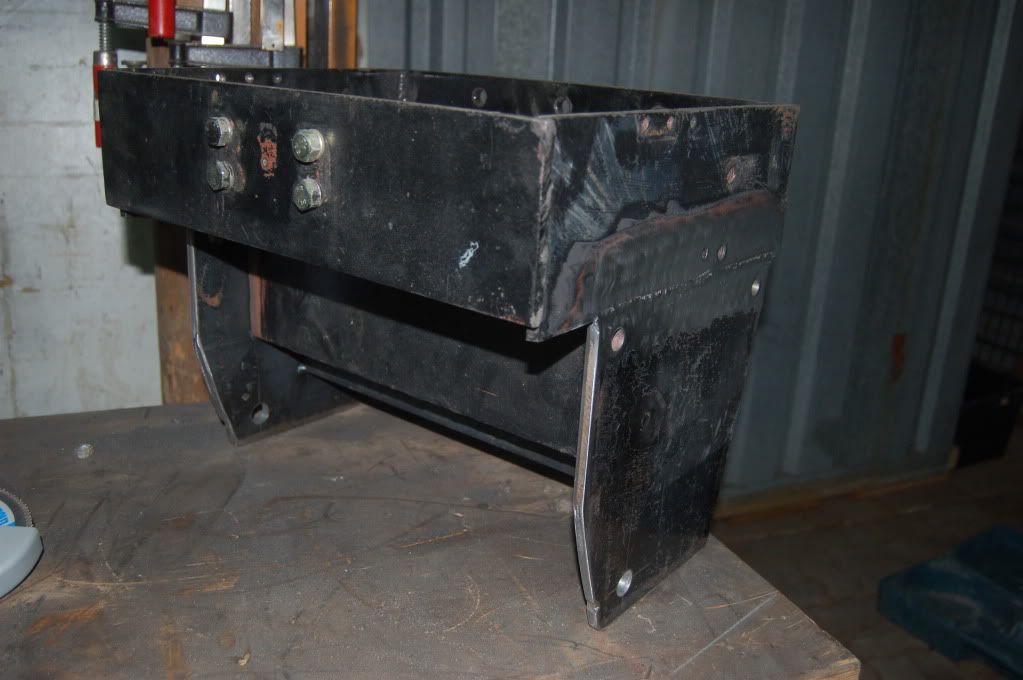 i must also extend the Front Plate so that i can weld later the Bracket for the Top Link and the Hydraulic Cylinder 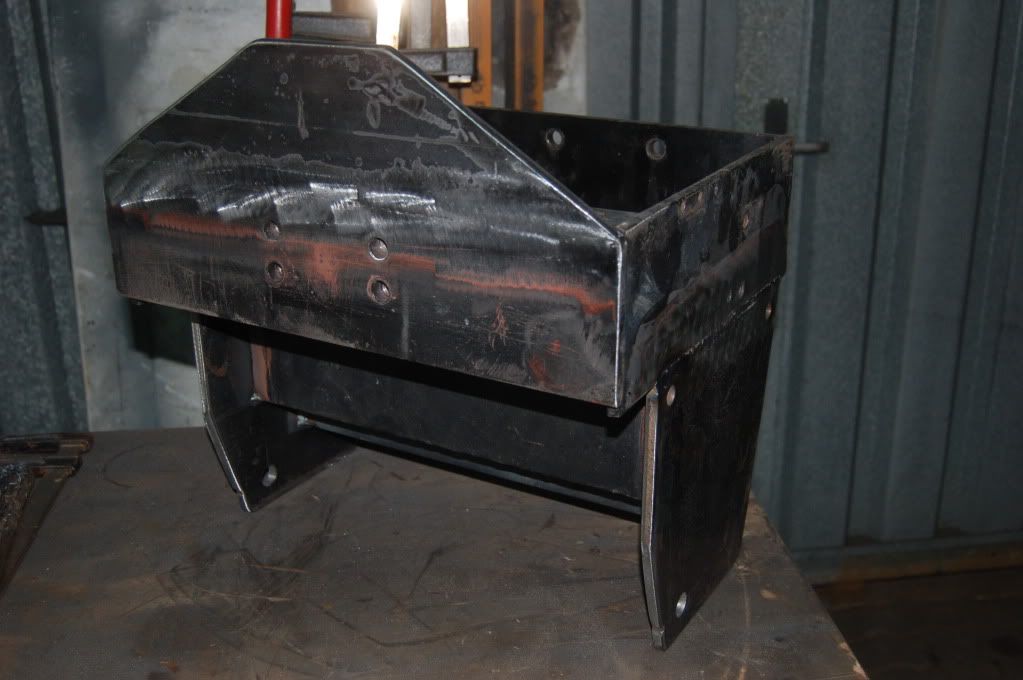 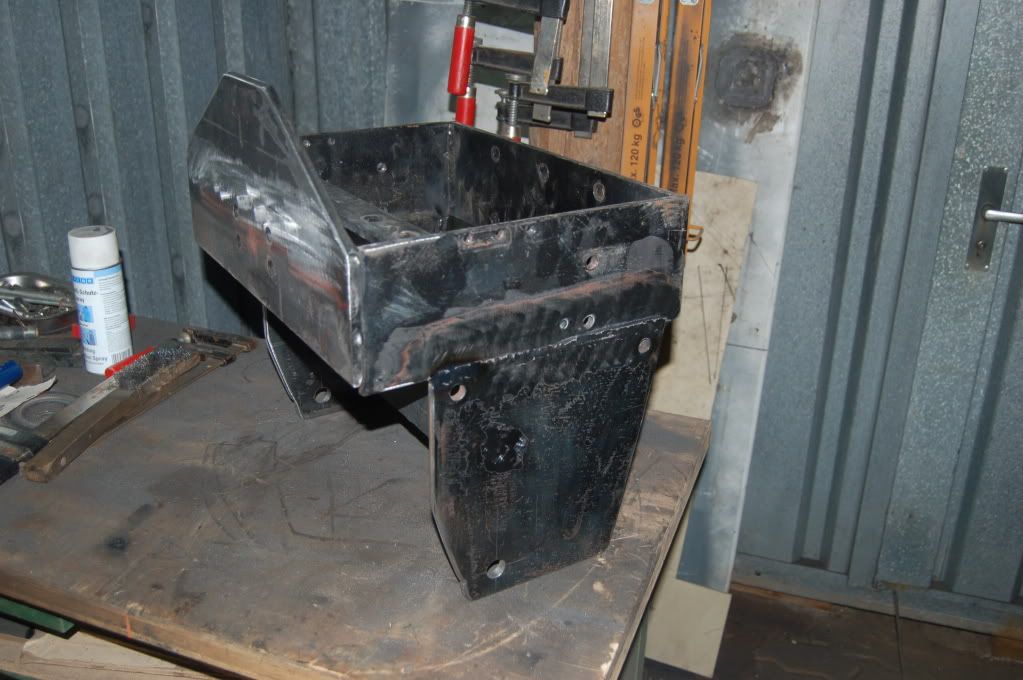 after this, i attach the modified Bracket back to the Tractor to see if all fits well and it Looks like and also the FEL Support stays in the right place. 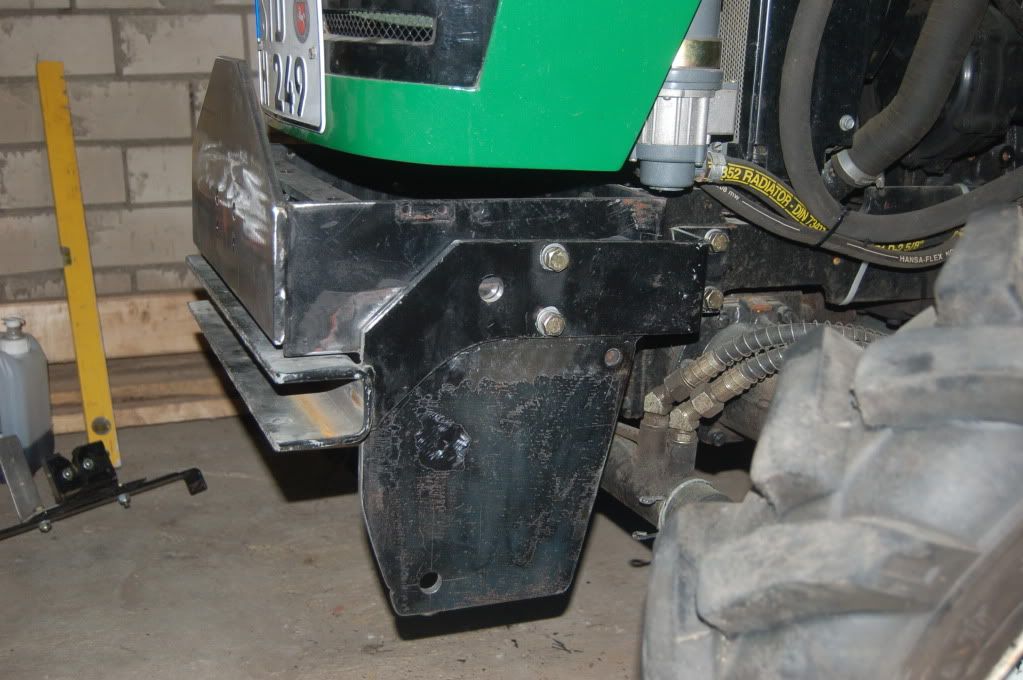 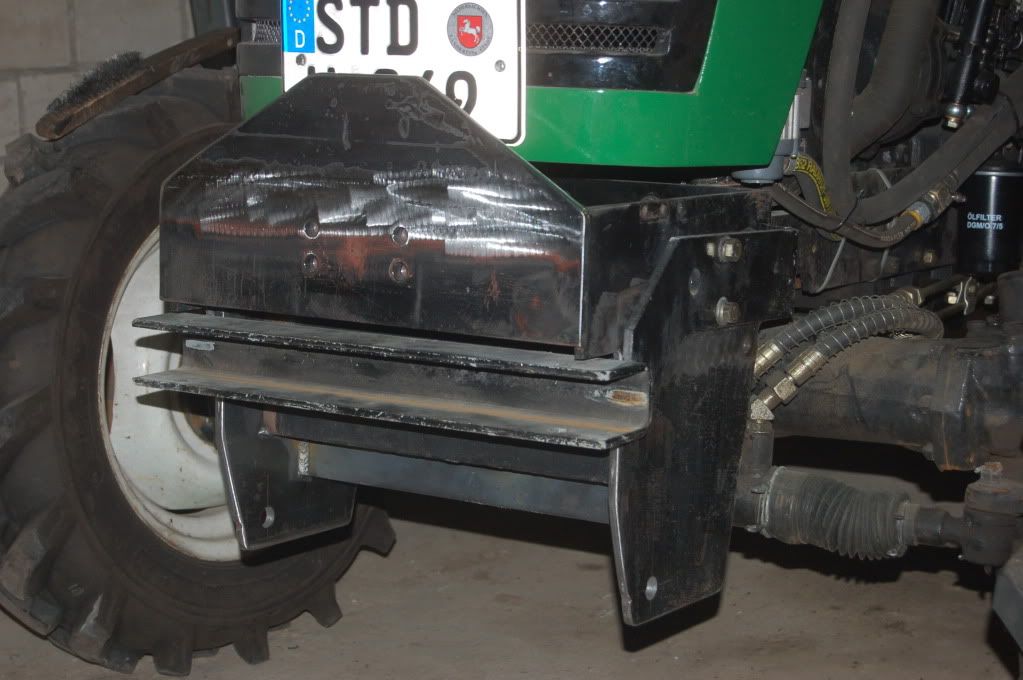 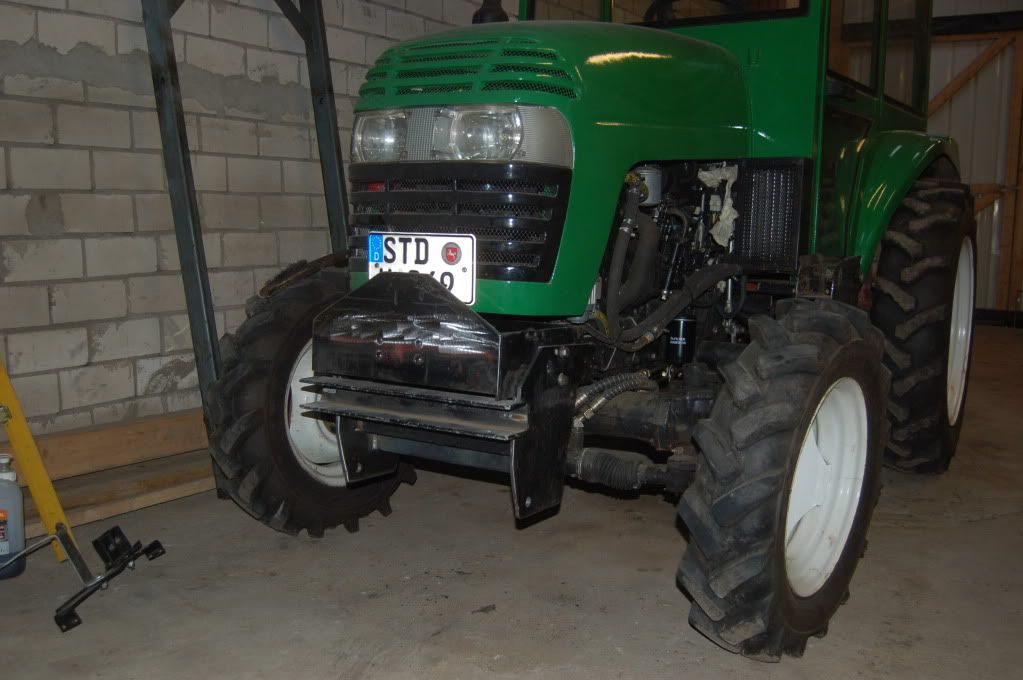 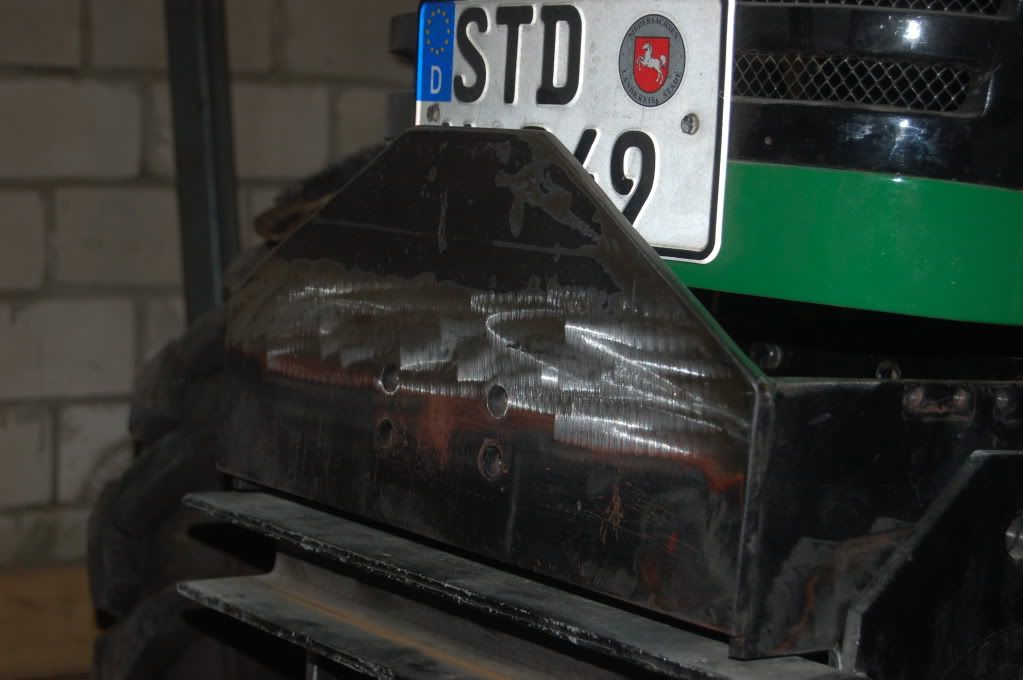 in the Next days i will Start to build the Lower Linkage |
|
|
|
Post by linus69 on Aug 17, 2011 9:05:27 GMT -5
Very nice metal fabrication job Nuno, look forward to seeing it progress.
Paul
|
|
nuno
CTW Member
Posts: 26
|
Post by nuno on Aug 20, 2011 9:05:48 GMT -5
Hey Paul, thank you. Today i start to build the Lower Linkage. First i made a Template out of 4mm Plywood so that i can meassure the right angle of the Linkage. 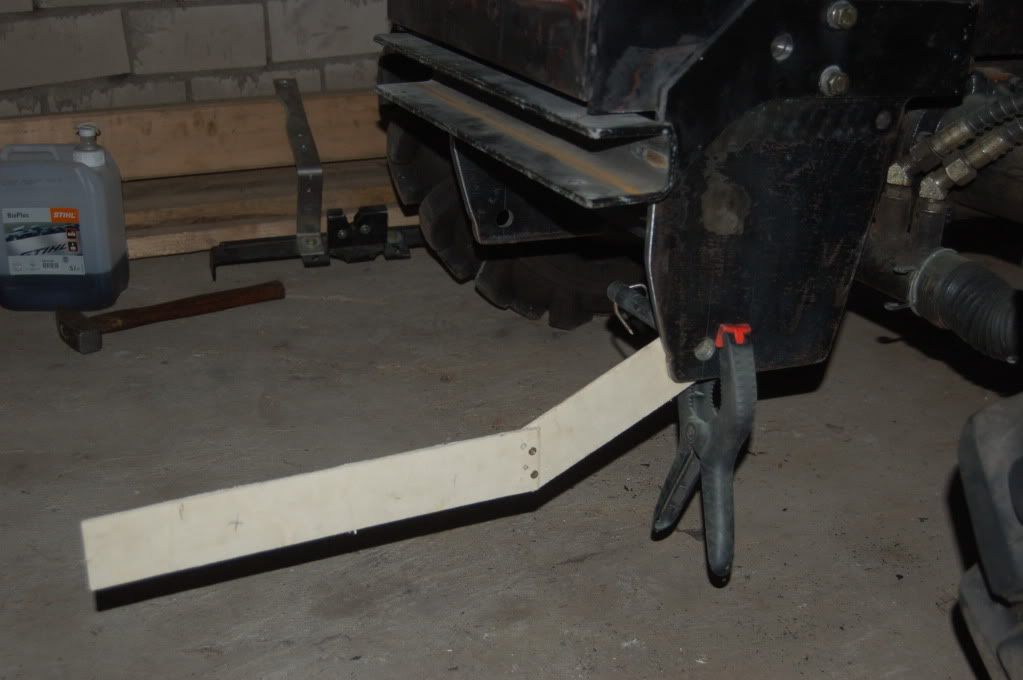 than i go to a Metal Shop near by, the Shop owner is an old Shool Friend so i can use all the Machines i need to cut the 60x15 mm Flat Steel. The Pieces of Steel that later would be the Hook are made of 20mm Steel (80x80mm) 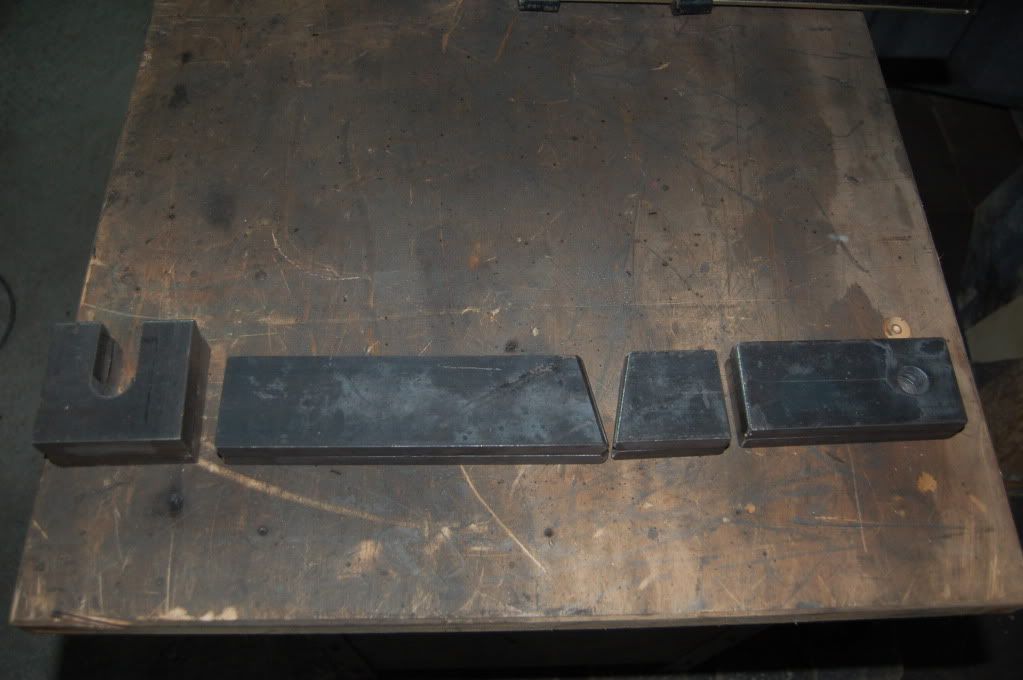 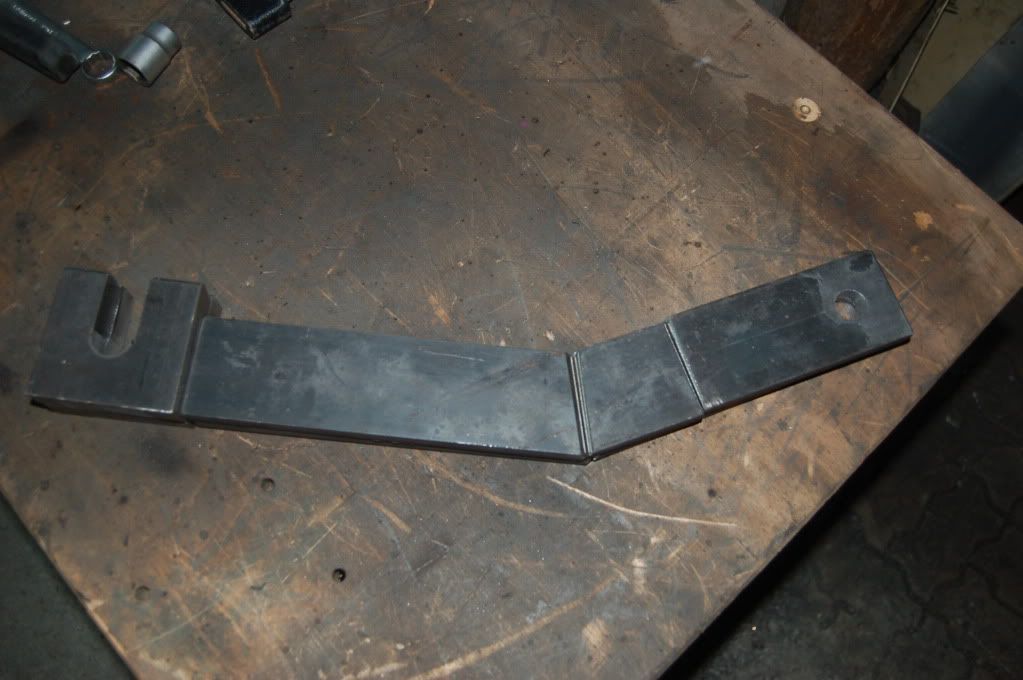 after a lot of meassurements and building another Template on the Workbench i fix the Pieces only with a few welding points so that i can make some corrections if needed 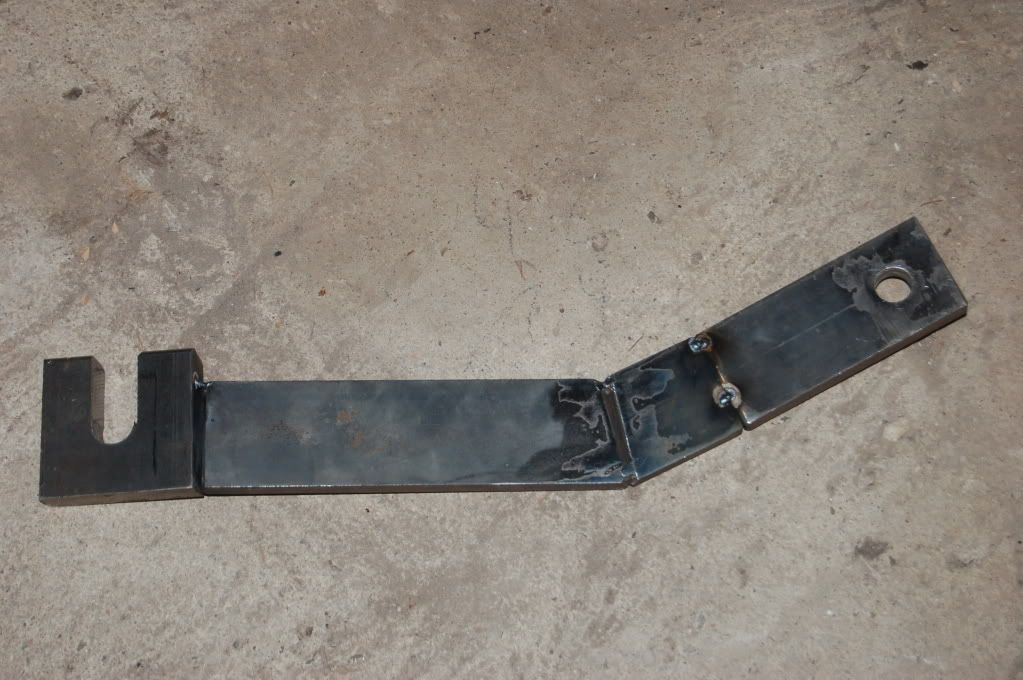 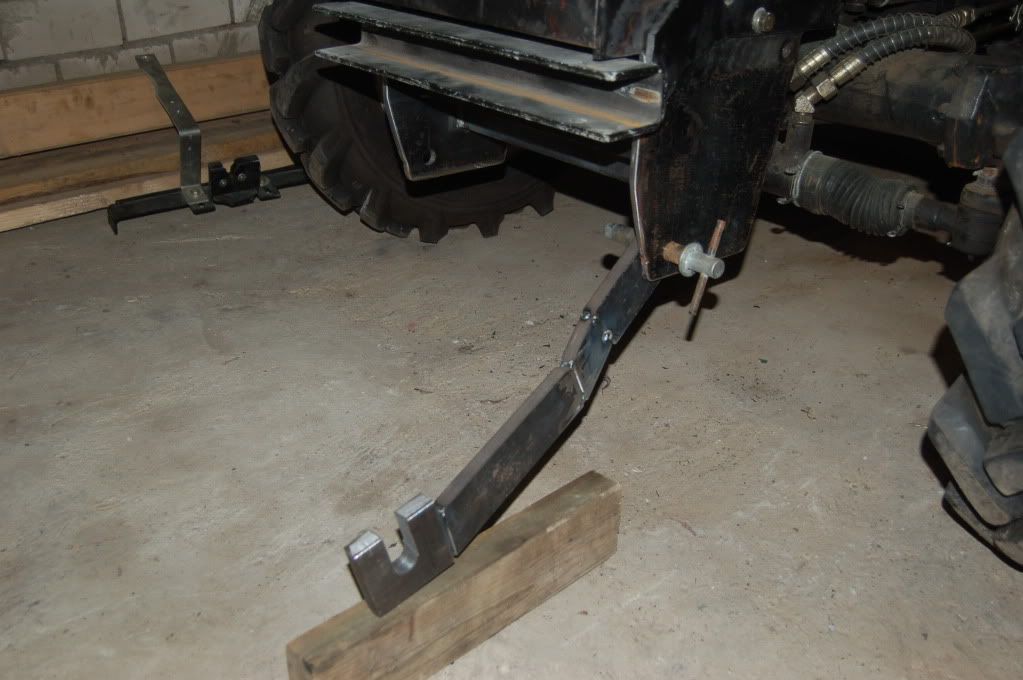  the other one was made in the same way an this is how it looks like mounted on the Tractor. 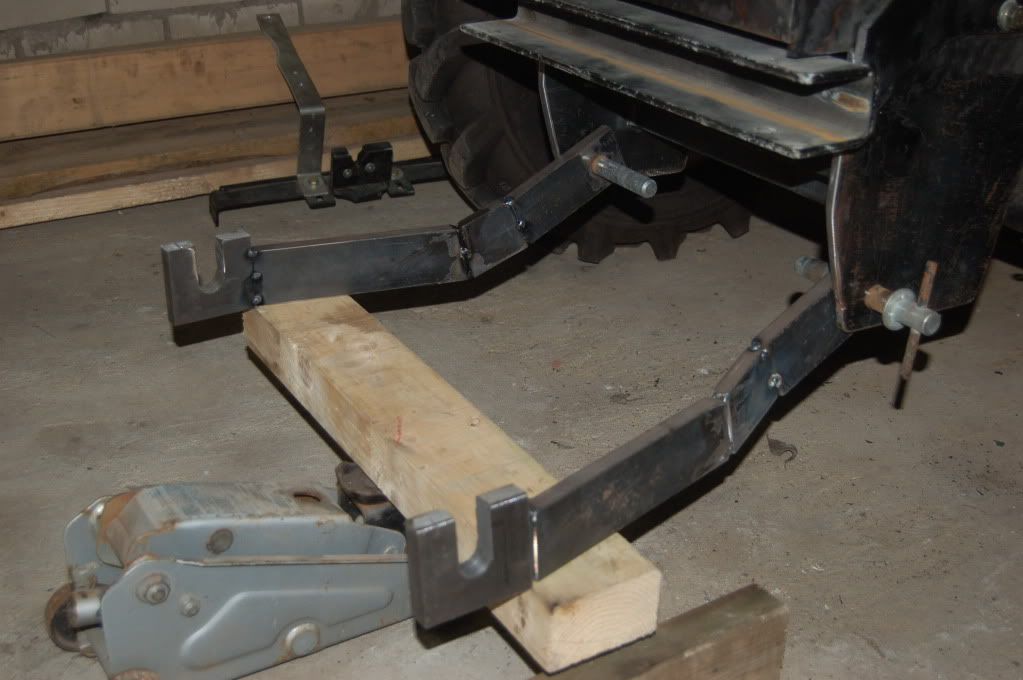 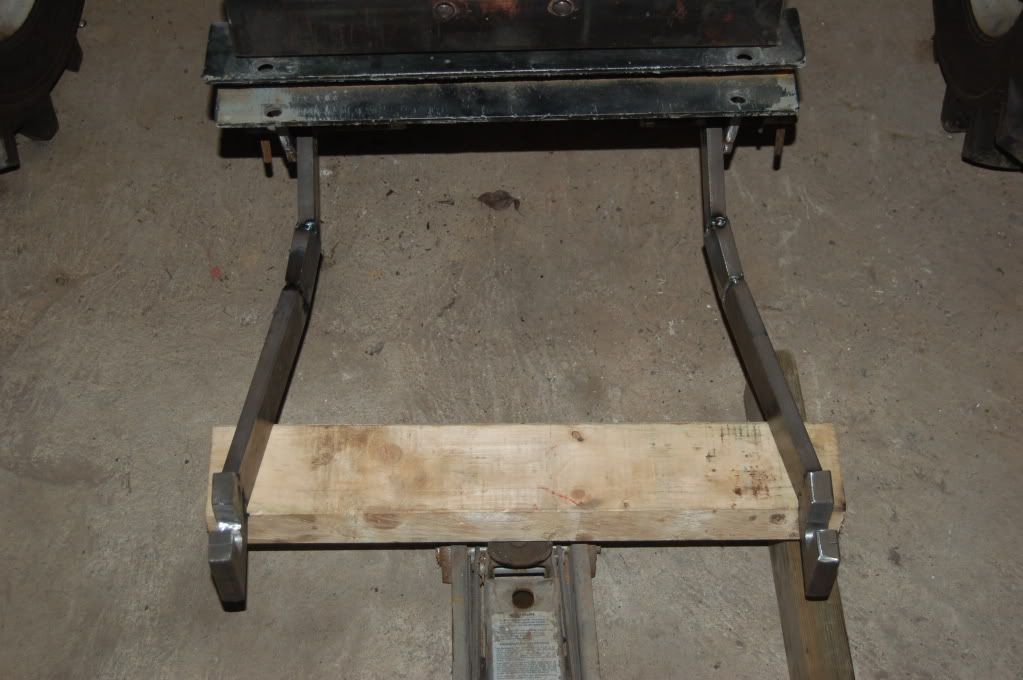 i weld two pieces of 60x30x3 mm rectangular Tube also with only a few points to fix the two Linkage to each other. This Peaces i will remove after doing the finish weldings and replace it with stronger ones 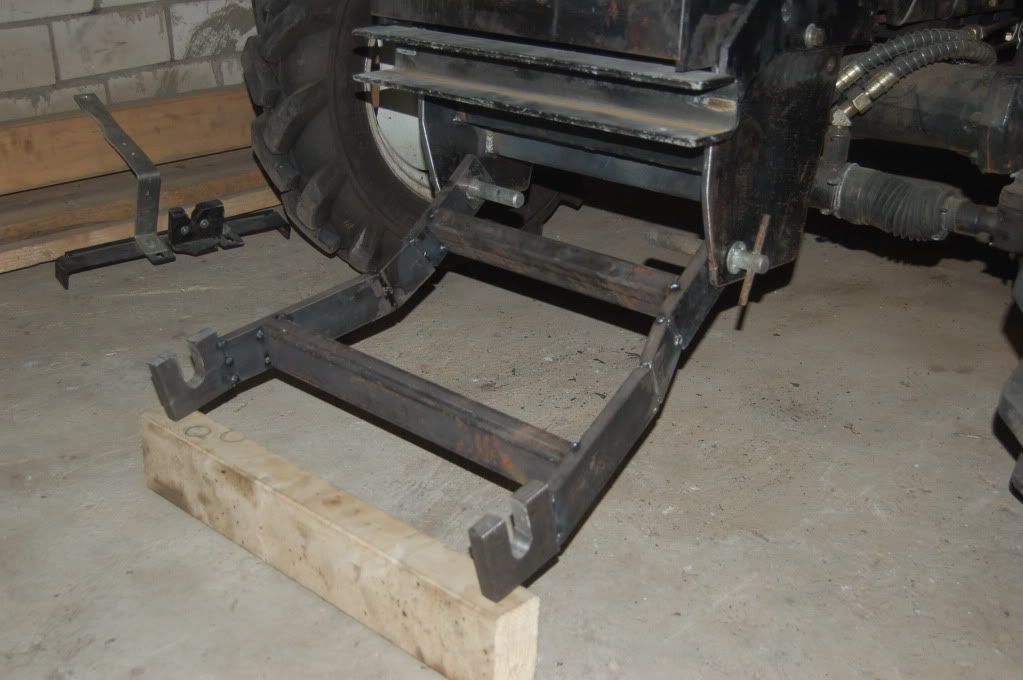 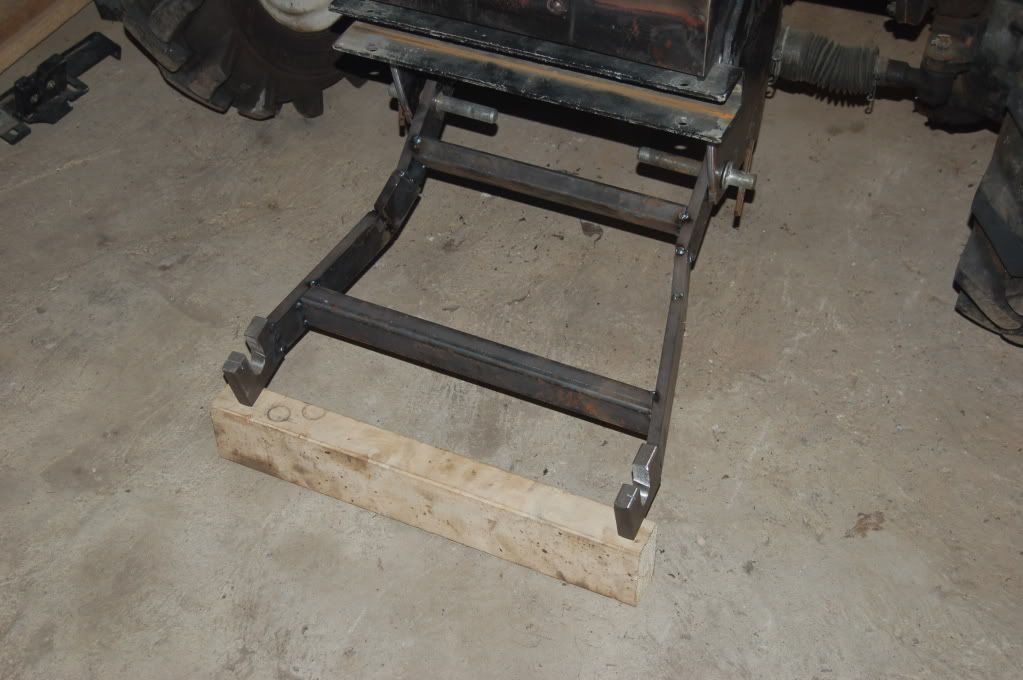 so that was my second step on the way to my home Made Front Hitch. The Next Step will be installing the Hydraulic Cylinder and the Top Link and upgrading my FEL Valve with an Float Position. |
|
|
|
Post by mrmikey on Aug 20, 2011 13:24:36 GMT -5
Nice loking job Nuno. You're going to remove the rectangular tubing after all your welding is done? If it were me I'd think I'd be leaving them in there, it'll help with any diagonal movement should you hit something at an angle. I would add a piece of flatbar as well along the inside centerline of each flatbar so you'd end up with a '|---' shape. Just commenting, not complaining......Mike **EDIT** Just reread your post and see you are putting braces in there. I'll shutup now  |
|
nuno
CTW Member
Posts: 26
|
Post by nuno on Aug 21, 2011 12:49:58 GMT -5
Hey Mike, thank you. Yes i will replace the rectangular Tubing with stronger ones. This Tubes are only for fixing the Linkage and have only 3mm Wall thickness. i need Stronger ones because they have to do two jobs, at First and like you say they will help on any diagonal movement an second they will hold the Bracket for the Hydraulic Cylinder. Don't know how i can explain so i make an quick and dirty drawing of my plans for the Linkage. 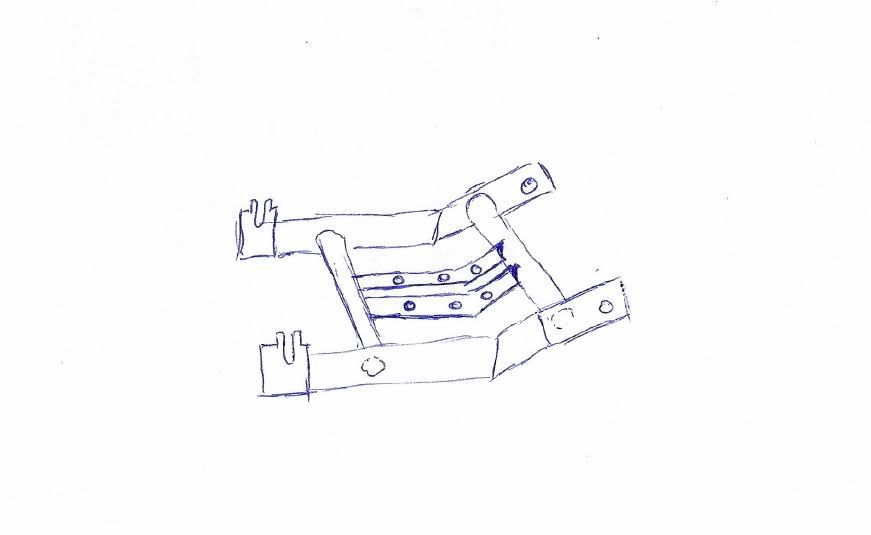 |
|
|
|
Post by mrmikey on Aug 21, 2011 17:51:24 GMT -5
The quick and dirty drawing worked Nuno, LOL.
If you're not planning on down pressure, what about a chain to connect the lift cylinder to the push frame, it'll give you float as well....Mike
|
|
nuno
CTW Member
Posts: 26
|
Post by nuno on Aug 24, 2011 15:35:43 GMT -5
Hey Mike, i will install an Double Action Hydraulic Cylinder and upgrade my Valve with an Float Position. The Float Position will be also helpful for the FEL. Here a few Pictures of the things i have done the last days This Bracket i made out off 80x10 mm Flat steel 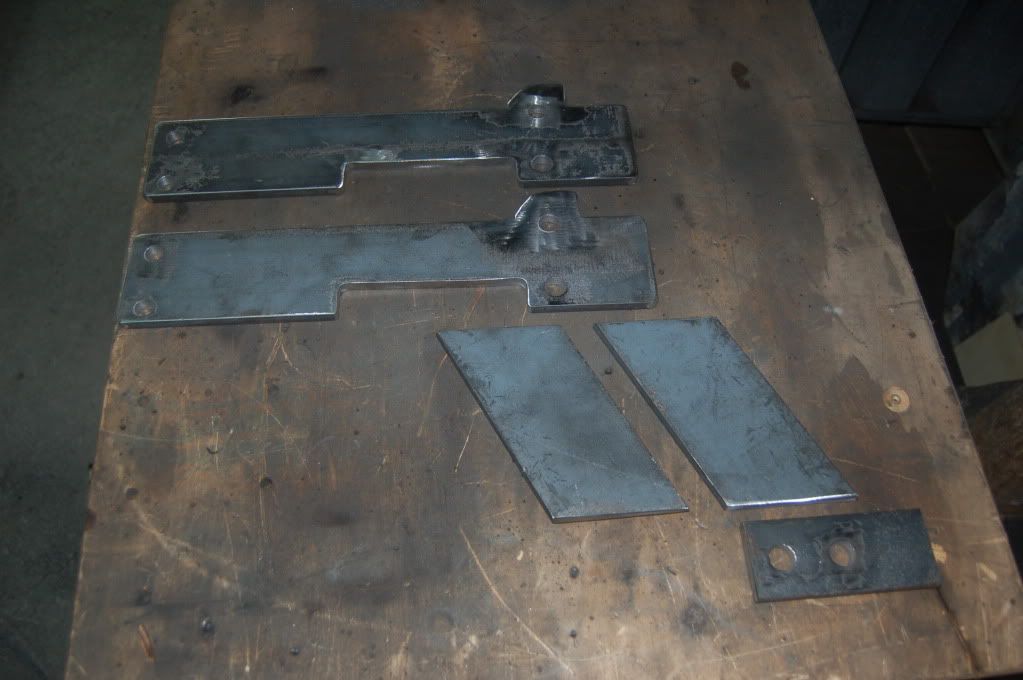 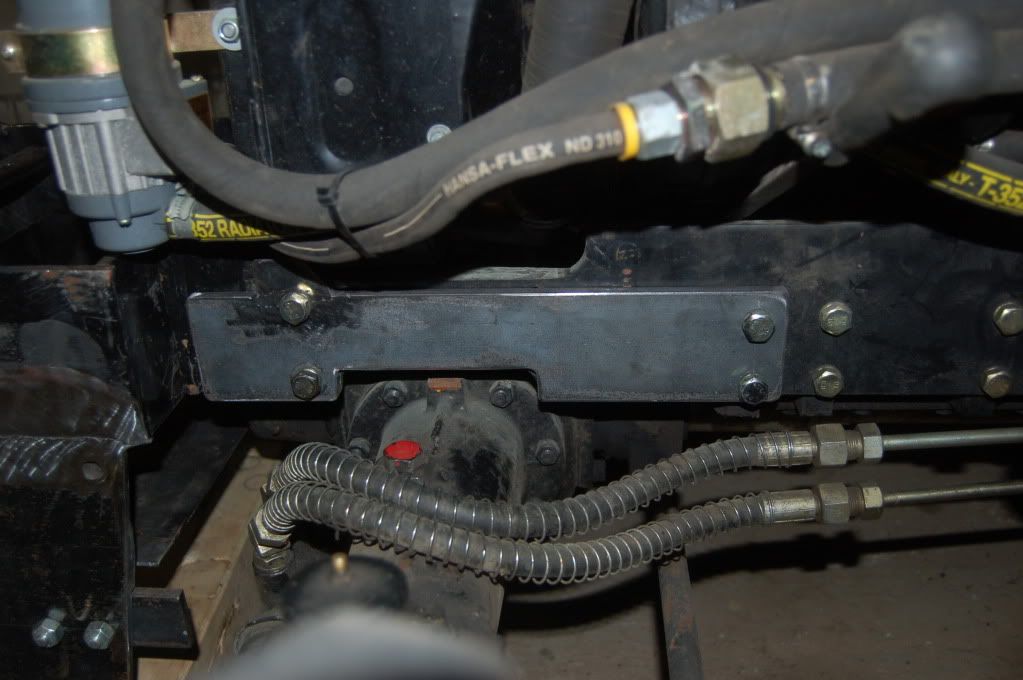 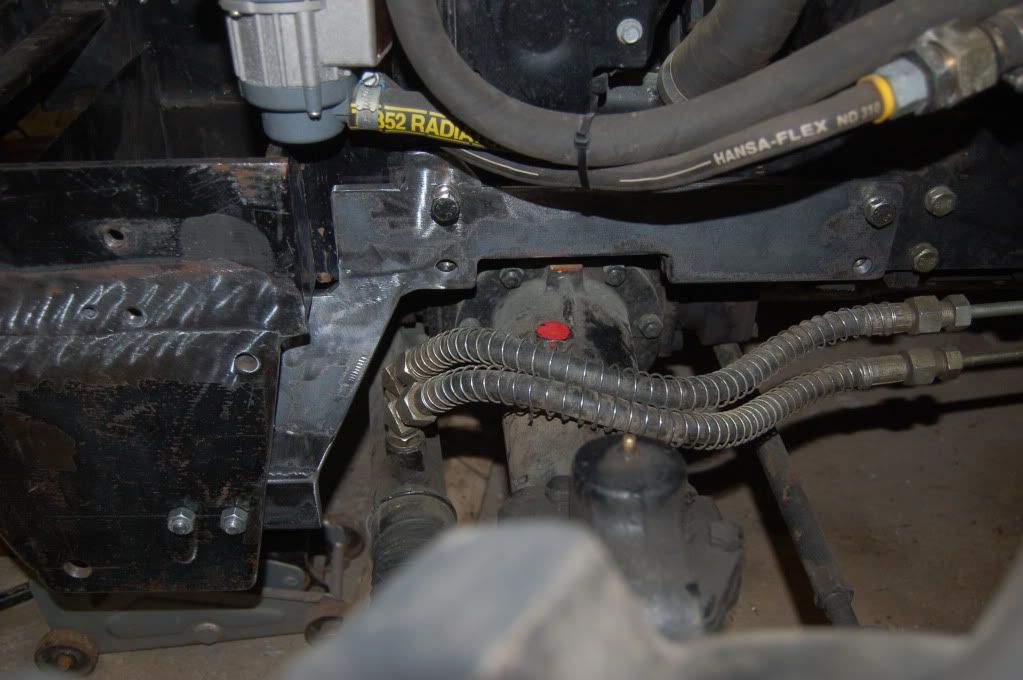 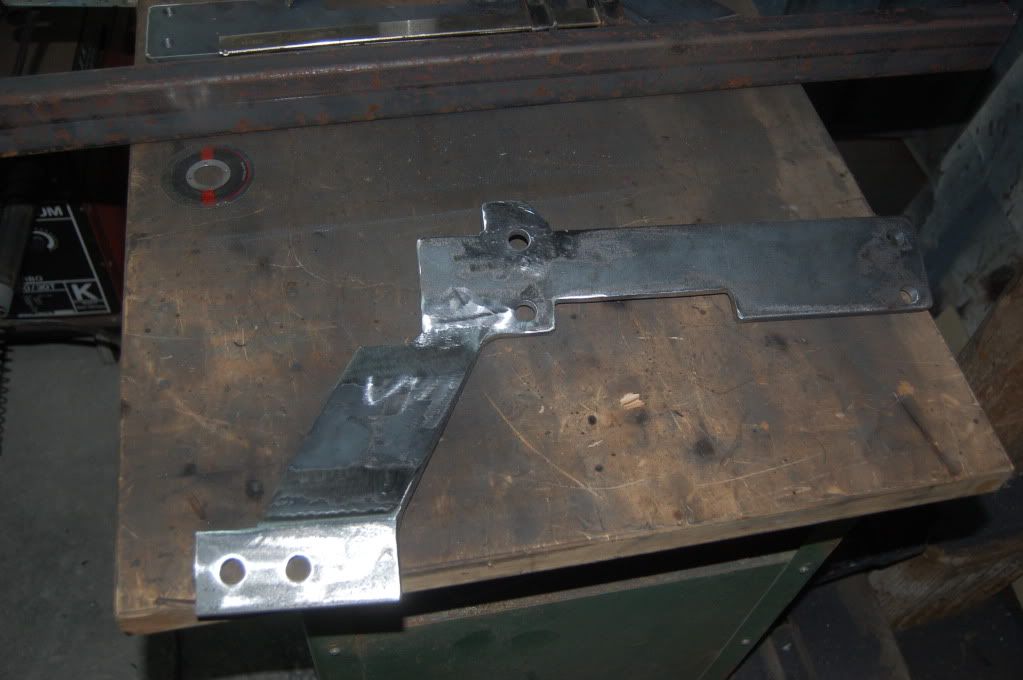 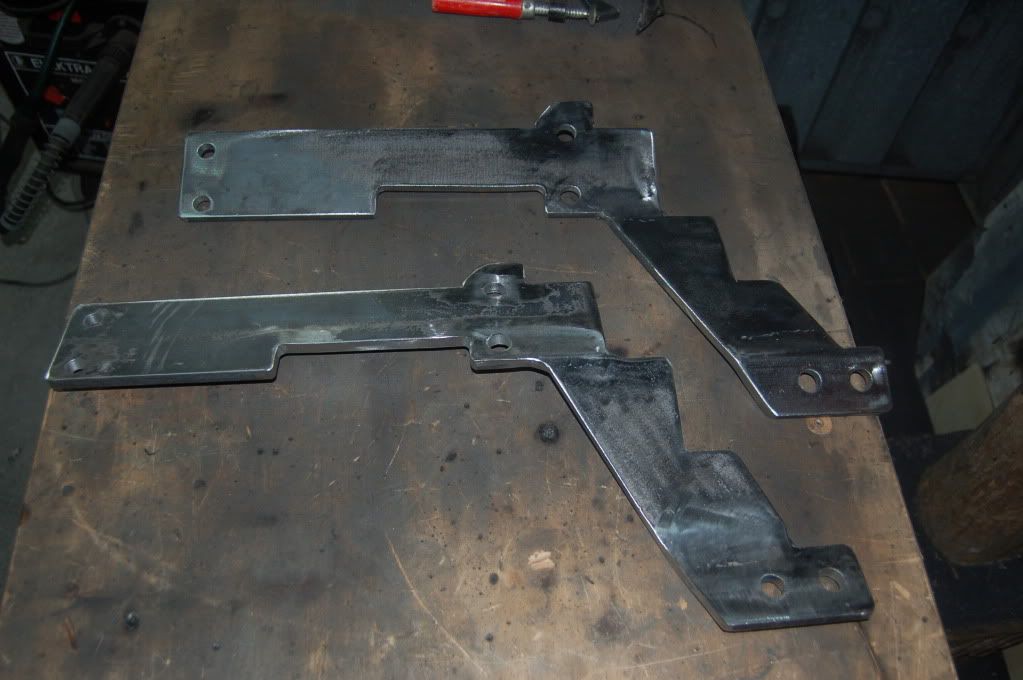 have to modify the FEL Support and cut out an piece of 10mm each side 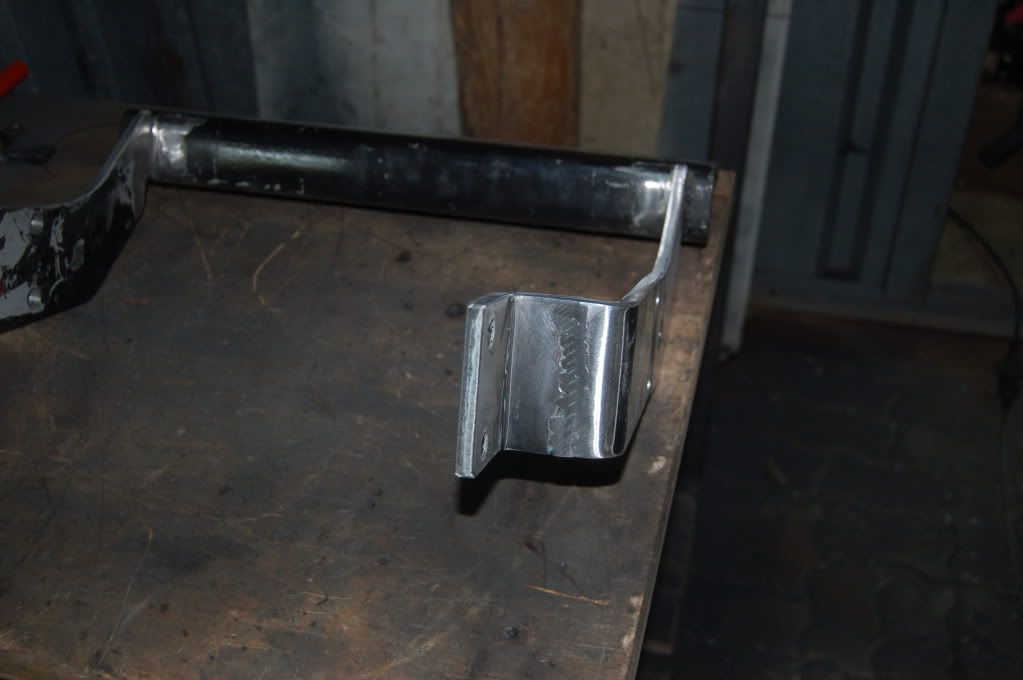 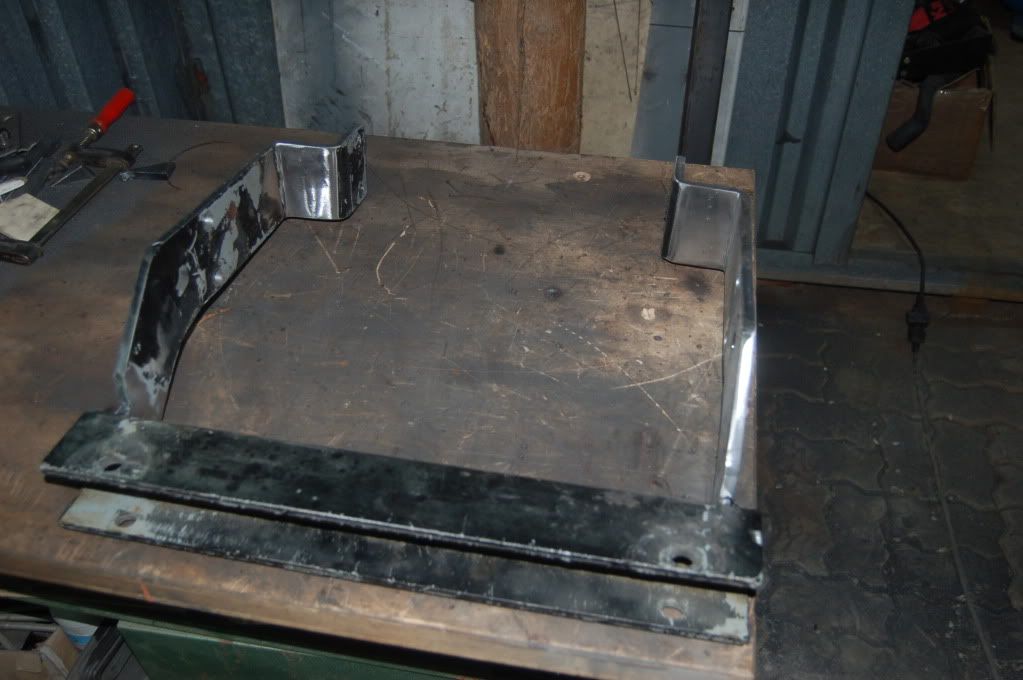 Today we have about 31°C ( 88°F) and i think it was an good day to paint the Stuff. The Primer and the paint dry very fast at this Temperature so that i can mount the Parts back to the Tractor after only a few hours. 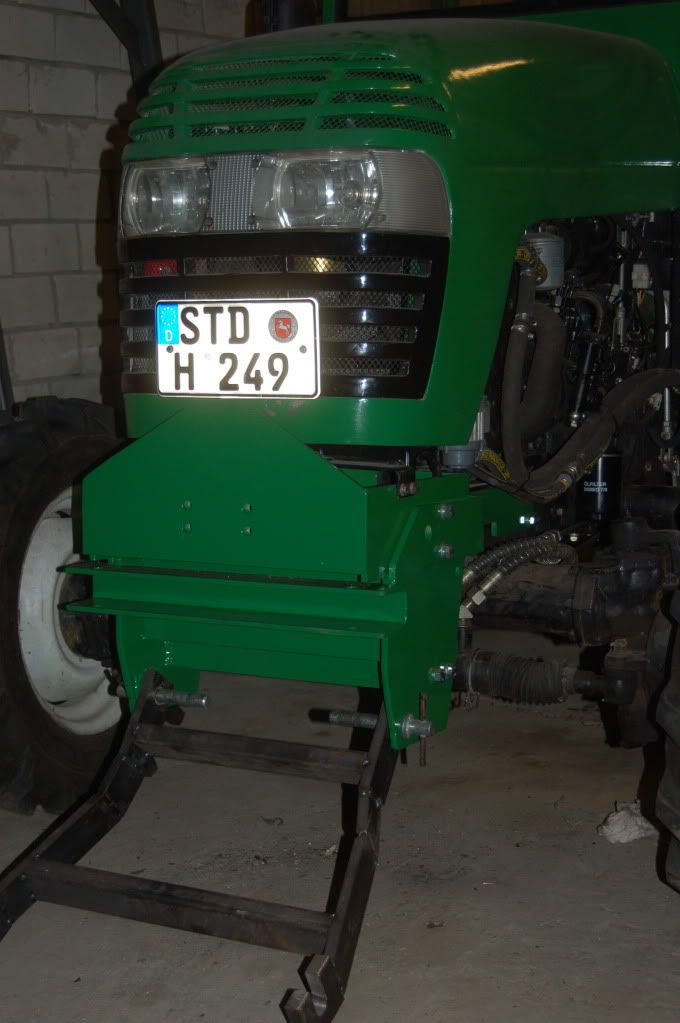 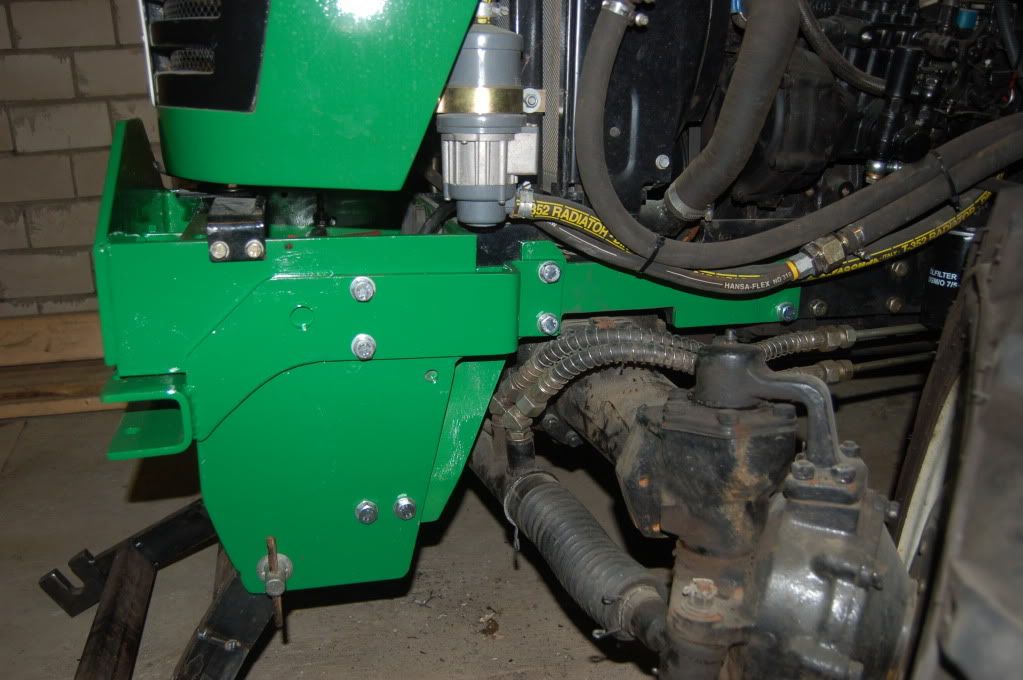 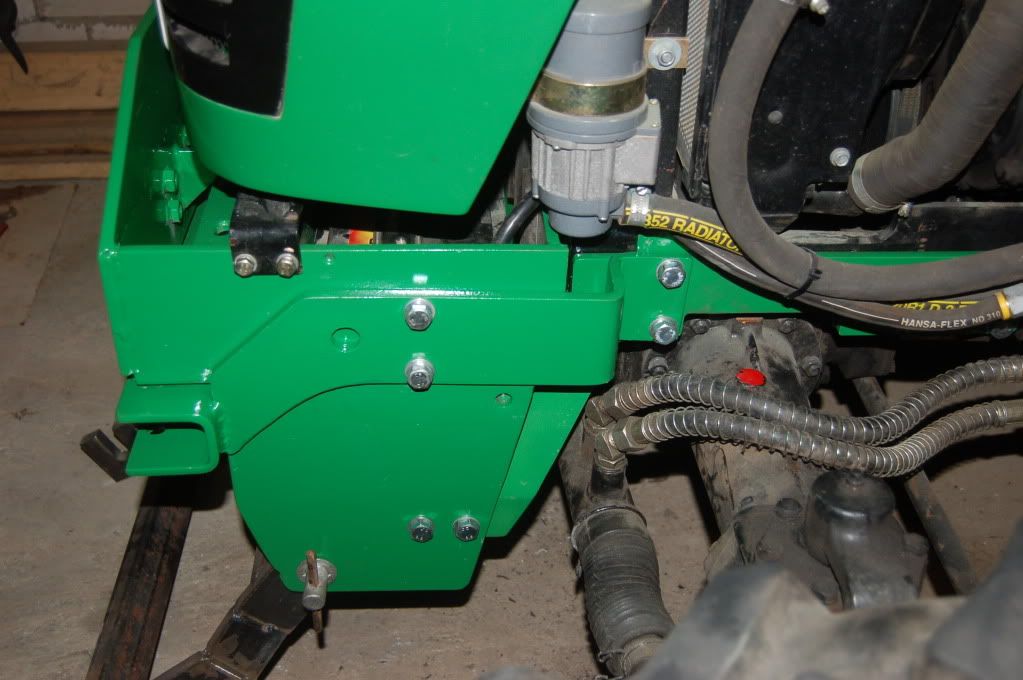 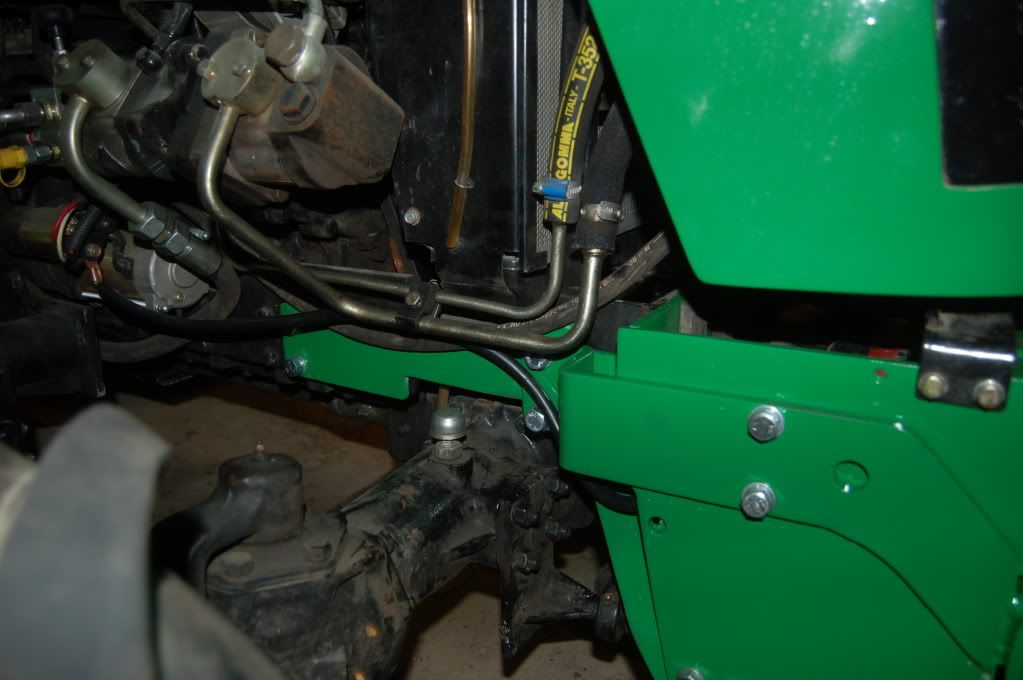 |
|
|
|
Post by mrmikey on Aug 24, 2011 18:35:52 GMT -5
As always, nice work Nuno.
If I had a lot of area to plow I'd be doing the same thing, as it is I do most of my place with a walk behind blower. My daughters place, (next door) and my neighbor across the street, I'll scrape with the back blade if need be to get up the hard snow.
Yuck....what a miserable word....snow, it'll be here before we know it. Been taking the bike to work (Goldwing not a pedal bike heaven forbid LOL) for the past couple of weeks and you can feel the cold in the air in the morning...Mike
|
|
|
|
Post by bracabric on Aug 27, 2011 9:03:49 GMT -5
Mike "You can feel the cold in the air in the mourning" Aha so that's where it's gone, I thought things round here were beginning to warm up a bit.
Nuno, Great work, I am full of admiration for you !
Dick
|
|
nuno
CTW Member
Posts: 26
|
Post by nuno on Oct 16, 2011 3:12:50 GMT -5
short Update, we have had last Week a few rainy days so i can continue the Front Hitch build. at first i build the Bracket for the Cylinder and the Toplink so that i can locate the right position for the Cylinder and the connection point on the lower Linkage.  the Cylinder have 50mm (60mm outside) diameter, 30mm Rod and 150mm stroke. By welding the Bushes to the Cylinder by myself i can save around 50 Euro as buying the Cylinder ready to mount with welded Bushings 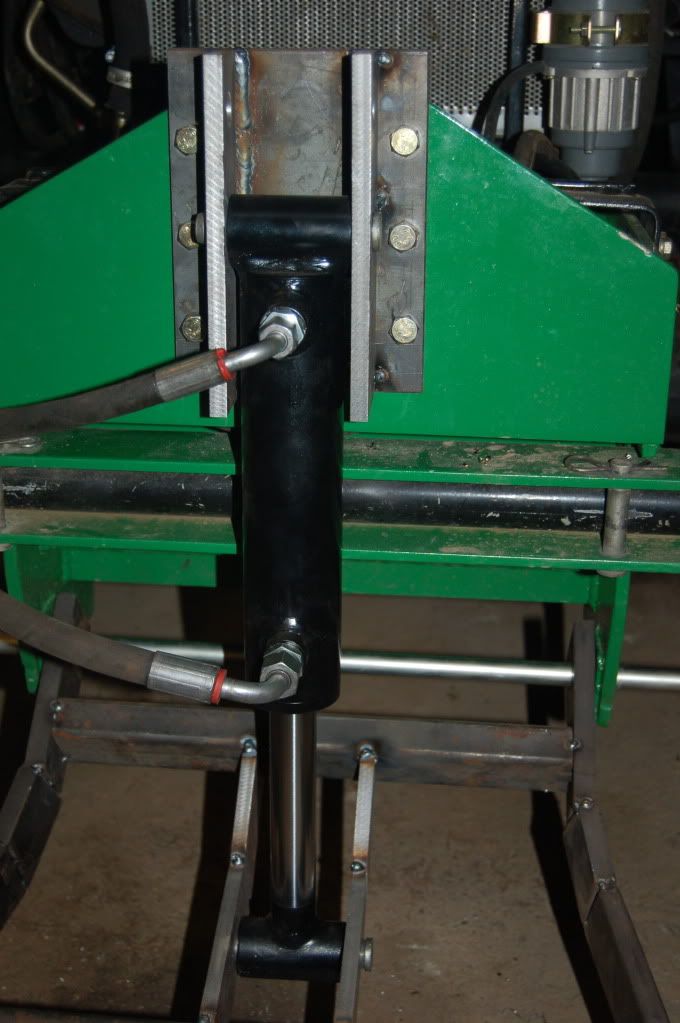 4 Pieces of 60x10mm Flat steel cut with 13,5° angle and with two 20mm Holes make the support of the Cylinder on the Lower Linkage 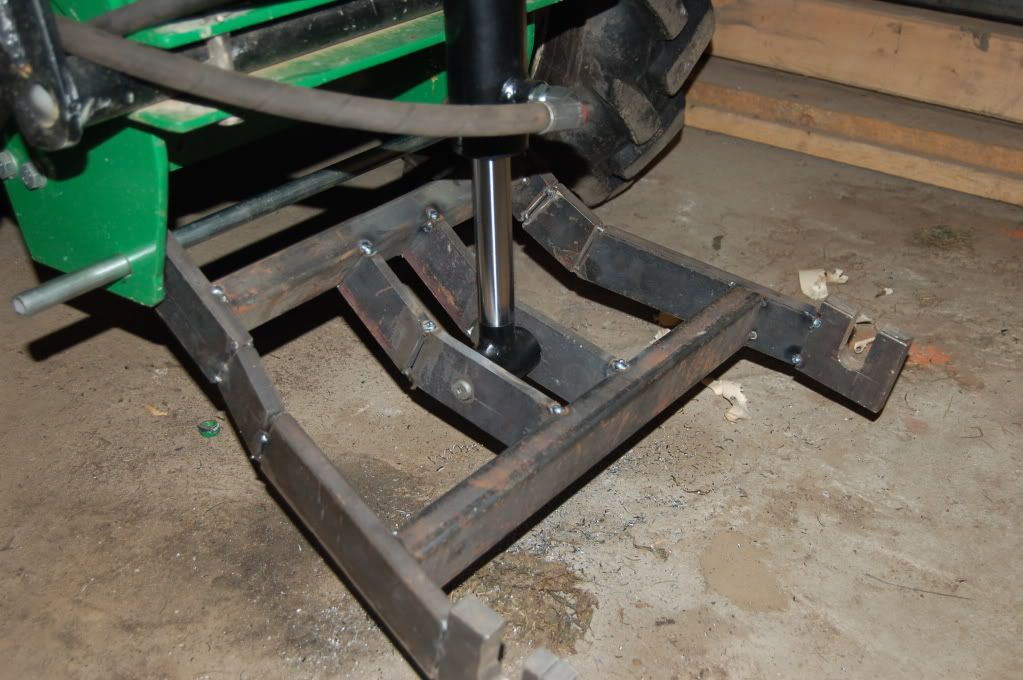  i do a first Test with compressed air an it looks like it will work like i am thinking 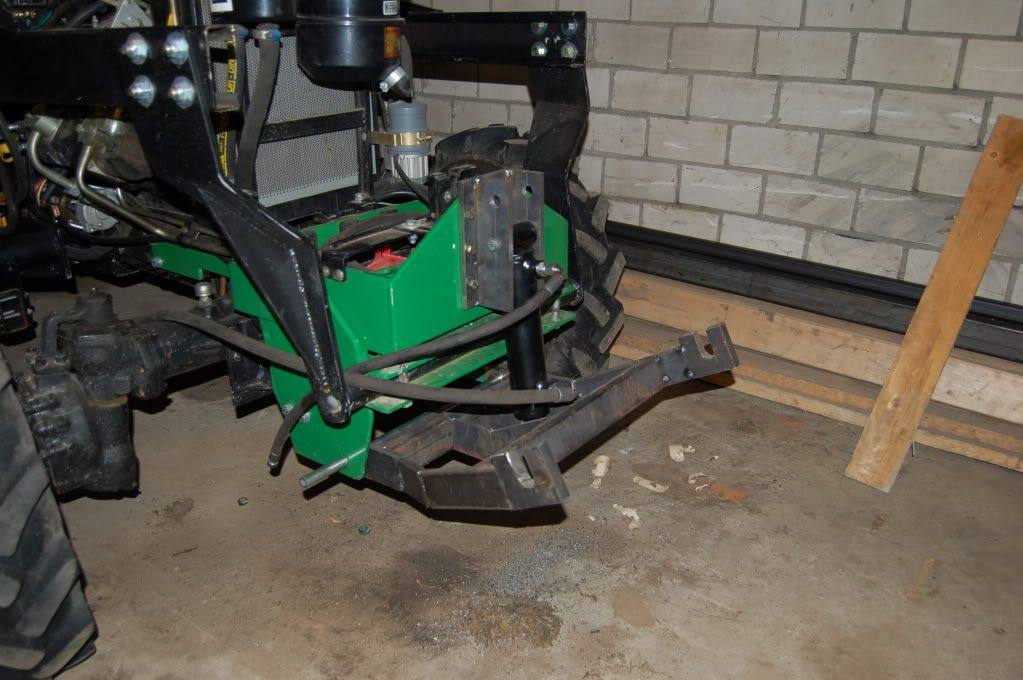 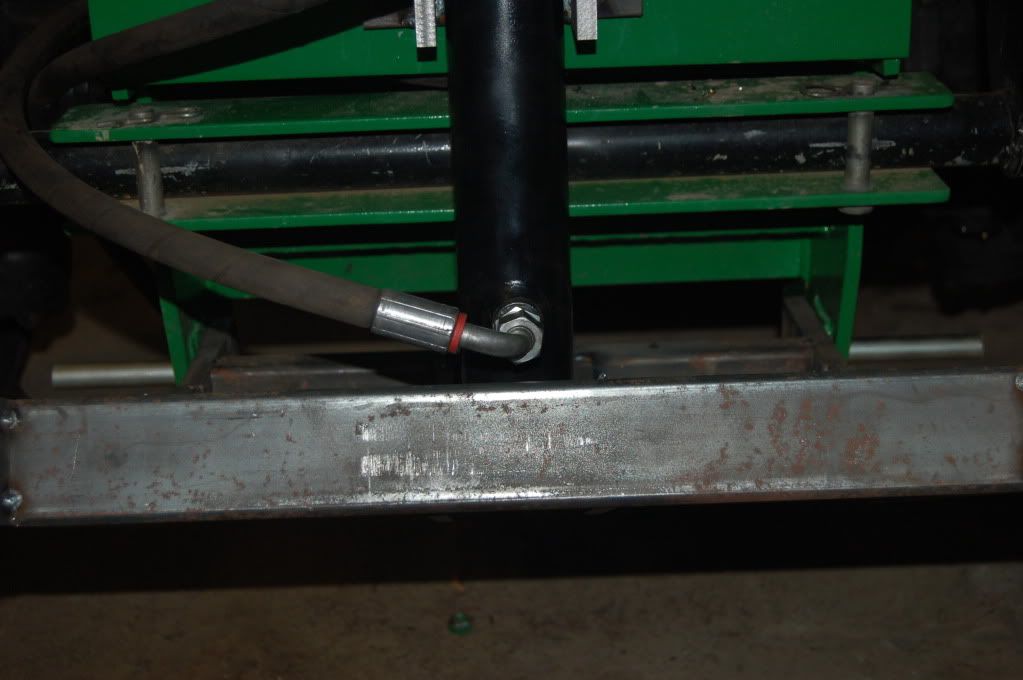 the Connection Pins i made out of 20mm Cylinder Rod i have buy as an 1 Meter piece 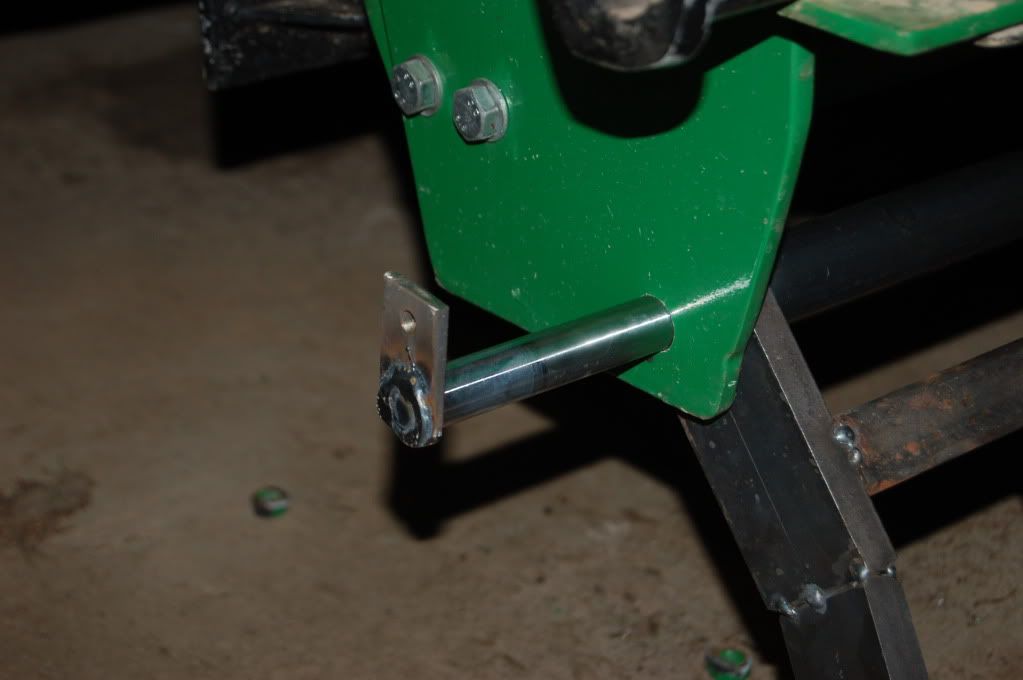 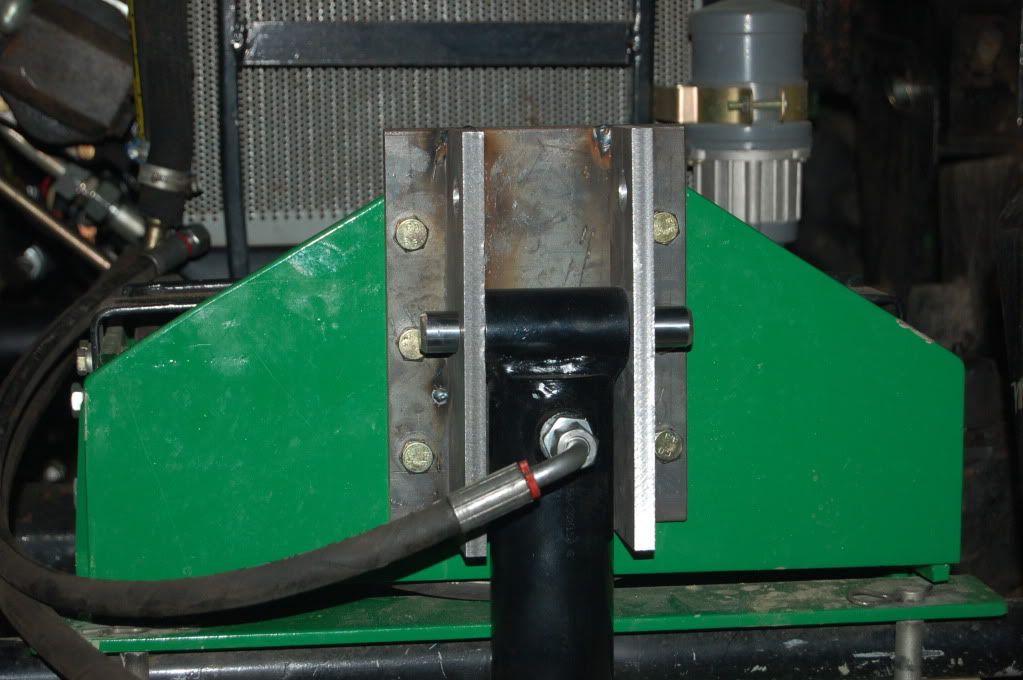 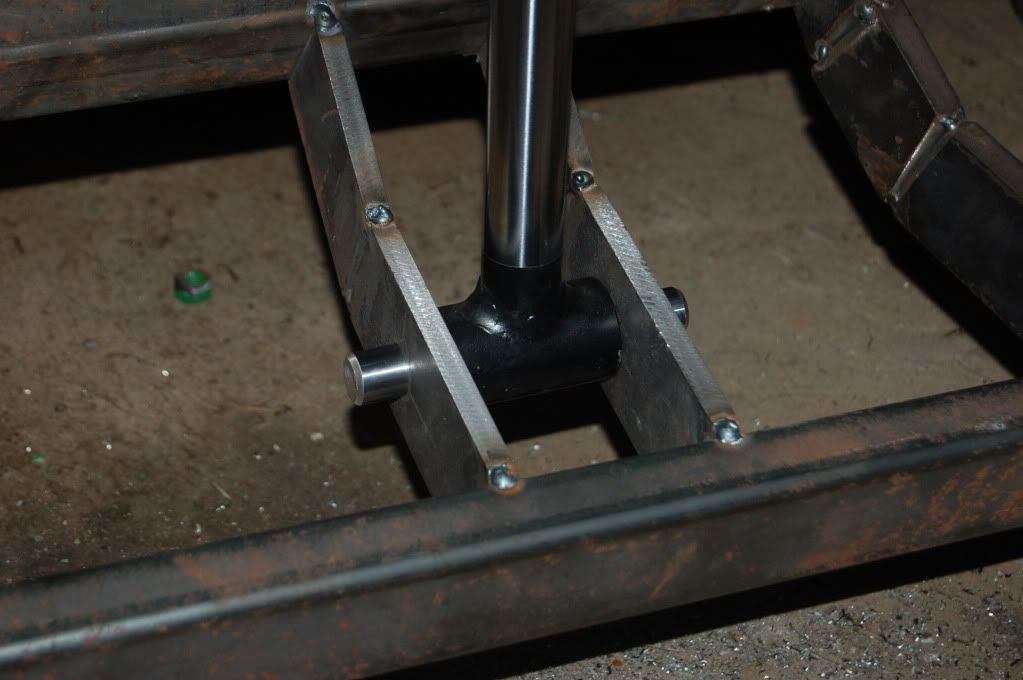 The Connection Pin for the Lower Linkage will be fixed with an Screw to the Front Hitch Bracket so i weld a piece of 30x5 mm Flat steel the Pins for the Cylinder will become only Holes on booth ends and be fixed with this Type of Pins (don't know the english spelling for this)  This is how it looks like at the Moment 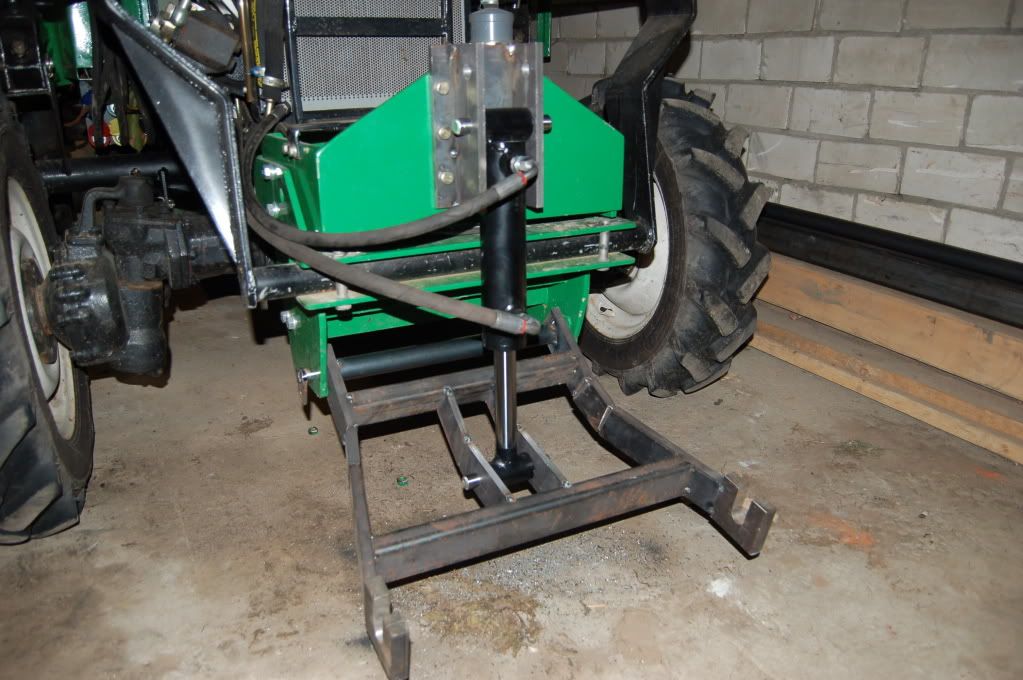 Yesterday i buy a new role of Welding Wire and a few consumables for my Welder Torch and now i can finish the weldings on the Lower Linkage. |
|
|
|
Post by mrmikey on Oct 16, 2011 5:10:15 GMT -5
Lookin' good Nuno, glad to see you replaced the piece of conduit with a proper pin, don't think it would last long LOL. Question for 'ya. The two pivot pins with the tab that go thru the cheek plates, have you ever considered using bolts and lock nuts? Reason being is that I've seen similar setups like yours where I work (welding shop DOT) on different applications and most of the ones I've seen the ears eventually bend. Reason being, the pin has nothing to prevent the ears from being pushed out, it's not sandwiched between anything like it would be using a nut and bolt. Another option would be to put weld another ear on the inside of your cheek plate so the pin goes thru the outer, then push frame then inner, just thinking out loud, not picking I realize pins are a lot more conveniant.....Mike |
|
|
|
Post by bradblazer on Oct 26, 2011 23:38:31 GMT -5
Nice work! The pins with the round spring keepers are called lynch pins. What is going to keep the lower hitch pins in the slots? If those pieces need to be drilled it might be easier to take them off and drill them before they are solidly welded to the structure.
|
|
nuno
CTW Member
Posts: 26
|
Post by nuno on Nov 20, 2011 16:18:45 GMT -5
Hey Folks, i start a few other projects so it takes a little bit more time to finish the Front Hitch but now i is finally done sorry, i have no pictures of the welding procedure, i forget to take the camera to the shop. mrmikeyi understand what you mean, to prevent the ears bent or being pushed out i weld a piece of Flat steel to the structure (see thumbnail, marked in yellow) to prevent the Push Frame being bent i weld also a round tube between them (marked red in the Thumbnail) 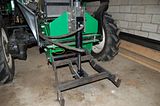 bradblazer bradblazerthank you, yes i do it like you have mention. i take the Hooks off an cut and drill it before i weld it finally to the Hitch. so here are a few pictures of the last steps the painting i have done yesterday and i use a Thinner-Hardener-Mix that is recommended for this sort of Resin Paint. Without this Fluid the Paint will need a few weeks to dry at this temperatures we have here at the Moment. 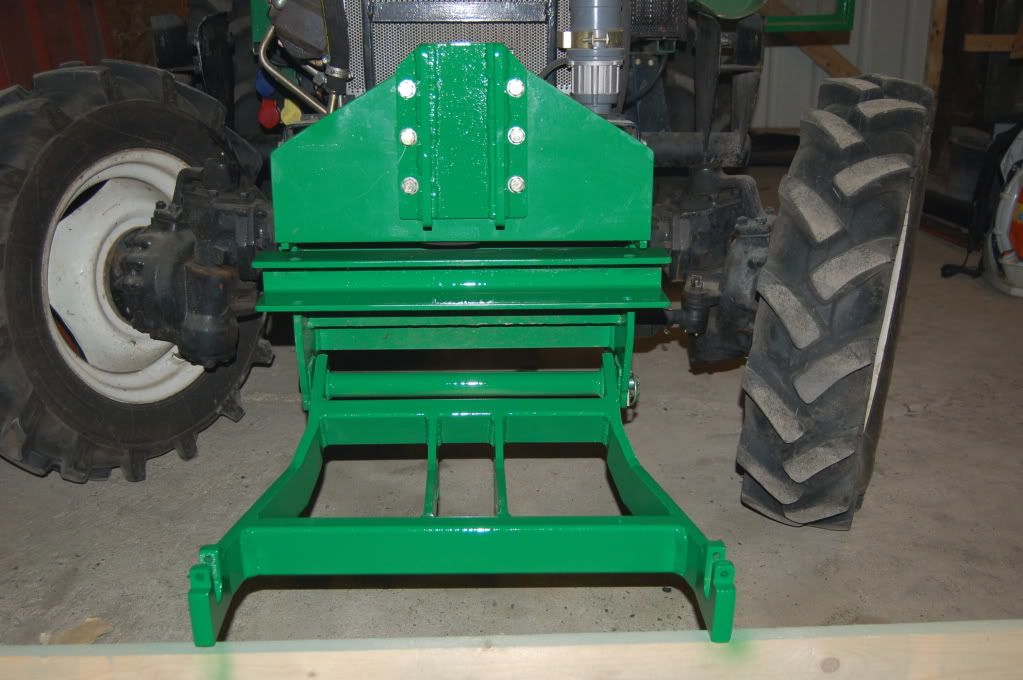 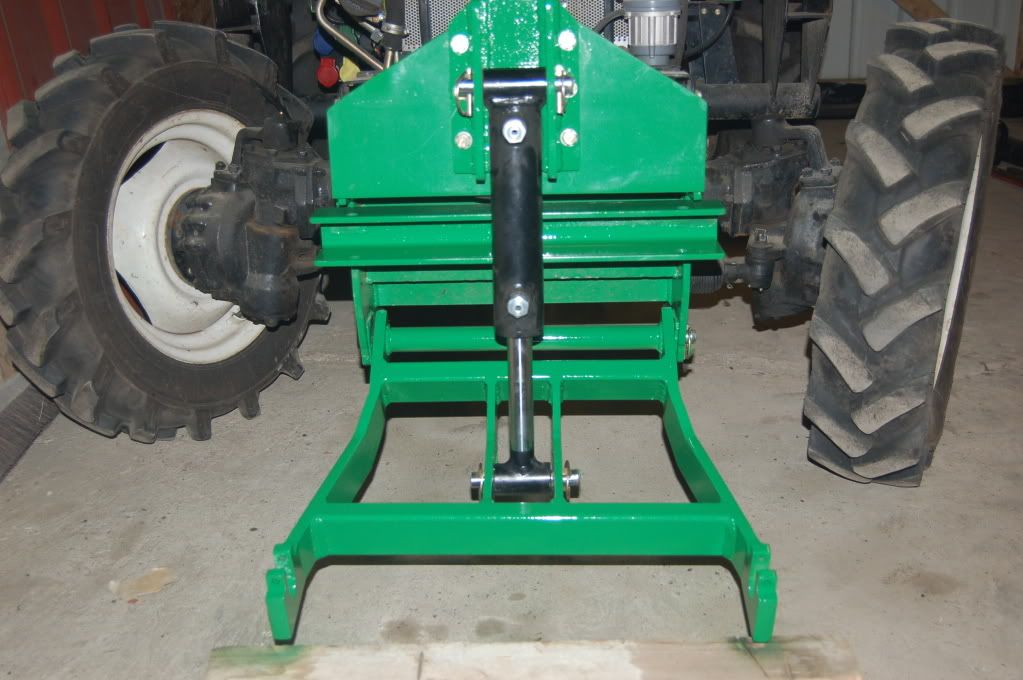 the Connection is also done, i need only to fix the Hose to the Tractor Frame but i have to route another 4 hose in this way for my other project so thisi will be done when all Hose are connected 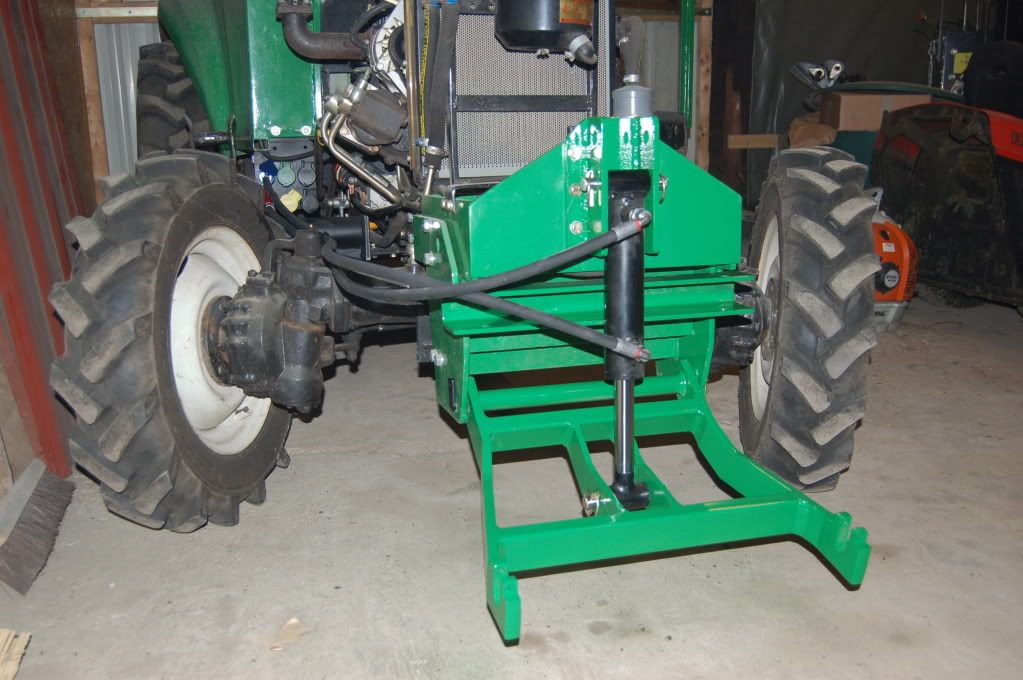 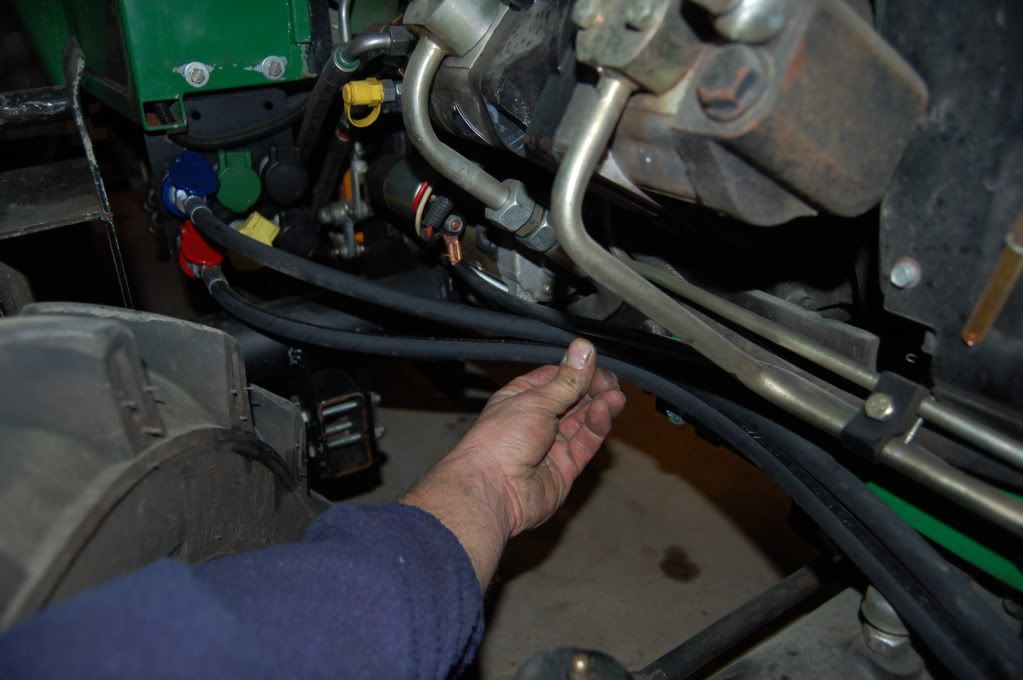 |
|
|
|
Post by bracabric on Nov 21, 2011 9:27:42 GMT -5
Nuno, are you sure it's a Jinma ? that green pain is suspiciously like a Fendt.(remember them ? )
Dick
|
|
|
|
Post by bradblazer on Nov 21, 2011 9:36:35 GMT -5
Looking good - can't wait to see it with the blade in place. I see you relocated your license plate  . You probably know this but be careful with the paint hardener - most are extremely toxic and require a good mask + good ventilation. |
|


 .
.