3RRL
Administrator  Huge Kama
Posts: 2,027 
|
Post by 3RRL on Apr 28, 2008 10:50:38 GMT -5
Larry,
Have you been taking pictures of your ripper build?
Any updates since you got that steel in?
Rob-
|
|
biggkidd
CTW Expert
 A World Away!!!
Posts: 226
|
Post by biggkidd on Apr 29, 2008 9:23:24 GMT -5
Rob, I am ashamed to say no I haven't been taking pictures.  But I might go out and work on it today. Its way to wet to do anything outside. Water standing in my yard and I live at the top of a small hill. I think we are close to setting a new record for rain in April. Its reeking havoc on my work. Whats worse we haven't been up to the property in over a month. Just to wet or steadily raining. Larry |
|
biggkidd
CTW Expert
 A World Away!!!
Posts: 226
|
Post by biggkidd on Apr 29, 2008 19:12:38 GMT -5
Finally ALMOST Finished, Its probably done as its going to get. Paint cost money you know. First here are the shanks (rippers) I used. 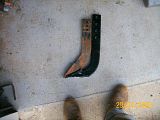 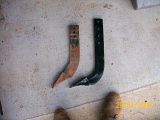 Thats one of the old ones out of my box blade and one of the new ones I used for this project. I took this opportunity to replace the ones in the box blade also. You can see just how crappy the scarfers that came with my box blade were. Look at the angle way to steep. Here it is all done. Getting ready for a test run. Which is a joke as wet as the ground is right now. 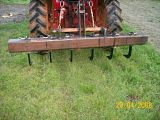 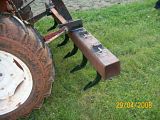 Now for a test run this is the very first run I haven't even looked at it yet. 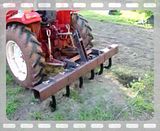 Not bad this is the area before I used it. 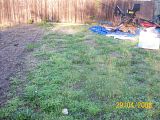 For you guys who do feed patches for the animals this might be ideal. I would try and find longer shanks (rippers) though. I can't wait to see if it works as well getting the tree roots out of the top layer where we are clearing. Larry |
|
FlyHiFlyLo
Administrator  2007 Jinma 554LE
Posts: 425
|
Post by FlyHiFlyLo on Apr 29, 2008 21:20:30 GMT -5
Wow! Works great! Good Job!
Man we really all need to start loading these videos on YouTube so we can add them to CTWTV.
|
|
3RRL
Administrator  Huge Kama
Posts: 2,027 
|
Post by 3RRL on Apr 29, 2008 23:20:01 GMT -5
Cool video Larry, that ripper works great.
I guess it's pretty wet at your place so you are getting some wheel slippage when you bury them all the way down, huh? How much do they stick out? About 10" or so? When it's dry, you'll get better traction, but then the ground will be harder also. So you might end up with a similar situation. I know even with Huge Kama when I have all the rippers all the way down it starts to slip. That's across 7 feet with 7 scarifiers. I usually go for 4" to 6" with all of them engaging. Then do it again if I have to.
Anyway, you did a good job and thanks for sharing that video.
Rob-
|
|
GuglioLS
Administrator  Jinma354 LE
Posts: 1,276
|
Post by GuglioLS on Apr 29, 2008 23:57:15 GMT -5
Larry,
Amazing Video and nice work putting that ripper together. Paint cost money - LOL
I get mine at Wal-Mart "Color place" brand, it' 96 cents a can. I bet you could prime and paint it for 2 dollars and it would look like a million bucks! BTW when Nicole shot the video, were you in Hi or Lo range? Just curious.
Thanks for sharing this cool project. Oh one more thing are you going to add a stand to keep it upright when it's disconnected?
Larry
|
|
biggkidd
CTW Expert
 A World Away!!!
Posts: 226
|
Post by biggkidd on Apr 30, 2008 7:27:56 GMT -5
Wow! Works great! Good Job! Man we really all need to start loading these videos on YouTube so we can add them to CTWTV. Thanks Scott, I have never used Utube. But I will see what I can do in the next few days. Larry |
|
biggkidd
CTW Expert
 A World Away!!!
Posts: 226
|
Post by biggkidd on Apr 30, 2008 7:31:27 GMT -5
Cool video Larry, that ripper works great. I guess it's pretty wet at your place so you are getting some wheel slippage when you bury them all the way down, huh? How much do they stick out? About 10" or so? When it's dry, you'll get better traction, but then the ground will be harder also. So you might end up with a similar situation. I know even with Huge Kama when I have all the rippers all the way down it starts to slip. That's across 7 feet with 7 scarifiers. I usually go for 4" to 6" with all of them engaging. Then do it again if I have to. Anyway, you did a good job and thanks for sharing that video. Rob- Rob, Its wet real wet here now. The rippers are about 12" I can adjust them out farther to. I put pin placement holes both top and bottom for that very reason. I might make some skis for it to so it can't anchor into the ground like it did there. Larry |
|
biggkidd
CTW Expert
 A World Away!!!
Posts: 226
|
Post by biggkidd on Apr 30, 2008 7:38:08 GMT -5
Larry, Amazing Video and nice work putting that ripper together. Paint cost money - LOL I get mine at Wal-Mart "Color place" brand, it' 96 cents a can. I bet you could prime and paint it for 2 dollars and it would look like a million bucks! BTW when Nicole shot the video, were you in Hi or Lo range? Just curious. Thanks for sharing this cool project. Oh one more thing are you going to add a stand to keep it upright when it's disconnected? Larry Larry, I was in low 3rd. That seems like the best working gear. Yes I am planning to add some sort of stand and maybe some skis too. It should work for cleaning out the roots from the trees I hope and if not it will still break up the ground before tilling. I guess I could paint it but thats a lot of rust removal too. I'm just lazy. LOL More to do than I have energy for and now I have to get to work. Larry |
|
biggkidd
CTW Expert
 A World Away!!!
Posts: 226
|
Post by biggkidd on Apr 30, 2008 7:42:03 GMT -5
Guys,
Thanks for all the great replies. I wish I had more energy to keep up with what all is going on here all the time. This damn MS is really cutting into my energy this spring.
Next project a set of forks for the FEL Coming soon.
Larry
|
|
|
|
Post by bradblazer on Apr 30, 2008 8:03:11 GMT -5
Very nice design and construction. It works great too!
"I can adjust them out farther to. I put pin placement holes both top and bottom for that very reason."
I think it's important to have the rippers engaged at the top and bottom of the carrier for strength. If the end is just supported by the bottom hole even with your nice reinforcement it might twist back and tear up the hole. It might be okay for light duty but you never know what you might hook into when you penetrate the ground.
Dude - you get a LOT done - it's hard to believe you have any disability.
|
|
tractor
CTW Member
 DF354/404
Posts: 16
|
Post by tractor on Apr 30, 2008 9:23:37 GMT -5
Where did you get the shanks (rippers) ?
|
|
3RRL
Administrator  Huge Kama
Posts: 2,027 
|
Post by 3RRL on Apr 30, 2008 9:54:24 GMT -5
Dude - you get a LOT done - it's hard to believe you have any disability.
Well said Brad, and I couldn't agree more. My hat is off to Kidd for his hard work. I admire him for that.
About the scarifiers being engaged to the steel carrier on top and bottom, Brad is absolutely right. If they get enough resistance, they could be pushed back so hard that they could pivot on the bottom lip of the carrier or even on the supports you made and end up getting stuck inside the carrier bar. My carrier had elongated slots from the forces. Those supports will help the scarifiers from breaking off like mine did.
Rob-
|
|
red
CTW Advanced Member
 
Posts: 306
|
Post by red on Apr 30, 2008 18:36:59 GMT -5
Larry thanks for sharing always like to see what you've made NICE JOB! -Ed
|
|
biggkidd
CTW Expert
 A World Away!!!
Posts: 226
|
Post by biggkidd on Apr 30, 2008 18:58:56 GMT -5
Brad, Rob,
I can only use the top or bottom hole but the scarfer is fully encased either way. The Lowest usable setting probably only drops it down about 2-3 inches. I wont run them unless they are passing through both top and bottom of the main beam.
You guys get a lot more done than I do these days. I have slowed down more than I like to admit.
Tractor,
I got them at Agri Supply a little under $20 each. They were the best I could find local.
I would like to thank Larry, Rob, Brad, Ken, You guys with your wild Projects Give me incentive to take on these projects. I say your wild projects Because you all do some pretty far out mods. To give one example Larry & Rob building Robo blade. ;D
Larry
|
|