3RRL
Administrator  Huge Kama
Posts: 2,027 
|
Post by 3RRL on Mar 12, 2008 15:36:33 GMT -5
Here is something I did to help from spewing out hydraulic oil through the stock breather/fill plug. I've heard of this being a problem with a lot of our tractors. It happens to me too, and I think this is because I have more hydraulic cylinders now than before. When all the cylinders are extended, the tank level is lower than usual. So when I top it off and retract some cylinders it fills up enough to spit some out more than normal. Other times are when I work on steep slopes using the fel or whatever. It seems to worse then. I've read where others have put "extensions" on their breather/fill pugs to avoid or reduce this problem. I thought about trying a bell shaped overflow extension. I got a 2"NPT reducer to 3/4NPT and a plug for the 2" side. Also a short 3/4" nipple. I drilled some vent holes in the sides of the plug so they came into the center. And also snitched the top inside wall a little. The 2" plug is now the new breather plug. 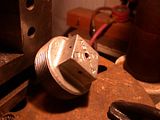 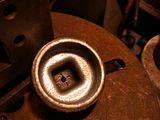 Rob- |
|
3RRL
Administrator  Huge Kama
Posts: 2,027 
|
Post by 3RRL on Mar 12, 2008 15:49:50 GMT -5
This is the reducer which is bell shaped, and the 2" breather plug in it. Hopefully it will catch a little more of the fluid than the old plug. It is screwed into the tank via a short 3/4 NPT nipple, which is what the thread is on the old tank plug. Even with the seat slid all the way back, it does not interfere on my Kama 554. You'll have to check yours. 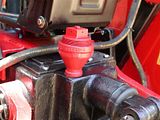 I drilled and tapped the new plug so I could screw in a dip stick. The dip stick has holes drilled in it to measure where the fluid level should be. The dipstick is adjustable so I can set the holes for the best fluid level. It is also locked into the cap with a nut to keep it from unscrewing. The holes in it make it easy to see where the fluid on it. 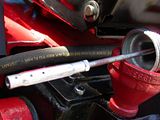 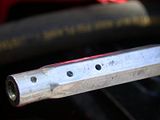 Rob- |
|
3RRL
Administrator  Huge Kama
Posts: 2,027 
|
Post by 3RRL on Mar 12, 2008 15:53:14 GMT -5
To keep the bugs out of the tank, I filled the cap with expanding metal to act as a screen. I smashed some expandable metal screen into the top of the cap where the vent holes are. I checked to be sure it would still vent and it does. I cut a hole in the screen and wrapped it around the dip stick so it would not fall off accidentally. I was worried about that, but realized it wouldn't pass through the 3/4" pipe neck even if it did get loose. 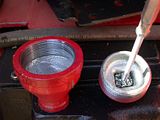 Anyway, so far the vent and reservoir has worked real good. When I changed my hydraulic pump out, I over filled the main hydraulic box (reservoir sump) and only a little was pushed out through the vent. So I know the little bell and mesh work good. Over the last year, I've lost very little hydraulic fluid compared to before. It was a simple mod to cure an annoying problem. Rob- |
|
|
|
Post by Ronmar on Mar 12, 2008 18:46:55 GMT -5
That is pretty neat Rob. I went one further and re-located the breather forward to the middle of the resovoir, right in front of the hump on my 284's rear case. It didn't matter how low I let it get, working uphill building brush piles, I would still manage to dump some fluid out the stock vent.
To the original cap/vent I welded a street elbow and put on a hydraulic QC to use it as a return point to the resevoir for the half remote... The oil stays in the resovoir much better now:)
Ron
|
|
biggkidd
CTW Expert
 A World Away!!!
Posts: 226
|
Post by biggkidd on Mar 12, 2008 18:52:41 GMT -5
Rob, Thats a good fix I will more than likely copy.  Sounds like Ron got his pretty good too. Using it as a dump for the 1/2 remote COOL. Nice write up Thanks. KIDD  |
|
red
CTW Advanced Member
 
Posts: 306
|
Post by red on Mar 12, 2008 21:46:06 GMT -5
Ron-
When you get a chance would you post a picture of your mod. I too get a lot more than I like of dripping on slopes. thanks -Ed
|
|
GuglioLS
Administrator  Jinma354 LE
Posts: 1,276
|
Post by GuglioLS on Mar 12, 2008 22:16:25 GMT -5
Rob,
Nice fix to an annoying problem. That was a good idea to use expanding metal, is it a Stainless steel scouring pad stuffed up into the breather to help keep dirt, dust and bugs out?
I have the same problem, just like you and everyone else.
I like Ron's fix too, Seems to me that would be a good solution as well. I have zero room behind the seat to add what you did, so I may have to do as Ron did, then seal the rear vent / filler and use it only as a filler port. One day if my seat ever falls off again, I will add a breather to the center of the TPH lift box reservoir.
Larry
|
|
3RRL
Administrator  Huge Kama
Posts: 2,027 
|
Post by 3RRL on Mar 12, 2008 22:57:38 GMT -5
The screen is some expandable metal ... aluminum I think. The dip stick is aluminum also.
I too would like to see what Ron did. Can you post some pictures of your mod Ron? Moving the breather like you did would surely be better than having it on the corner like mine. Every time you go up a slope all the oil goes to that spot. But in any case, my mod was pretty simple to do and has made enough of a difference to be acceptable.
What I really need is a larger reservoir for all the extra cylinders I have.
I was thinking a wild solution would be to have 2 breather ports, one on each end of the box. Each one would have a float valve on it like in a toilet. So when the tractor is on a slope and the oil goes toward that vent, it would shut off and seal ... and the other vent would be open. lol.
Rob-
|
|
|
|
Post by Ronmar on Mar 12, 2008 23:18:58 GMT -5
This one took a little bit of work, but wasn't too bad. Measured from the front to the rear, my new sample point is a little aft of center, but it is a bit higher up. After a carefull inspecton inside the case with mirror and flashlight, I determined that the area inside where I drilled this hole did not interfere with the 3PH mechanism, at least to drill and tap the hole. I of course did this with the reservoir empty. I used a shopvac while drilling and tapping to get as much of the metal out as possible. I tapped the hole to 1/4" NPT to take standard fittings. Then I fit a rubber hose to the reservoir drain hole and ran it into a bucket full of kerosene. I used a small generic windshield waser pump to draw the kero from the bucket, thru a generic fuel filter, to a piece of thin aluminum tube I could use as a wand to direct the rinse flow inside the reservoir. From the filter opening in the front, I was able to direct the flow all over the inside and was able to wash any particles away to the rear and out the drain. It helps to have the front wheels up on ramps to aid the flow to the rear drain. I got a lot of brass and real fine steel/iron shavings out that were leftover from the factory. Here is a pic with my maintenance filter attached. You can just see the new breather location upper right, with a filterthat needs new dessicant(turns pink when moisture saturated).  Here is a pic taken tonight with a recharged dessicant filter installed. I make the filters from a generic fuel filter, and I add the indicating dessicant to one end with a perforated rubber push on cap. To recharge it, you remove the cap and shake the dessicant out into a microwaveable glass dish, and nuke it till it turns blue. Let it cool and put it back into the filter with a funnel. You can also see the homemade street elbow I made to attach the return QC.  Ron |
|
3RRL
Administrator  Huge Kama
Posts: 2,027 
|
Post by 3RRL on Mar 12, 2008 23:31:20 GMT -5
Wow, great pics Ron. That is really a cool mod too.
I can't believe some of the things you think up such as that dessicant filter.
Does your seat clear the filter then? In the first pic it looks like it's sitting closer to the tank ... more flush than in the 2nd one.
|
|
|
|
Post by Ronmar on Mar 13, 2008 0:11:28 GMT -5
Your very observant Rob. It was setting lower and completely under the seat mount in the first pic. The first filter I built, I epoxied the generic filter to a nylon 1/4" NPT nipple, but I had issues with it cracking/getting a good glue bond. I re-did it last week with a brass hose barb, and will ultimatly fit the filter up on the back of the seat. I only had a little scrap of hose to put the new filter in place, so put it where you see it...
That is my normal seat position and it only leans slightly like this, so I may just leave it that way for a while.
Ron
|
|
ewal
CTW Member

Posts: 18
|
Post by ewal on Apr 5, 2008 10:35:57 GMT -5
The hydraulic venting on these tractors seems to be a problem with a lot of solutions. I have the filler tube type that sticks out behind the reservoir on my IHT284. I bought a length of flexible plastic tubing 1.5 ID that could be stretched over the opening and looped it up behind the seat so it made a water proof end for the vent. The end is covered with plastic pipe reducer fittings with some dust mask material keeping foreign material out of the tube. Wire ties keep the loop fixed to the back of the seat.
I have seen the hydraulic oil 4 to 6 inchse up the tubing on steep slopes so I know I am keeping the oil contained and allowing the oil reservoir to vent adequatly.
Maybe this will work for some others, Elton
|
|
|
|
Post by Ronmar on Apr 5, 2008 18:35:30 GMT -5
I originally started out making up a small plastic resovoir up on the back of the seat, with a bottom port attached to the stock vent. This gave the fluid someplace to go when it would burp while working up a steep slope. Once the tractor was back on level, any fluid pushed up into this overflow tank would find its way back to the main tank. The top of the overflow tank was going to have a filtered air vent. I have lost quite a bit of fluid, more than just a piece of hose could accomidate. I flooded my first dessicant filter. It was located on the back of the seat up on the end of a piece of hose. That was where the expansion tank thought came from.
Since I planned on making the fill port into a hydraulic return, moving the air vent forward on the case was inevitible, and solved the inclined overflow problems.
Ron
|
|