3RRL
Administrator  Huge Kama
Posts: 2,027 
|
Post by 3RRL on Sept 15, 2009 22:53:43 GMT -5
Here is a thread I did on another forum back in 2006 when I had to repair the hydraulic box on my Kama 554. I'm posting this thread so it might help those who need to get into their hydraulic box, specifically CaptainJack... Rob- Hello, I thought I'd share some information on changing the gasket above the rear end and below the hydraulic box on my Kama 554. It all started when I was pushing in new trails and roads on my property. Not only did I manage to bend the drag links, but all the stress on the tractor (probably from day 1) had loosened up the nuts and bolts that hold the hydraulic box onto the rear end housing. Once again, I cannot stress enough to check frequently all the nuts and bolts on these things. Even those you would think should NEVER come loose! Believe me, they will. It may have happened before then, but I noticed it after careful inspection and bending the drag links. I could only get to 3 or 4 bolts to tighten and the others were blocked by the position control levers on one side and the suction return filter and metal tube on the other. Besides that, I could see the old gasket was pushed out from between and looked eroded and torn. So even if I could, tightening them would do no good. So I used my handy-dandy built in "A frame" a chain and a come-along to remove the box. A definite NO-NO ... I drilled and tapped the ROPS so I could a swivel eye bolt for the chain hoist. Here's the set-up.  I had to remove the top hydraulic box.  |
|
3RRL
Administrator  Huge Kama
Posts: 2,027 
|
Post by 3RRL on Sept 15, 2009 22:56:12 GMT -5
That hydraulic box is loaded with the 3pt valve and cylinder and also the upper lift arms pivoting shaft, so it is very heavy. Before I could actually get the box off, I had to remove the suction filter and steel lines out of the way. 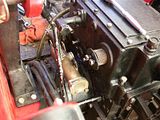 Not only on the hydraulic box, but all the way up to the hydraulic pump so the line could swivel and move out of the way enough.  |
|
3RRL
Administrator  Huge Kama
Posts: 2,027 
|
Post by 3RRL on Sept 15, 2009 23:02:58 GMT -5
And here is the culprit. A badly worn gasket that appeared to be eroded and torn.  Loretta quickly whittled out a new one for me. She is pretty handy. Here is the old rubber gasket and the new cork one.  LOL ... when I told her to make it exactly like the old one she looked at me funny and said with a smirk "do you want me to cut off that one end too??"  She cut the new one pretty quickly. Then I checked it to be sure it would fit properly. I used a Ø3/8" pipe nipple with sharpened edge to punch the clearance holes for the bolts.  |
|
3RRL
Administrator  Huge Kama
Posts: 2,027 
|
Post by 3RRL on Sept 15, 2009 23:06:18 GMT -5
Next thing was to re-assemble everything using locktite on every nut and bolt, even the seat. I figure this will help reduce future bolt loosening, in this area at least. Here is a picture of everything put back together and also with the repaired drag links. They worked out great as you saw on my "Trails" thread.  After completely assembling the tractor, I tried out all the hydraulic functions to be sure they all worked. It took a little bit of working the levers to get the hydraulics flowing and everything functioning again. So I drove over to my boxblade to hook it up and start on my trail work. The only thing I forgot to check was the 3pt system. When I tried to hook up the boxblade by raising the 3pt, it would not come up AT ALL! I was not too pleased with this since we had just put everything back together and I didn't look forward to dis-assembling right away. I was actually hoping to do that about 5,000 hours from now. I couldn't figure out why it would not raise, but when I lifted the lower arms up, they came to a definite, solid stop. Like a pin had slipped and something had fallen in the way blocking the internal movement. Loretta got out the manual and we started looking what it could be. From the diagrams, it looked like a dowel pin could fall out out of the push rod, allowing the push rod to fall out of the center push pivot that rotates the upper lift arms. |
|
3RRL
Administrator  Huge Kama
Posts: 2,027 
|
Post by 3RRL on Sept 15, 2009 23:08:36 GMT -5
Well, I pulled the tractor back into the canopy to tear it apart AGAIN. Loretta was not too happy either since all the bolts had locktite on them now  Anyway, we took the seat of again and then removed the cover to the hydraulic box. It was a lot less dis-assembling than removing the entire box. Here's a view from the cab and a view from the rear. 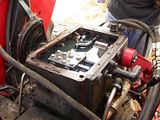  |
|
3RRL
Administrator  Huge Kama
Posts: 2,027 
|
Post by 3RRL on Sept 15, 2009 23:13:48 GMT -5
The gasket was also rubber but was in really good shape so we re-used it. I started fishing around for pieces but did not see or find anything.  I started the tractor and decided to see what would happen by operating the 3 pt lift. I noticed that the piston in the cylinder was not responding to the valve controls. It was fully extended and would not retract. Even lifting the arms with my tremendous strength and great effort could not budge it.  The dowel pin I thought may have fallen out was in place and the push rod was in position. The only thing I could figure out was that the piston was stuck somehow in full extension. So I got to drain the hydraulics (again) to see what it looked like. 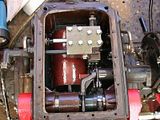 |
|
3RRL
Administrator  Huge Kama
Posts: 2,027 
|
Post by 3RRL on Sept 15, 2009 23:18:57 GMT -5
Indeed it was stuck in the extended position. After looking it over, I could not find any mechanical reason for it not to retract. I decided it may have overextended without any load on it and now fluid was behind the piston and could not get out.
If you look at the photo, there are 2 bolts that are for fluid relief on the valve. One on top for retracting and one in the front for extension. Their was also a pressure relief valve on top of the valve. I decided to remove the bolt for retracting and try to move the piston backwards. And that worked. I removed the bolt for extension and moved the piston forward and that worked too. I moved it back and forth several times to be certain there was nothing like a pin or chip or something binding up the movement.
Then I re-filled the hydraulic box and tried the 3pt lift ... and it worked perfectly again. I did it several times to be sure. Well, we put everything back together (again) with more locktite and hooked up the boxblade. It is now working fine again. The only thing I can think of is during the time I checked the hydraulics and there was no load of any kind on the 3pt upper lift arms (everything was still off the tractor), no tilt cylinders, no drag links or stabilizers, nothing ... the piston may have moved out just a hair more than normal? And then got filled to a point where the fluid could not escape normally ... I don't know?
Anyway, it all ended up well after an exhausting tear down, etc. Just another normal day at camp for us. One thing for sure, now every single bolt on the tractor and fel frame has been re-torqued. Those that were removed all have locktite on them. That doesn't mean I won't check them though. I do that anyway regardless, and recommend you do the same.
Rob-
|
|
3RRL
Administrator  Huge Kama
Posts: 2,027 
|
Post by 3RRL on Sept 15, 2009 23:39:21 GMT -5
In the mean time, here is what I learned about all that stuff that's inside the hydraulic box. These photos are labeled ... some with questions and then some with answers from the guys. Now I know what all that stuff is in there. And below that hydraulic box, once removed, you can see the rear end drive gears.  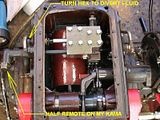  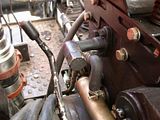  So those photos show the half remote. It's activated by screwing down the knob in the front under the seat which diverts fluid to the half remote. However, then your 3 pt doesn't work, so you have to open the knob again. The photos also show the 3pt valve (distributer) and the cylinder piston. Those bolts could have been loose for a while resulting in the gasket wear. Actually, there are no dowels to hold the box on. There are 2 long bolts on the front that go through the cover and 2 short bolts on the rear. Studs (4) in the center with nuts to remove there. It is a complete separate self contained unit. Brad suggest a hard gasket for compression and I wish I knew that before. All gears inside looked VERY good. One other thing about the valve that controls the 3pt lift is that it is nothing like the valve shown in the manual, at least in my manual. I had seen the valve in the manual (distributer) and wondered where it may be but figured that must be what they are referring to. I think it was referred to as the "distributer assembly" in the manual? I also tightened several small bolts that hold the valve together. They had lock washers on them but 3 or 4 were loose/snug, not tight like the others. Anyway, hope this helps if anyone has to get into their hydraulic box... Rob- |
|
|
|
Post by captinjack on Sept 16, 2009 7:43:09 GMT -5
Holy Crap Rob. Talk about a solution to my troubles. That write-up is EXACTLY what I needed.
I thought that all the internal to the tank had to be removed first and I was too much a coward to do that.
When I do the same repair, I'm going to put some locating dowels in to resist the shear forces. I tried using a cork gasket for the valve cover and that doesn't work well as it compresses and has to be snugged down repetitively till it fails.
What kind of gasket material should I use. A buddy told me about some kind of caulk/fluid that is used without any gasket material at all and says that all the car shops use it. The drawback is that disassembly is then difficult.
I'll do an update when I get around to fixing this tank problem.
Rob...........I can't tell you how much you helped me here. I owe you buddy and I won't forget it.
|
|
|
|
Post by baknblack on Sept 16, 2009 10:16:04 GMT -5
What kind of gasket material should I use. There is a gasket material called multi-swell that swells upon contact with water or oil. It's perfect for this application. My box came loose on my kama also. I used this material and it's held perfectly ever since. The only place I know to get it is order it off the net or in my case the plant I work at stocks it, lol. |
|
|
|
Post by bradblazer on Sept 16, 2009 10:49:31 GMT -5
|
|
3RRL
Administrator  Huge Kama
Posts: 2,027 
|
Post by 3RRL on Sept 16, 2009 16:35:16 GMT -5
Hey Jack, you are welcome old buddy...
I think Dwayne and Brad plus Larry and many others commented on the original thread. BTW, it's still there under the Hydraulics section ... I missed it yesterday.
Brad, what was that gasket material you suggested in that original thread?
I still check those bolts and snug them up even today. I've been thinking about putting one of those "bend up" washers with the little tab to bend up to keep the nut or bolt from spinning loose. That might help too?
Rob-
|
|
|
|
Post by bradblazer on Sept 16, 2009 23:12:28 GMT -5
Brad, what was that gasket material you suggested in that original thread? ... snip snip ...Rob- All I could find was where I said aramid reinforced silicone. I think I made that up.  I think there was another thread where I recommended Gorilla Glue based on some success in assembling the hitch support frame on my Belarus. Captain Jack - if you take the lid off the 3ph box don't forget to tap a 1/4" npt hole in the middle for a vent that doesn't burp oil. |
|
|
|
Post by captinjack on Sept 17, 2009 8:31:13 GMT -5
Talked to my buddy and the gasket goup that he recommended is called "The Right Stuff". He said that no gasket is needed; just this stuff.
Anyone out there use this stuff?
|
|
|
|
Post by bradblazer on Sept 17, 2009 10:03:26 GMT -5
I did see The Right Stuff yesterday when I was looking for the anaerobic sealer. If your buddy has had success with it that's as good of a recommendation as you are likely to get. Any removable gasket material is not going to contribute tremendously to the shear strength but the advantage of a chemical gasket is that you get metal-to-metal contact while the chemical fills any spaces to provide a seal. What I don't like about RTV silicone is that it seems to take forever to cure when trapped in a flange and if it's not cured it's a lubricant. These new products don't have that problem. A few years ago I bought some GE 2-part silicone to prep some special cable samples. It is very cool - will cure potted samples overnight. My boss still kids me about paying $1000 per gallon for it. Here is The Right Stuff - it's a Permatex product and AutoZone even carries it: www.permatex.com/products/Automotive/automotive_gasketing/gasket_makers/auto_Permatex_the_Right_Stuff_Gasket_Maker.htm |
|