GuglioLS
Administrator  Jinma354 LE
Posts: 1,276
|
Post by GuglioLS on Apr 1, 2008 21:19:44 GMT -5
Bob,
Wow thanks for the update and all those pictures, that's quite a bit of work dissembling everything like that. I'm totally impressed that you took this on. Good thing you got some help, it's always comforting to have a partner to help keep track of everything and to discuss the plan of attack. Plus it's always nice to have a brother as company.
I know this is a major project, and it looks and sounds like you are on your way to getting it fixed. Have you found a source for those bearings?
If you have some pics a little further back so as to show the two halves of the tractor that would be much appreciated as well. I'm interested in seeing what all it took to get the tractor split in half.
A brief description of the major parts you removed would be beneficial, did you have to remove the fuel tank and hood / dash?
I am with you regarding that retaining clip, if you found it out of the grove and the grove is narrow with sharp edges and the clip is not damaged, there is no way it could have popped out on it's own. It was probably never seated properly into the grove during assembly.
Larry
|
|
|
|
Post by sokkerbob on Apr 2, 2008 0:27:21 GMT -5
For the benefit of all, I will try best to give step by step in order I disassembled the transaxle. Phase I--Said a long prayer. Phase II--Split the Tractor 1.Disconnected Battery. 2.Drained Transmission Fluid by Removing Plug on Differential Housing. Notes: - After most of oil drained out, I removed four bolts holding plate on so I could inspect for possible clues (metal pieces, clips, etc)
- I replaced plate and plug just to try to keep things from dripping.
- Make sure you have plenty rags, containers, and things close by to catch oil when you disassemble. Seemed like I was always cleaning up some drip.
3.Drain hydraulic oil Notes: - I disconnected all three hard lines running from lifter box to front of tractor to drain oil since they all would have to come off eventually. I helped it along by blowing a little compressed air into fill hole on back of lifter box.
- While I was waiting for transmission and hydraulic oil to finish dripping I started on next steps.
4. Disconnect electrical connections Notes: - Disconnect left and right taillight harness.
- Make sure you mark wires on right side. Three of them had same type of connector
- I disconnected clutch and brake switch thinking they might get hung up, but it turned out it was not necessary.
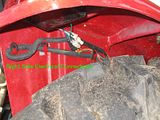
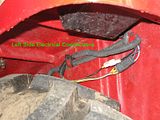
5. Disconnect brake linkage and two bolts holding floor boards to transmission housing. Notes: - Do this for both sides.
- Just need to disconnect one side of brake linkage
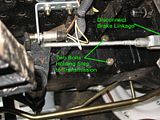
6. Disconnect other end of three hard hydraulic lines from lifter box Notes: - After disconnecting both ends, we just made sure that they were free and not interferring with splitting the tractor.
7. Support tractor for split Notes: - We put jackstands under fel bracket support and blocked front wheels. We wanted as wide a stance as possible to make sure front end did not roll to one side.
- For the backend, we used a floor jack under the transmission
- Take care not not to bend hard lines when jacking under the transmission
8. Remove bolts holding transmission to bell housing and split tractor Notes: - Some of the studs pulled out of transmission along with bolts. However, we were able to disconnect from bellhousing. The nut and stud just remained with bell housing.
- Make sure all your gears are in neutral before trying to split
- Tap on transmission with hammer to help start the split while using tires to roll back tractor
- Just keep an eye on everything. Make sure hydro lines are free and everything is staying on jacks.
Here is what it looked like when we split except that we have already removed the shifter plate on top of transmission and took the coupling off the top shaft. I will post pictures of how coupling works when I reassemble the tractor. 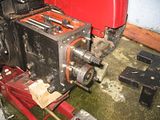 Thats it for now. I will continue in another post before I lose what I have done so far. FYI. - The notes are notes I took while we were working. I know they are a little simplistic, but sometimes it is the simple stuff that screws you up.
- Although nothing was too hard, it was nice having two set of eyes and elbows
- If working by yourself, you will definitely need some type of hoist to remove some of the bigger stuff like lifter box and axles.
- As Ronald said, keep everything neat and clean.
Bob |
|
|
|
Post by sokkerbob on Apr 2, 2008 0:45:12 GMT -5
Larry,
Answers to your questions
Yes, I believe so. I talked with and done business with Keno Tractors and Affordable Tractor and it looks like should not be a problem. Keno is closer to where I live, but Affordable seems to have better availability. Also, they both have been very helpful in discussing my tractor problems. I am open to other suggestions, but these vendors both seem to have good reputation with members of this board. Also, Ronald @ Ranch Hand Supply is a first class individual and businessman who took time to help me develop a plan of attack. I wished he lived closer to me.
No, just removed items I mentioned in my last post, but that is because I split tractor at the transmission/bellhousing and not bellhousing/engine. It looks like that would be a bigger job if you split tractor at bellhousing/engine.
Bob
|
|
quikduk
CTW Life Member
   Dog House
Posts: 552
|
Post by quikduk on Apr 2, 2008 10:06:50 GMT -5
Bob:
I have been lurking here watching you tackle this BIG project in amazement. The guys at Keno are very good, as well as those at Affordable and Ranch Hand. I am assuming you talked to either Mitch or Tom...unless they have new help. I got my 354 from them and so far, no worries...but at my next fluid change, I may pop the inspection covers off of things and check certain bolts etc.
Keep up the great work and documentation.
Ken
|
|
|
|
Post by sokkerbob on Apr 2, 2008 17:55:08 GMT -5
Replacing pinion bearing (cont) Phase III Stripping Tractor Down to Transaxle General Comments: - After we split tractor, we attempted to disassemble the transmission. However, after removing the two front plates on front of transmission, we ran aground when we were unable to remove the front roller bearings on both shafts. They appeared to be pressed onto shafts. Decided at that time to ask for advice.
- As mentioned in a previous post, we found out the only way to replace pinion bearing was to completely disassemble the transaxle.
- What follows is steps we took to disassemble.
1. Remove tractor seat. Notes: - Pretty simple process just remove four bolts and lift seat off
- My brother has whole set of air tools which really sped up the process
2. Remove lifter box. Notes: - We had already disconnected three of hard lines so only needed to remove eight bolts and disconnect three point arms bars from
lifter box
- The lifter box is heavy. Two old men struggled a bit. After we took off, we put on a dolly to remove around easier.
3. Remove ROPS and Fenders 4. Remove rear wheels. This is picture of tractor stripped down. 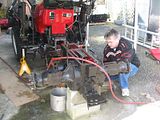 |
|
quikduk
CTW Life Member
   Dog House
Posts: 552
|
Post by quikduk on Apr 2, 2008 18:44:41 GMT -5
SHEESH!!!  I hope I NEVER have to do that! |
|
|
|
Post by sokkerbob on Apr 2, 2008 20:11:25 GMT -5
Phase IV- Disassemble Transaxle. 1. Remove shifter forks. Notes: - Forks and shifting dogs are held in place with pins. Drive pins out and make sure you have a little magnetic thing to retreive ones that drop down in case.
- To remove forks , turn rod 1/4 turn. This will unlock the rod and you will be able to slide back.
- There are springs and ball located on wall between transmission and differential that clicks into detent on shifting rod. If you pull rod out too fast when removing forks, the little ball will shoot out and you will be on your hands and knees looking for it.
2. Remove reverse idler wheel. Notes: - My brother did this while I was documenting our progress so I can not say for sure what he did.
- Apparently he just pulled or pushed the reverse shaft out of front of case.
- Pretty sure it came out fairly easy because when I came back he was fishing all the pieces out of bottom of case.
3. Remove lower front shaft bearing. Notes: - The lower front shaft bearing seemed to be pressed onto shaft. Really have no idea what is preferred of removal. There is really no good lip on bearing to grab and it was pressed to close to 1st speed gear to get a hold of from behind.
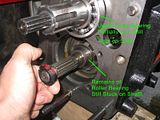
- It is possible that there might have been more room if pinion bearing had not come out of case. We will know more when we reassemble.
- To remove, we ground two slots on side of bearing and then used two screwdrivers and heated bearing with a torch
to remove being careful not to overheat main shaft.
4. Remove top front shaft bearing and shaft. Notes: - After attempting to pound bearing out the day before, we discovered we had marred the bearing . Since a new bearing was going to be needed, we continued to pound with brass punch until bearing came off.
- Once the bearing came off, I wiggled shaft for a bit and rear bearing came out of case.
- It was necessary to move gears on bottom and lower shaft to get shaft to move forward. Once I moved shaft forward to clear the back of case, I was able to tip back of shaft up and pull entire assembly out of case. This was picture I took right before I started to remove upper shaft
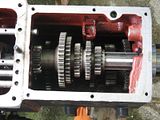
- I was so excited about shaft coming out that I forgot to take picture. Here is picture with upper shaft removed and out of case
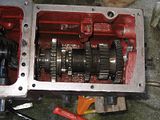
5. Remove Final Drive Assembly Notes - All that is needed is to remove bolts holding left and right drive to transmission housing. Whole assembly comes off in one piece.
- These assemblies are heavy. Make sure you have the other side blocked when you take first assembly off. Otherwise transaxle might tip and crush something.
- We took time to look at brakes. It is not necessary to remove, but we wanted to inspect.
6. Remove differential lock. Notes: - Drive out pins on both ends of lock lever and remove cap on non business end of lever
- Slowly pull lever out of case.
- I used a large screwdriver to relieve tension of spring on lever and rod.
- Here is pic with differential lock removed.
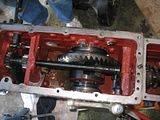
7. Release PTO lever. Notes: - Remove two screws that hold plate to housing
- Rotate PTO lever until it is no longer engaged with PTO shaft
- There is a little steel ball that works detent mechanism. It sort of just dropped out when I was rotating PTO lever
- After rotating PTO lever, remove connecting sleeve from PTO shaft
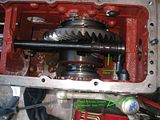
8. Remove PTO shaft. Notes: - There is plate on back of transaxle case at end of of PTO shaft. Remove four bolts and cover plate and then remove three hex screws and remove bearing plate.
- We removed circlip, but found out it was not necessary.
- We pounded PTO shaft out of back of tractor. This came off pretty easily. Here is picture with cover plate and bearing plate removed and another picture with PTO shaft partially removed.
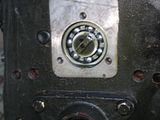
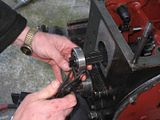
9. Remove Spider Gear. Notes: - First we marked location of the large adjusting nuts on both sides of the main spider gear and removed locking tab.
- After this we removed the adjusting nuts counting number of rotations until they came off. We came up with eight on each side.
- On the outside of the bearing seat we removed the guide screw for the differential bearing seat and pulled bearing seat out far enough to remove spider gear..
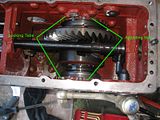
Remove lower shaft assembly Notes: - Because my pinion bearing had slipped forward, we had a little trouble pulling pinion shaft out of back. It it would have been in proper place we would have just pounded on front of shaft and bearing would have come out of case. Instead when we pounded the bearing came off shaft.
- Here the final set of pics.
- Next step reassembly. Parts are on there way. We plan to tackle some time next week.
Bob |
|
3RRL
Administrator  Huge Kama
Posts: 2,027 
|
Post by 3RRL on Apr 3, 2008 0:07:28 GMT -5
Bob,
Great documentary so far.
You and your brother are two brave old dudes! That's a hell of a lot of work.
From the looks of the photos, you've done an excellent job cleaning everything spic and span. That really helps from the get go and for re-assembly. Ronald gave you good advice there.
You'll need new gaskets, right? Are you buying them or making them?
Rob-
|
|
|
|
Post by sokkerbob on Apr 3, 2008 10:22:32 GMT -5
Rob, Thanks for encouragement. I ordered parts and gaskets from Jerry at Affordable Tractor. There are a couple smaller ones that my brother wanted to hand cut. He is my "baby" brother and I think he justs wants to show off his skills a little bit. You that have brothers know what I am talking about. - As I go back over post, I notice there are smaller steps that I have left out. I plan on going back over and editing so board can use for future reference
- The order of disassembly is just the path we took trying to figure things out. Please feel free to suggest other ideas for the benefit of board members.
- Have plans with family for next few days, so this will be on back burner till middle of next week.
Bob |
|
|
|
Post by bracabric on Apr 3, 2008 14:24:49 GMT -5
You have my total admiration, Like Ken "I hope I NEVER have to do that"
Dick
|
|
GuglioLS
Administrator  Jinma354 LE
Posts: 1,276
|
Post by GuglioLS on Apr 3, 2008 16:22:56 GMT -5
"I hope I never have to do that" seems to be a common theme here. Me too! However I would tear it down without hesitation if I could figure out a way to slow down my Jinma 354 rocket sled! it's way too fast in high range but just about right in low range. I wonder what they were thinking with this transmission gearing? I am surprised there are no other gearing options for the 354. What gets me is there are some web sites that show two different transmission speeds. My parts book has a few gear and shifter fork options (none are explained) and the factory has never fessed up to it, and none of the dealers have any information. My hunch is the NorTrac brand (Jinma Tractors from Northern Tool) have the slower speed transmission more suited for US applications. But I have not been able to prove it (yet). Does anyone have a Nortrac 30 or 35 HP tractor? If so please step forward. Bob, I have possession of a reverse idler gear with two gears on it that Tommy special ordered for me a while back in hopes of seeing if it would somehow fit to slow down the reverse speed. Since your transmission is in pieces, if I send that gear to you prepaid would you be willing to see if by some miracle it would fit? No obligation of course, I was just wondering if you would be willing to see if it has any potential? I could send it to you rather quickly so let me know. If interested send me a PM with a shipping address and I'll get it off to you. Sorry to hijack your 354 transmission tear-down and repair thread. However since this is transmission and gearing related, I thought it might be worth bringing up the discussion of the 354 gearing speeds. Here is what that Double reverse idler gear looks like and my idea of how it might work: The only caveat to slowing down reverse, is it would slow it down in low range as well, maybe to the point of it being a reverse creeper gear? 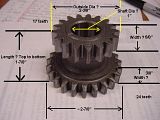 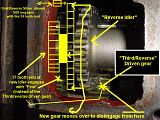 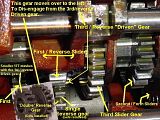 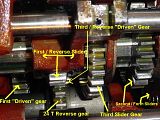 Larry
|
|
|
|
Post by quicksandfarmer on Apr 3, 2008 16:38:51 GMT -5
Larry --
I'm going to hijack your hijacking. I was looking at my parts manual, and I noticed that for the hi-lo sliding gear it lists two possible part numbers, 300.37.134 and 300.37.134A. In your wanderings have you investigated this?
Thanks.
|
|
|
|
Post by sokkerbob on Apr 3, 2008 17:19:12 GMT -5
Larry,
I would be more than happy to help. I sent you an email to address you have on listed on board.
If it does work, it will not be that bad of a job. Just split tractor and you can remove .
Did you want me to measure dimensions on my gear?
|
|
GuglioLS
Administrator  Jinma354 LE
Posts: 1,276
|
Post by GuglioLS on Apr 3, 2008 17:51:39 GMT -5
Did you want me to measure dimensions on my gear?
Bob,
Thanks for being so kind to check that double geared reverse idler, and the offer to measure yours. The measurements will not be necessary, as I have possession of a single gear reverse idler just like yours, plus that two gear reverse idler that I am going to send you to check out. I will FedEx the double reverse idler to you tomorrow.
QuickSand-
I'm going to hijack your hijacking. I was looking at my parts manual, and I noticed that for the hi-lo sliding gear it lists two possible part numbers, 300.37.134 and 300.37.134A. In your wanderings have you investigated this?
Yes I saw that in my parts book too, however the gear that it mates with has no other option. If that Hi/Lo sliding gear is changed, the opposing gear it mates with must be also be changed. The parts book lists no option for the corresponding Hi/Lo mating gear you refer to. So that is why none of the gearing options in the parts book make any sense.
Larry
|
|
3RRL
Administrator  Huge Kama
Posts: 2,027 
|
Post by 3RRL on Apr 3, 2008 18:10:56 GMT -5
Furhter hi jack!!!
Sorry Bob, I could not resist.
Yes I saw that in my parts book too, however the gear that it mates with has no other option. If that Hi/Lo sliding gear is changed, the opposing gear it mates with must be also be changed. The parts book lists no option for the corresponding Hi/Lo mating gear you refer to. So that is why none of the gearing options in the parts book make any sense.
I wonder if that second gear number is refering to the
"double reverse gear" you have Larry? Where did Tommy get that gear?
I too would be very interested in seeing if you could install that gear Bob. If it works, maybe Larry could send one to all of us?
I'm not 100% sure since I'm talking about Loretta's tractor now, a 284 Jinma, but she has a HI-LOW range and a creeper gear range. I believe the HI-LOW range works in both ranges...for those of you with creepers, am I right about that? I remember her reverse being very fast in regular HI range and very slow in LOW range. But I've never tried it in creeper gear HI range?
Back to your thread Bob, (sort of)
Thanks for encouragement. I ordered parts and gaskets from Jerry at Affordable Tractor. There are a couple smaller ones that my brother wanted to hand cut. He is my "baby" brother and I think he justs wants to show off his skills a little bit. You that have brothers know what I am talking about.
Yes, I've got 2 older brothers and I remember showing off for them.
But all that made them do was want to do beat the shit out of me because they could. ;D
Rob-
|
|