
Post by tuffytractor on Apr 23, 2008 23:21:20 GMT -5
Here is an overview of an ongoing project that we have been working on for the last couple of years. We are planning the building of our dream house and outbuilding (can you say garage on steroids?). Our outbuilding will incorporate an in law apartment, a giant shop and family room/ work out area. We had initially planned a dream home, but we may scale back our ideas, as we think we may not need the "dream home"
Some of the things that we wanted to incorporate within the new structures were building techniques I haven’t encountered or used before. One element being ICF (insulated Concrete Forms www.logixicf.com/client/LogixICF/....tallation+Guide), the other element is SIP (Structural Insulated Panels www.premier-industries.com/pbs/).
In our area, fire is the biggest danger, we think the ICF building clad in concrete fiber board, stacked stone waistcoat, with a metal roof and fiber glass(professional.integritywindows.com/protectiveEdge/ultrexAdvantage.cfm) windows will offer great protection for any such calamities that might occur. But before we build the dream home, we decided it would be wise to test build with the materials, before we built out the main house or outbuilding.
Here is a rough idea/plan that we started with, for the "Well House".


What follows is the journey through this experiment while building our “Well House” 30 minutes south of Yosemite at 3200 ft elevation.
First came the drilling of the well.


Then the creation of a flat spot nearby. This was my first experience renting a Tractor a Kabota 21 Horse tractor, I found it a bit underpowered, and decided to go for the 354 when I purchased.

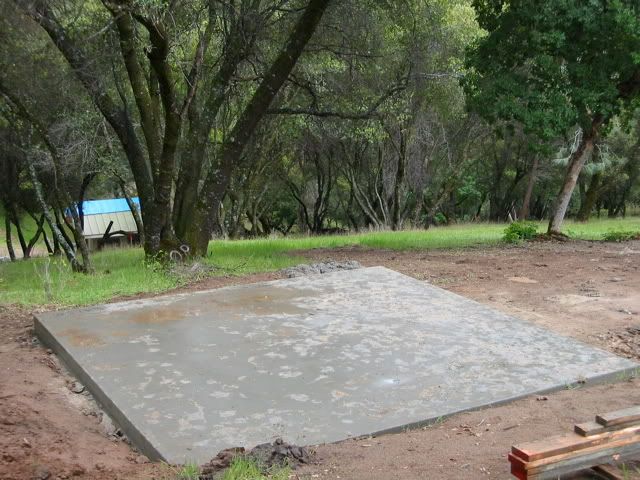
Here is the finished Pad.


We laid it out the best we could, estimating its height and placement of doors and windows and at the time where we thought the storage tank would go. After careful flow calculations we decided we would move it up the hill to get a better rate and instead use the space we created for the tank as parking for a trailer or tractor.

Then we had the trenching and footings to do, my wife was right there digging alongside me. Then laying in the steel.


Then we poured the pad, 8.6 yards of colorized concrete to see if we would like the effect when pouring with colors in our other buildings.


Then came the setting of the ICF block, basically like large legos, deriving their strength from the interlocking design, reinforced with steel and concrete.


Here the third course, with the V buck in place, which is the material used to set the rough openings for the windows and doors.


Then as we get to the fifth course we set the window bracing as we went up.


Above the fifth course, we put up bracing/scaffolding, which provides a work platform as well as the ability to keep the structure plumb.


All the block on, Gable ends in place, pocket in to accept the ridge beam, preparations for the day of the pour, which is rapidly approaching.


Probably doesn’t appear to be that much different with the concrete in the walls than before. The concrete is heavy, note the additional bracing/jacks across the door openings. All the corners are reinforced with packing tape and plywood, to keep from sustaining a blow out. The retaining wall is completed and all the penetrations for power and water have been incorporated, pretty tough to do after the wall is full of concrete, let alone avoiding all the steel.


Got the roof material up to the property, kind of a top heavy load.

Let me tell you setting that 17' 4X10 ridge beam by myself was all I could manage.
Then started the assembly, with my daughters help (she'll love seeing herself here)


Got the roof on, the roll-up door in, the man door in and the windows set.


Here are some of the connection details for how we did the SIP roof.


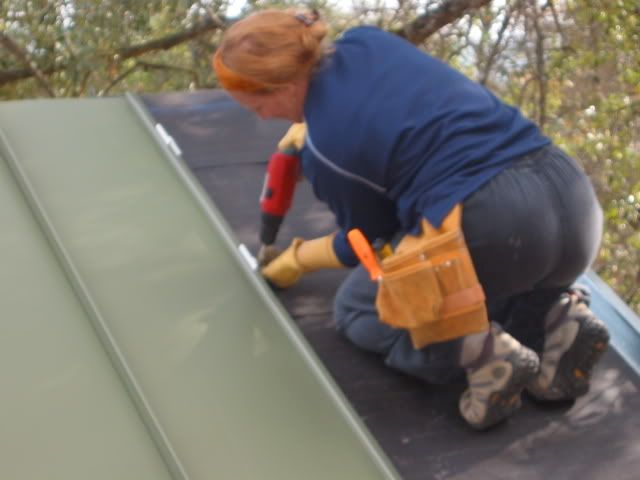
Here is a few pics of us putting up the roof. I had never done a metal roof before, wasn't that hard, except the manufacturer let his bending jig move around and we ended up with uneven slats, which made one side take more than the other. I could have corrected as I went but I didn't discover it until I was three from the last one, at which time I went back and measured them all. Needless to say the manufacturer wasn't my favorite person by the end of the day. I didn't know what I was doing, so I didn't take up a little brake to help with the bending and ended up using a dead blow to form the bottom 1" bend for each slat, won't make that same mistake again!
I did mention I had help, right? Who could ask for a prettier helper ;D


Wasn't able to get the Ridge cap placed before weather started to get to me, so had to tarp it off until, I could finish up.
The pad is 14' X 14', to accommodate a Tuna Can water tank (low and flat), doesn't draw the eye as much. The tank is 141" in diameter, so the pad will stick out about a foot on every side. (Like these... www.plastictanks.ca/prodfiles/LSthingyER5000X141a.pdf www.plastictanks.ca/product.php?prod_id=01356) The tank when full will be holding about 21 Tons, so I made it beefy (water weighs 8.35 lbs per gal X 5000 gal = 41,750 lbs). My Well guy says they don't like to take the pipes through the pad, complicates things unnecessarily, so I didn't put chase in the pad for pipes to pass through. Because the ground was so soft I couldn't ask the Cement truck to back in (I was afraid he'd get stuck) so I hired a pumper to pump it in, which made setting the pad much easier.
Many people set the tanks on a gravel bed instead of concrete slab. Anecdotally, I've heard creatures like to tunnel under, because its cool, over time their tunnels collapse causing the tank to shift and break the connections, causing a mini-flood. I opted for the pad because of this.
We pumped in one pass around the base of the forms to keep it from leaking out as the weight of the concrete filled the forms. The key to getting a flat pad is screeing the concrete in the forms. Make sure you start with level forms, cut off the stakes that protrude upward past the form edge (makes it easier, but you don't have to) so your scree board can pass by easily, over fill the forms a smidge, pull the scree board (crown up) forward slowly leaving behind a smooth pass behind. If there are any low spots, fill them in, run the scree board past it till it comes up filled and smooth. I rented a Bull Float (rectangular 36" X 6" wood board) and two 6' poles and a Fresno (steel, round ended 36" X 6") for $8 a day, for the pour. After the pad sets up a little, use the Bull Float, which brings the "fat" (concrete) to the surface, let it set a while longer, then try a trowel around the edge. Patience is key, try not to over work it. Then when the edges work right with the trowel, hit the pad with the Fresno, make sure not to catch an edge. Wait...... trowel the edge again, if it takes it right, run the Fresno again, or get out on Knee boards and work the surface with hand trowels, do the edges with an edger, sit back, have a Sandwich & Ice Tea, admire your work, touch up and call it a day. Most of my cement work is trial an error, I'm no journeymen, when it counts I bring in a finisher, because I'm not up to the task.
As far as manifolds, at the tank is probably not where you are going to have them. You'll want your pressure tank, pre filter, water softener, etc.., lines protected from frost, probably in some form of shelter. (my pump house) I'm running two 2" lines to the Outbuilding and Main house, one filtered, one agricultural use.
For our area, the Fire Dept won't come to defend your land unless you have a 5000 gal tank minimum and a "T" (Hammerhead) intersection large enough that they can turn around their trucks in and a 2.5" hydrant within 8' of the road. Also the tank has to drain into their truck, not need suction to get the water into the truck. They say it takes 40K to 50K to fight a dwelling fire, so the Fire Dept relies on all your neighbors to have tanks as well, to take on fire. Realistically, I think you are on your own, which is the big danger living in the urban/forest interface.


Then forms and steel (#5 or 5/8 rebar)....


Then get the cement in the hole....


Here is a picture of the tank after it has been installed and the power and water trenches backfilled. I think it blends fairly well.

Then in with Power, which was kind of its own adventure.


I also got DSL installed and working last time I was up. With putting in an on demand water heater, warm showers coming soon, in addition to a small fridge. All the pleasantries and conveniences of home, will be ours when we are away building.
I rented a little trencher to dig about 300' feet of trench to drop the phone line in.


Then a shower pad for the nice warm, on demand water heater (80 amps), nothing better than a shower after getting dirty up on the property.


Then got to work on the stacked stone facade.

Put in some Knee braces to support the large overhangs of the roof we had decided on and create the craftsman style we had settled on. Which were quite a trick to fabricate, not on site. (I guess Rob is the King of preparing things long distance).


Extended the door jambs and started in on the Fiber Cement siding. Because we are building with ICF (insulated concrete forms) we had to screw all the siding down. You can see some white clips hanging from the top of the siding, these allow the next row to go on, without having to level or have someone assist, then snap off when the next row goes up. Made things go faster, used quite a few screws however, boy did I get some blisters.


We were pretty happy with the look when all the ledger-stone and Capstone, as well as all the trim on. We were so late getting out, we had to shoot most of the pictures in the dark. We look forward to how our outbuilding will look with our Well House as the model.


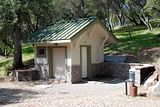
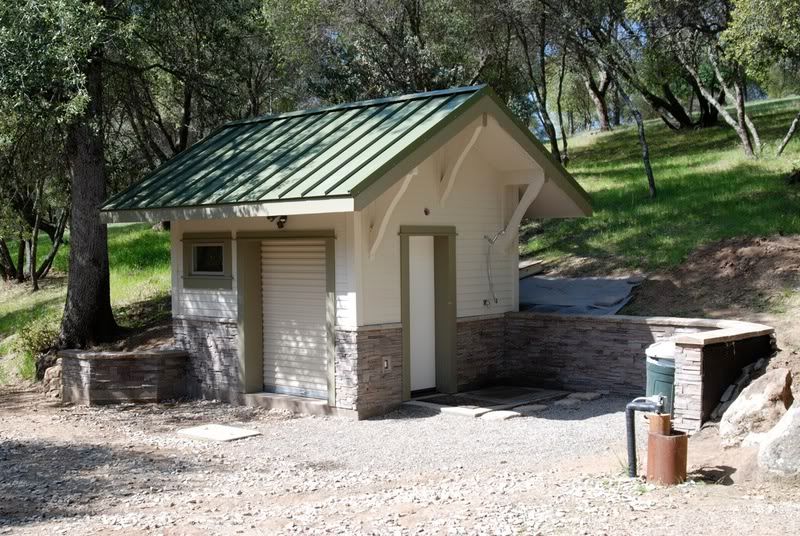
We finally got up during the day and took some pictures after it had the initial coat of paint on. We still have to paint the trim on the knee braces, but getting very close to having this project buttoned up.


Now I can start with the next big one, next weekend we start the footings for our 3200 sq ft "Garage on Steroids"
Some of the things that we wanted to incorporate within the new structures were building techniques I haven’t encountered or used before. One element being ICF (insulated Concrete Forms www.logixicf.com/client/LogixICF/....tallation+Guide), the other element is SIP (Structural Insulated Panels www.premier-industries.com/pbs/).
In our area, fire is the biggest danger, we think the ICF building clad in concrete fiber board, stacked stone waistcoat, with a metal roof and fiber glass(professional.integritywindows.com/protectiveEdge/ultrexAdvantage.cfm) windows will offer great protection for any such calamities that might occur. But before we build the dream home, we decided it would be wise to test build with the materials, before we built out the main house or outbuilding.
Here is a rough idea/plan that we started with, for the "Well House".


What follows is the journey through this experiment while building our “Well House” 30 minutes south of Yosemite at 3200 ft elevation.
First came the drilling of the well.


Then the creation of a flat spot nearby. This was my first experience renting a Tractor a Kabota 21 Horse tractor, I found it a bit underpowered, and decided to go for the 354 when I purchased.

Here is the finished Pad.


We laid it out the best we could, estimating its height and placement of doors and windows and at the time where we thought the storage tank would go. After careful flow calculations we decided we would move it up the hill to get a better rate and instead use the space we created for the tank as parking for a trailer or tractor.

Then we had the trenching and footings to do, my wife was right there digging alongside me. Then laying in the steel.


Then we poured the pad, 8.6 yards of colorized concrete to see if we would like the effect when pouring with colors in our other buildings.


Then came the setting of the ICF block, basically like large legos, deriving their strength from the interlocking design, reinforced with steel and concrete.


Here the third course, with the V buck in place, which is the material used to set the rough openings for the windows and doors.


Then as we get to the fifth course we set the window bracing as we went up.


Above the fifth course, we put up bracing/scaffolding, which provides a work platform as well as the ability to keep the structure plumb.


All the block on, Gable ends in place, pocket in to accept the ridge beam, preparations for the day of the pour, which is rapidly approaching.


Probably doesn’t appear to be that much different with the concrete in the walls than before. The concrete is heavy, note the additional bracing/jacks across the door openings. All the corners are reinforced with packing tape and plywood, to keep from sustaining a blow out. The retaining wall is completed and all the penetrations for power and water have been incorporated, pretty tough to do after the wall is full of concrete, let alone avoiding all the steel.


Got the roof material up to the property, kind of a top heavy load.

Let me tell you setting that 17' 4X10 ridge beam by myself was all I could manage.
Then started the assembly, with my daughters help (she'll love seeing herself here)


Got the roof on, the roll-up door in, the man door in and the windows set.


Here are some of the connection details for how we did the SIP roof.


Here is a few pics of us putting up the roof. I had never done a metal roof before, wasn't that hard, except the manufacturer let his bending jig move around and we ended up with uneven slats, which made one side take more than the other. I could have corrected as I went but I didn't discover it until I was three from the last one, at which time I went back and measured them all. Needless to say the manufacturer wasn't my favorite person by the end of the day. I didn't know what I was doing, so I didn't take up a little brake to help with the bending and ended up using a dead blow to form the bottom 1" bend for each slat, won't make that same mistake again!
I did mention I had help, right? Who could ask for a prettier helper ;D


Wasn't able to get the Ridge cap placed before weather started to get to me, so had to tarp it off until, I could finish up.
The pad is 14' X 14', to accommodate a Tuna Can water tank (low and flat), doesn't draw the eye as much. The tank is 141" in diameter, so the pad will stick out about a foot on every side. (Like these... www.plastictanks.ca/prodfiles/LSthingyER5000X141a.pdf www.plastictanks.ca/product.php?prod_id=01356) The tank when full will be holding about 21 Tons, so I made it beefy (water weighs 8.35 lbs per gal X 5000 gal = 41,750 lbs). My Well guy says they don't like to take the pipes through the pad, complicates things unnecessarily, so I didn't put chase in the pad for pipes to pass through. Because the ground was so soft I couldn't ask the Cement truck to back in (I was afraid he'd get stuck) so I hired a pumper to pump it in, which made setting the pad much easier.
Many people set the tanks on a gravel bed instead of concrete slab. Anecdotally, I've heard creatures like to tunnel under, because its cool, over time their tunnels collapse causing the tank to shift and break the connections, causing a mini-flood. I opted for the pad because of this.
We pumped in one pass around the base of the forms to keep it from leaking out as the weight of the concrete filled the forms. The key to getting a flat pad is screeing the concrete in the forms. Make sure you start with level forms, cut off the stakes that protrude upward past the form edge (makes it easier, but you don't have to) so your scree board can pass by easily, over fill the forms a smidge, pull the scree board (crown up) forward slowly leaving behind a smooth pass behind. If there are any low spots, fill them in, run the scree board past it till it comes up filled and smooth. I rented a Bull Float (rectangular 36" X 6" wood board) and two 6' poles and a Fresno (steel, round ended 36" X 6") for $8 a day, for the pour. After the pad sets up a little, use the Bull Float, which brings the "fat" (concrete) to the surface, let it set a while longer, then try a trowel around the edge. Patience is key, try not to over work it. Then when the edges work right with the trowel, hit the pad with the Fresno, make sure not to catch an edge. Wait...... trowel the edge again, if it takes it right, run the Fresno again, or get out on Knee boards and work the surface with hand trowels, do the edges with an edger, sit back, have a Sandwich & Ice Tea, admire your work, touch up and call it a day. Most of my cement work is trial an error, I'm no journeymen, when it counts I bring in a finisher, because I'm not up to the task.
As far as manifolds, at the tank is probably not where you are going to have them. You'll want your pressure tank, pre filter, water softener, etc.., lines protected from frost, probably in some form of shelter. (my pump house) I'm running two 2" lines to the Outbuilding and Main house, one filtered, one agricultural use.
For our area, the Fire Dept won't come to defend your land unless you have a 5000 gal tank minimum and a "T" (Hammerhead) intersection large enough that they can turn around their trucks in and a 2.5" hydrant within 8' of the road. Also the tank has to drain into their truck, not need suction to get the water into the truck. They say it takes 40K to 50K to fight a dwelling fire, so the Fire Dept relies on all your neighbors to have tanks as well, to take on fire. Realistically, I think you are on your own, which is the big danger living in the urban/forest interface.


Then forms and steel (#5 or 5/8 rebar)....


Then get the cement in the hole....


Here is a picture of the tank after it has been installed and the power and water trenches backfilled. I think it blends fairly well.

Then in with Power, which was kind of its own adventure.


I also got DSL installed and working last time I was up. With putting in an on demand water heater, warm showers coming soon, in addition to a small fridge. All the pleasantries and conveniences of home, will be ours when we are away building.
I rented a little trencher to dig about 300' feet of trench to drop the phone line in.


Then a shower pad for the nice warm, on demand water heater (80 amps), nothing better than a shower after getting dirty up on the property.


Then got to work on the stacked stone facade.

Put in some Knee braces to support the large overhangs of the roof we had decided on and create the craftsman style we had settled on. Which were quite a trick to fabricate, not on site. (I guess Rob is the King of preparing things long distance).

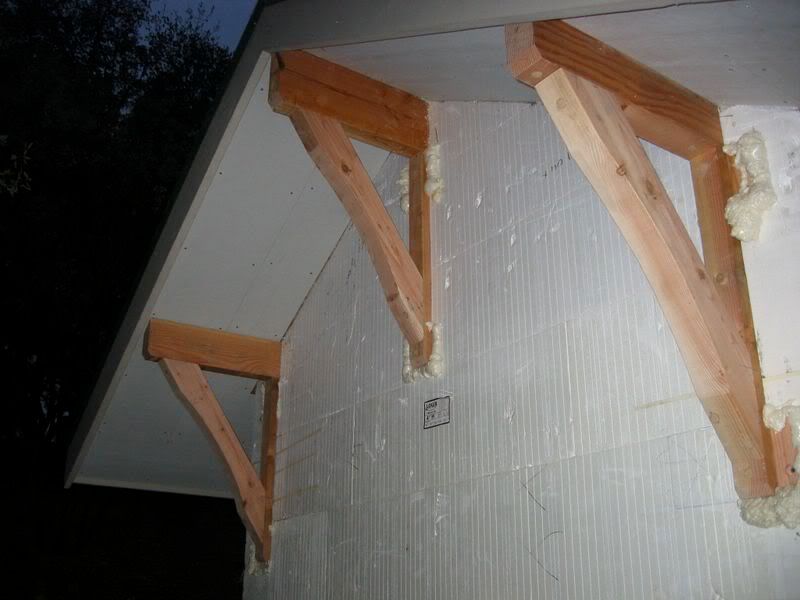
Extended the door jambs and started in on the Fiber Cement siding. Because we are building with ICF (insulated concrete forms) we had to screw all the siding down. You can see some white clips hanging from the top of the siding, these allow the next row to go on, without having to level or have someone assist, then snap off when the next row goes up. Made things go faster, used quite a few screws however, boy did I get some blisters.


We were pretty happy with the look when all the ledger-stone and Capstone, as well as all the trim on. We were so late getting out, we had to shoot most of the pictures in the dark. We look forward to how our outbuilding will look with our Well House as the model.


We finally got up during the day and took some pictures after it had the initial coat of paint on. We still have to paint the trim on the knee braces, but getting very close to having this project buttoned up.


Now I can start with the next big one, next weekend we start the footings for our 3200 sq ft "Garage on Steroids"


