|
|
Post by bracabric on Mar 24, 2008 10:49:11 GMT -5
Oh! Shit!
Dick
|
|
3RRL
Administrator  Huge Kama
Posts: 2,027 
|
Post by 3RRL on Mar 26, 2008 20:18:23 GMT -5
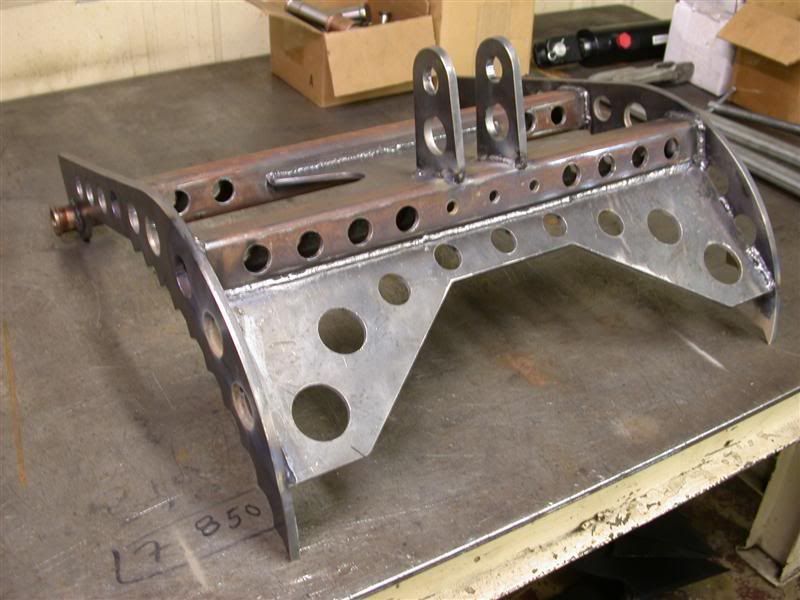
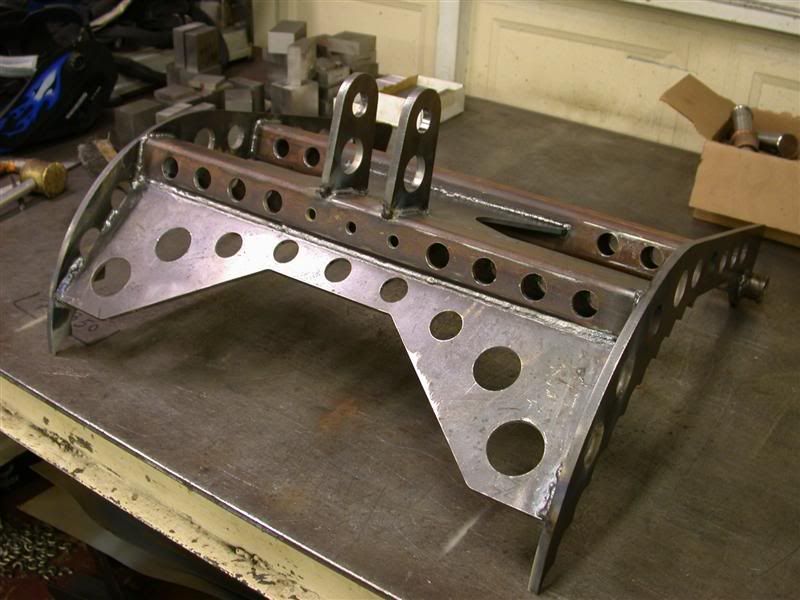
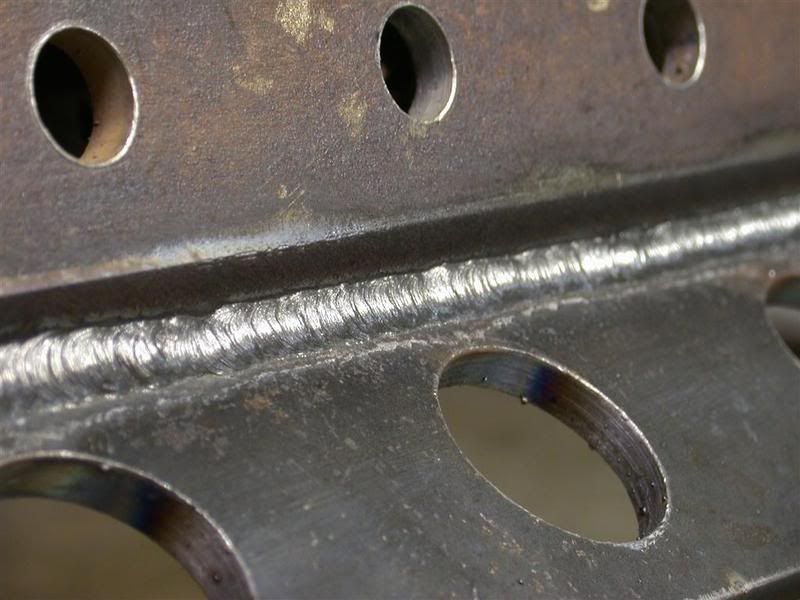
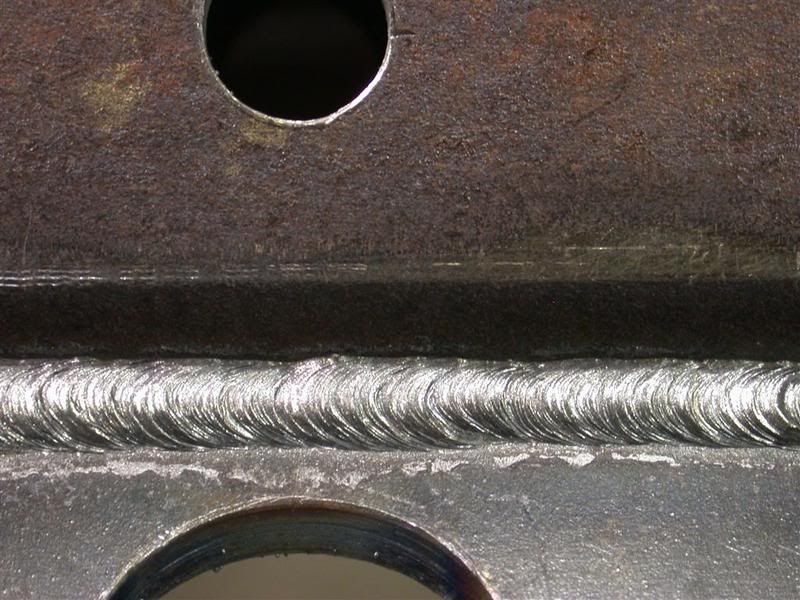
Thanks for the comments on Loretta's grapples guys. Larry, special thanks to you for sharing all those post about how you got the grapples plasma cut and you and Esther getting them all ready for Loretta. I hope Ken takes special interest to see how her grapples are coming along now. Since the last update, Loretta's grapples have been welded together. There are still pins to make with grease fittings like on the quick attach gauge wheels, and of course all the valve and plumbing required to get them working on her Jinma. One thing she has not picked out yet is that joystick handle that Larry posted. We don't have a switch for the solenoid valve yet. But anyway, here are a couple shots of her welded up grapples now, and some close up of the better AC stick welds. 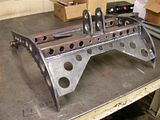 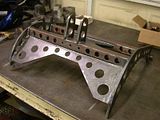 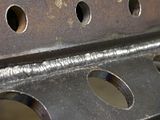 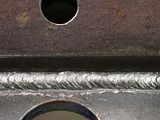 Rob- |
|
GuglioLS
Administrator
Jinma354 LE
Posts: 1,276
|
Post by GuglioLS on Mar 26, 2008 21:37:04 GMT -5
Oh man, does that looking futuristic now or what?
Best grapple I've see in my life. How much does it weigh now with all those lightening holes, very cool Loretta and Rob.
OK who did the welds? they are first class high quality, best welds I have seen you post, especially for AC stick, you sure they are stick welds?
Better get the valve handle with switches, it won't be long now before Loretta will be wanting and needing to use her new grapple.
Super impressive -
Larry
|
|
3RRL
Administrator
Huge Kama
Posts: 2,027
|
Post by 3RRL on Mar 26, 2008 23:13:36 GMT -5
Oh man, does that looking futuristic now or what? Best grapple I've see in my life. How much does it weigh now with all those lightening holes, very cool Loretta and Rob. OK who did the welds? they are first class high quality, best welds I have seen you post, especially for AC stick, you sure they are stick welds? Better get the valve handle with switches, it won't be long now before Loretta will be wanting and needing to use her new grapple. Super impressive - Larry Thanks Larry, I can't take all the credit, since Loretta wanted more lightening holes. I just weighed those jaws and you won't believe it ...they are exactly 50lbs all welded up like that. That is pretty light compared to what they would be without holes. I calculated the top plate (1/2 x 6 x 32") to be 27.2lbs. The pivot brackets and pins (all) weigh 10.8lbs and the cylinder weighs 15.9lbs. So that's 103.9lbs for the whole shebang! If I decide to use the back plate behind the bucket lip, add another 27.2lbs. for a grand total of 131.1lbs. But that is not really what it will weigh because I'm planning to use only 6" x 6" squares under the pivots instead of the entire plate across the top to cut the weight down. If I do that for the top and back, they will weigh 30.6lbs. that will make the entire thing weigh 107.3lbs with top and back stiffening plates. Thanks for the welding compliment. I know that must be hard for you to do. Those welds are 7018 AC arc welds done with my 35 year old Forney arc welder by yours truly. I had my reading glasses on this time. lol ... They are obviously x-ray quality.  I guess I'll order that joystick handle and switch now. I'll have to scrounge where the links are and which ones you got. I know you sent that information to me a couple times already. I wish Loretta would get off her butt and do some of this stuff. hahaha ;D Rob- |
|
GuglioLS
Administrator
Jinma354 LE
Posts: 1,276
|
Post by GuglioLS on Mar 27, 2008 0:05:48 GMT -5
I guess I'll order that joystick handle and switch now. You Guess? What? Are you waiting for me to order it for you? I'll have to scrounge where the links are and which ones you got. I know you sent that information to me a couple times already.Yea at least a couple times. OK here for the N th and last time: Home PageS series handleHandle specsMounting optionsParts ListI ordered a two button model without a trigger to keep it simple and lower cost, with a 10mm X 1.5 thread pitch mount bushing. Did you measure the threads on the new FEL valve? Wait, let me answer that for you - "no" You got so many projects going on, maybe keep a running "to do list"? Larry
|
|
3RRL
Administrator
Huge Kama
Posts: 2,027
|
Post by 3RRL on Mar 27, 2008 10:37:57 GMT -5
Hahaha, I love your sick humor Larry!!! You Guess? What? Are you waiting for me to order it for you?
lol ... Yeah, I keep checking my UPS to see if there's a package from you.  OK ... OK ... I'll order it!!! Shees ... I'm beginning to feel like Ken. ;D |
|
3RRL
Administrator
Huge Kama
Posts: 2,027
|
Post by 3RRL on Mar 27, 2008 17:44:30 GMT -5
Well, I just got off the phone with Scorpion Industries and placed the order for a joystick handle. Brian, the owner himself sent me a quote via fax within 5 minutes. I mentioned Larry's name and he new Larry and the Forum so he gave me a super deluxe discount. When I got the fax I called to place the order with Eden who was great to talk to. I got the "S" series customized handle with a rocker kit switch installed and an m10 x 1.5 mounting adapter all for $112.00!! They will UPS it to me tomorrow. Now, we have to measure and make the hoses running to the FEL cross bar and also those going to the hydraulic cylinder for the final grapple connection. Last weekend we started fitting the electric solenoid valve mounting bracket to Loretta's Jinma. It is on the left FEL mounting tube. We made a bracket at camp to accept the DO3 subplate. We also got ORB fittings to screw into the subplate and got two short hoses made up that will connect to quick couplers. We also made a bulkhead bracket (painted yellow) mounted to the tractor's left FEL upright which will get the hoses and quick connects leading to the front. That way, if Loretta ever takes her FEL off, she can undo those fittings right there. Here is a preview of that. 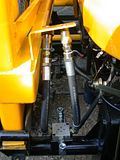 |
|
GuglioLS
Administrator
Jinma354 LE
Posts: 1,276
|
Post by GuglioLS on Mar 27, 2008 22:02:58 GMT -5
Hahaha, I love your sick humor Larry!!! You Guess? What? Are you waiting for me to order it for you?
lol ... Yeah, I keep checking my UPS to see if there's a package from you. OK ... OK ... I'll order it!!! Shees ... I'm beginning to feel like Ken. ;D HaHaHa - well sorry to bust your chops Rob, I was just loosing my patients wondering if you were ever going to order that handle. Glad to see you finally got a-round-tuit Larry |
|
GuglioLS
Administrator
Jinma354 LE
Posts: 1,276
|
Post by GuglioLS on Mar 27, 2008 22:39:49 GMT -5
........all for $112.00!! Nice deal - that's a better than I got and I tried to send them a bunch of referrals. Maybe it's time for me to contact Brian and pull in a favor? except I don't really need another handle (yet). Anyway glad you got that handle ordered. OH and don't forget to install diodes across the solenoids to protect the switch contacts - very important you do that. Whenever a switch is used on a solenoid, or any type of inductive load (coils of wire wrapped around a ferris metal core) with DC (Direct Current) You REALLY should install a diode across the solenoid to protect the switch contact from arcing. A diode will short out the resultant reverse current generated by the coil when the switch is opened, (It prevents arcing across the switch contacts extending switch life). So here is the Diode I added to the solenoid connector on my grapple. One diode per solenoid coil. Make sure the polarity is correct! i.e. The white band on the diode is connected to the + side going to the coil. I used a 2.5 amp 1000 volt diode (NTE125) 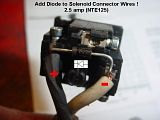 Radio Shack carries diodes. Larry
|
|
3RRL
Administrator
Huge Kama
Posts: 2,027
|
Post by 3RRL on Mar 27, 2008 23:17:51 GMT -5
Thanks for the reminder.
I should do that to my Kama solenoid grapple switch too then, right?
Say, do our ignition switches need it too when engaging the starter solenoid?
Do they have that already wired in?
Rob-
|
|
GuglioLS
Administrator
Jinma354 LE
Posts: 1,276
|
Post by GuglioLS on Mar 28, 2008 0:12:03 GMT -5
Yea, I would eventually install diodes on the Kama grapple solenoids. The rocker switch for your Kama grapple is a fairly heavy duty rocker switch, so it will last a long time with out them, but installing them will extend the life of the contacts.
The Switches in the s-series handle grip are miniature push button switches, the contact surface area is quite small so they are not very resistant to arching when the switch is released. Diodes short out that energy to eliminate the arching.
Say, do our ignition switches need it too when engaging the starter solenoid?
You bring up a good point with that question, - No there is no diode installed across the starter solenoid, If one was installed it would extend the life of the starter switch many hundreds of thousands of cycles. I bet the reason those switches eventually fail is because there is no diode across them. I have not put one across mine, but now that you mention it, I think I will.
Larry
|
|
3RRL
Administrator
Huge Kama
Posts: 2,027
|
Post by 3RRL on Mar 28, 2008 16:05:53 GMT -5
So you put the diode directly across the solenoid terminals, not at the switch terminals? I'd like to do that to all the solenoids then.
Can you use that same diode for all solenoids?
2.5 amp 1000 volt diode (NTE125)
I'll get a whole herd of them at Radio Shack.
BTW, the switch I ordered for Loretta's grapple is a rocker switch, not the push button like you have.
Rob-
|
|
GuglioLS
Administrator
Jinma354 LE
Posts: 1,276
|
Post by GuglioLS on Mar 28, 2008 19:01:35 GMT -5
So you put the diode directly across the solenoid terminals, not at the switch terminals? I'd like to do that to all the solenoids then.
Either location works, it might be easier to install it near the solenoid. Installing it at the solenoid is also better practice as it absorbs the energy at the source.
Can you use that same diode for all solenoids? Yea that would work fine.
Just make sure to get the correct polarity on the diode - Cathode (white band on the diode goes to the positive lead)
Larry
|
|
3RRL
Administrator
Huge Kama
Posts: 2,027
|
Post by 3RRL on Mar 30, 2008 22:28:58 GMT -5
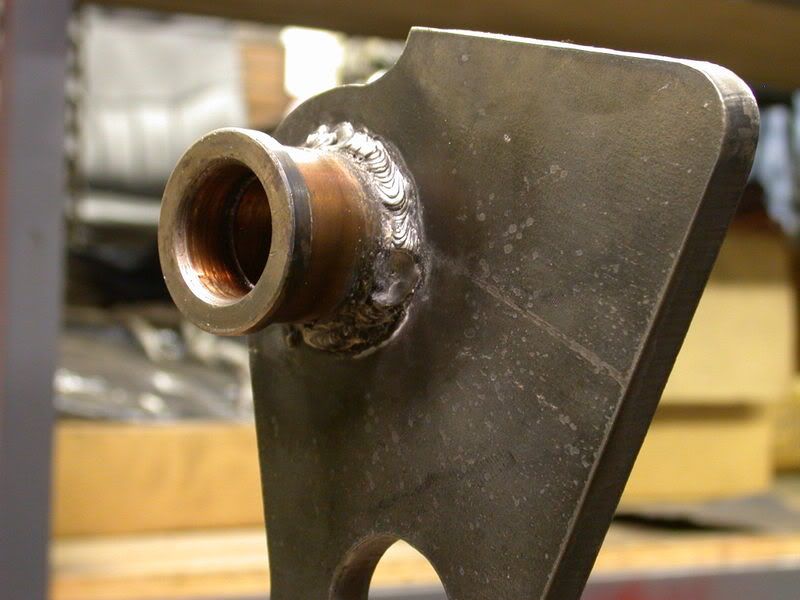
The first set of grapples you saw (made for Ken) have DOM tubing, but Loretta's (the last photos) have hardened shoulder bushings in them. I have several boxes with old leader pins and bushings from plastic injection molds. When I do a P&M (prevention and maintenance) on the molds, I replace them but keep the old ones for projects like this. Here is a photo of some spares. Also a shot of Loretta's grapples with the bushings welded in. 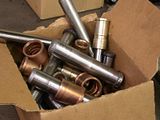  New they are very close tolerance (.001" clearance max) and some I replace are still very good. They align the two halves of the mold so the mating surfaces can match up. They have a very thin coating of Lamina, a bronze alloy for wear and lubricity. Some of the older ones can get worn down to where there is over .001" clearance ... maybe two or three thousands or more. Those make great pins and bushings for our home made projects since they are hardened and work fine for non critical pivots like these grapple pivots. Rob- |
|
3RRL
Administrator
Huge Kama
Posts: 2,027
|
Post by 3RRL on Mar 30, 2008 22:57:53 GMT -5
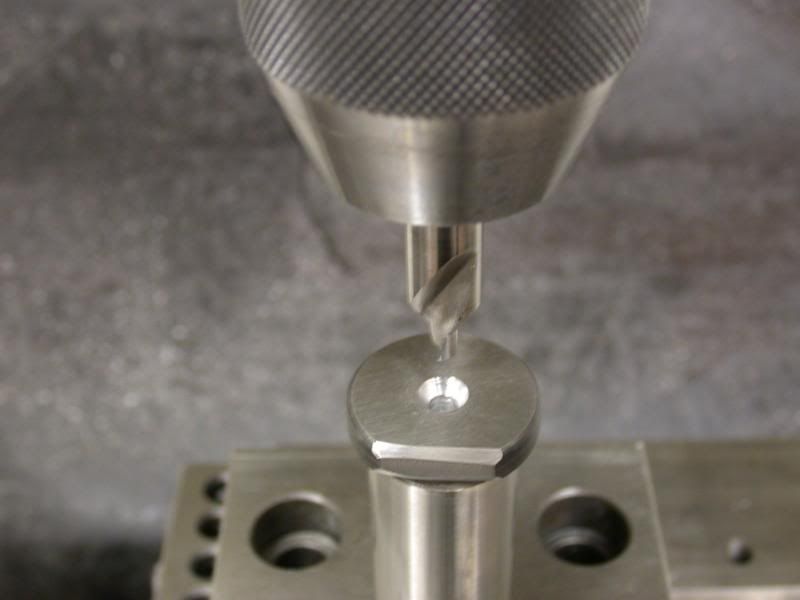
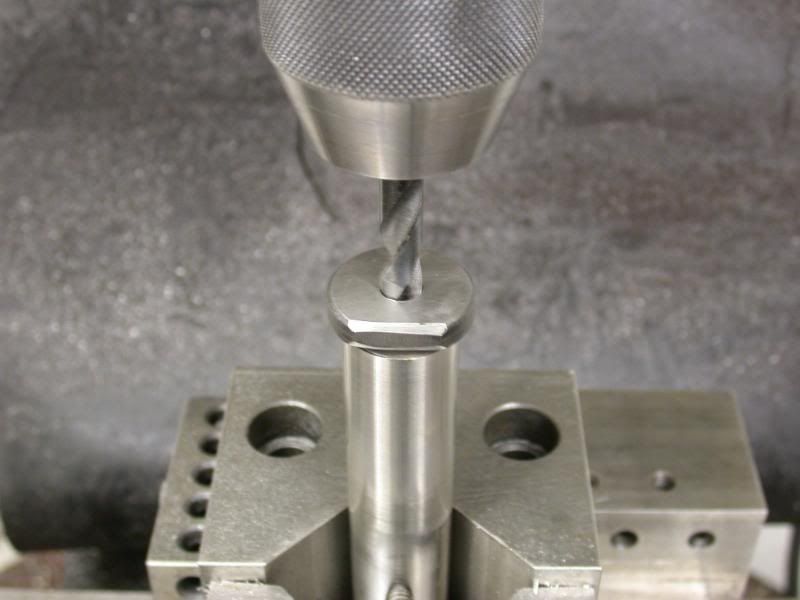
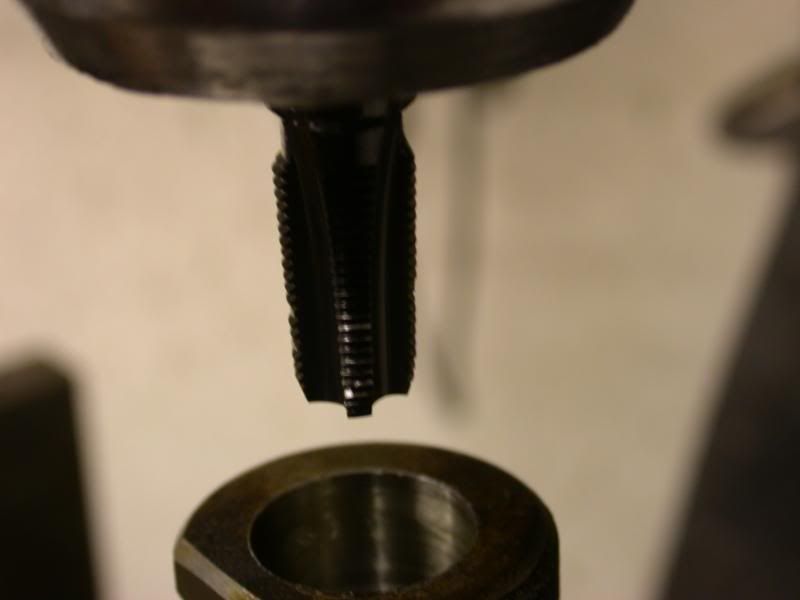
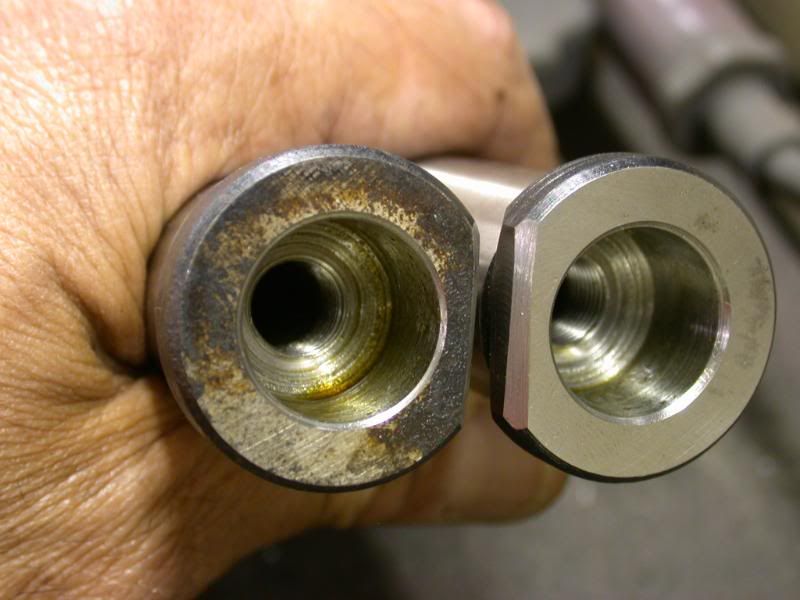
While on the subject, do you want to see some boring details what is involved in making the pins so they can be greased? I thought so.  It takes a little work, but the way I make them allows the Zerk fitting to sit below the surface in a protective pocket to reduce the chance of it getting snapped off. It also gets the grease right between the pin and the bushing. Overkill? Well, whatever floats your boat, right?  Here is the process in detail. I set up the pin in a "V" block in the mill and centerdrill, drill and counterbore. The drill is the tap drill for a 1/8NPT-27 thread, which is what the Zerk fitting thread is. 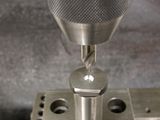 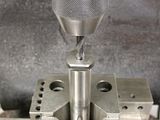 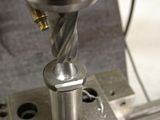 Those pins are case hardened, so once you get through the hardened surface, the center is soft enough (about 36RC) to cut and drill with high speed. But be careful when tapping with tapered threads. In order to reduce the chance of breaking a pipe tap, I use a pipe reamer first, then tap for about 7-8 threads engagement. So that's what the end looks like. Ready for the Zerk fitting. A chamfer makes for nice finished touch. 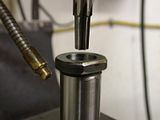  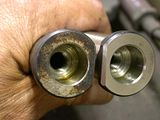 Rob- |
|