3RRL
Administrator  Huge Kama
Posts: 2,027 
|
Post by 3RRL on Apr 8, 2008 13:32:03 GMT -5
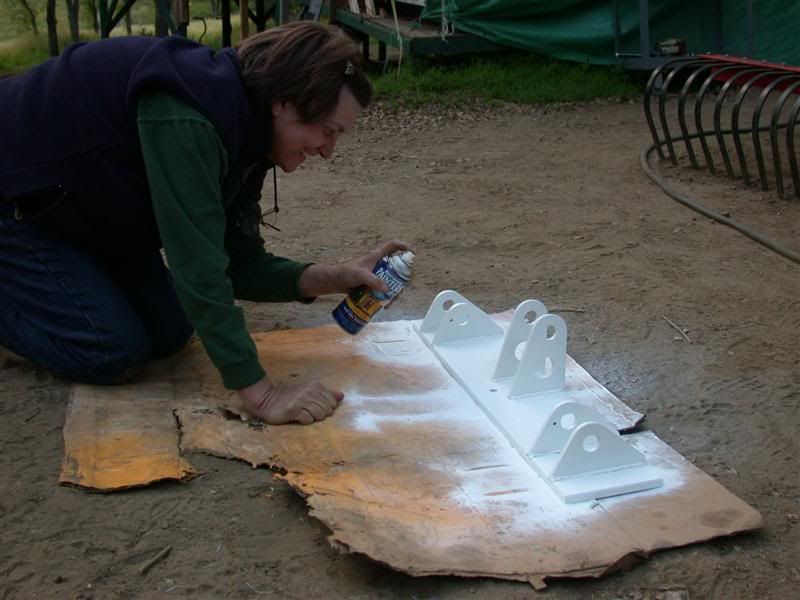
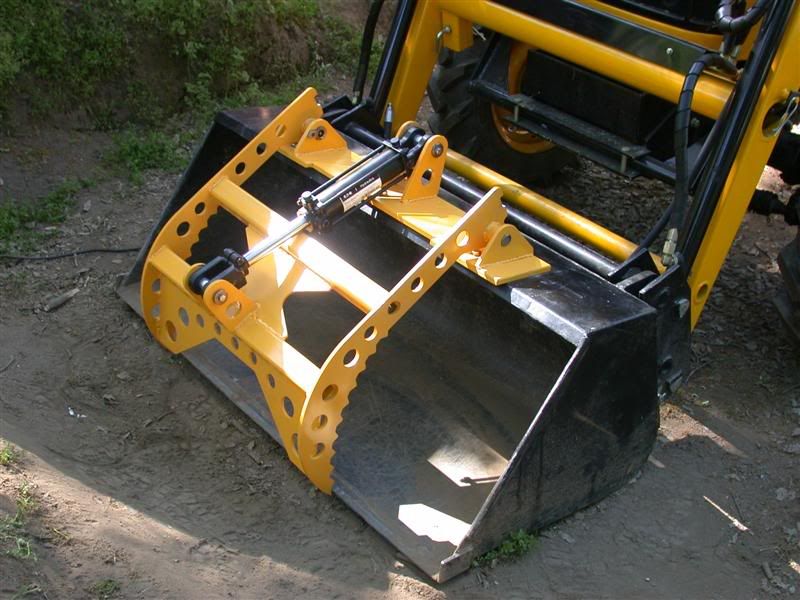
Loretta got her Scorpion joystick handle and it sure looks good! It has a rocker switch in it to control the solenoid valve. Only thing was since it is a lot longer than the other handle, it stuck way out from the valve. I had to cut the handle bar down a little.  She also had me change the position on the valve so it would be closer to her grasp and vertical instead of horizontal. There's a funny story about when it was horizontal and the functions were opposite of what she wanted, but there's a change to it coming. I had to change the mounting bracket a little for this, but will make another one next time up. This 45° mounting also allows her to enter the tractor from the right side now. Anyway, here's what the new Scorpion handle looks like.  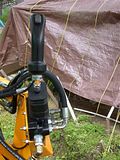  |
|
GuglioLS
Administrator
Jinma354 LE
Posts: 1,276
|
Post by GuglioLS on Apr 8, 2008 20:49:18 GMT -5
HaHaHa 1+2=3 LOL yea and it took the entire legal pad to figure that out  J/K Looking Good Rob and Loretta, Nice paint job too on the super futuristic looking grapple jaw assembly, and the new Scorpion technologies handle is sweet. I had to cut the handle bar down a little:A little? you mean cut it down to a nubby little stubby, HaHaHa. OK I want to know the real story about Valve placement? Did it go something like this? - Loretta to Rob - Honey - I want my valve to operate upside-down and back-wards from normal, it that OK?Rob- Sure, no sweat, I can do that, Let me get this straight... what you mean is when I, or anyone else drives your tractor we can crash the FEL bucket into an object because we will move the valve the wrong way to clear the object, Is that correct?Loretta:
Yes, ExactlyRob-
OK - WhateverTo please Loretta, Rob proceeds to modify the mounting plate then install the valve upside-down and back-wards, What a guy... A week later, after Rob has crashed the FEL bucket into everything in sight..... Loretta -
Rob Honey, my dear, can you RE-install the valve? I think that Lucky horseshoe charm need to face out-wards, it would make for better Fungswey.Rob -
WHAT
Sure no problem Loretta Dear, I'll get right on it......Let me get this straight... You want me to disconnect all the hoses, un-modify the valve bracket, install it the way it was designed, then re-route and re-install the hoses so the horse shoe faces outward? IS that your FINAL answer?Loretta-
Well...maybe not my final answer, but that's not going to be a problem is it?Rob-
No Problem, you know I will do that for you, it will help to increase my post count (grumble, grumble:  Is that sort of how it went? Inquiring minds need to know... You two are a riot, I hope you don't mind this little parody to poke a little fun do you? Larry |
|
3RRL
Administrator
Huge Kama
Posts: 2,027
|
Post by 3RRL on Apr 11, 2008 0:31:20 GMT -5
OMG!!! HAHAHA!!!! ;D ;D  ;D ;D |
|
3RRL
Administrator
Huge Kama
Posts: 2,027
|
Post by 3RRL on Apr 13, 2008 23:30:01 GMT -5
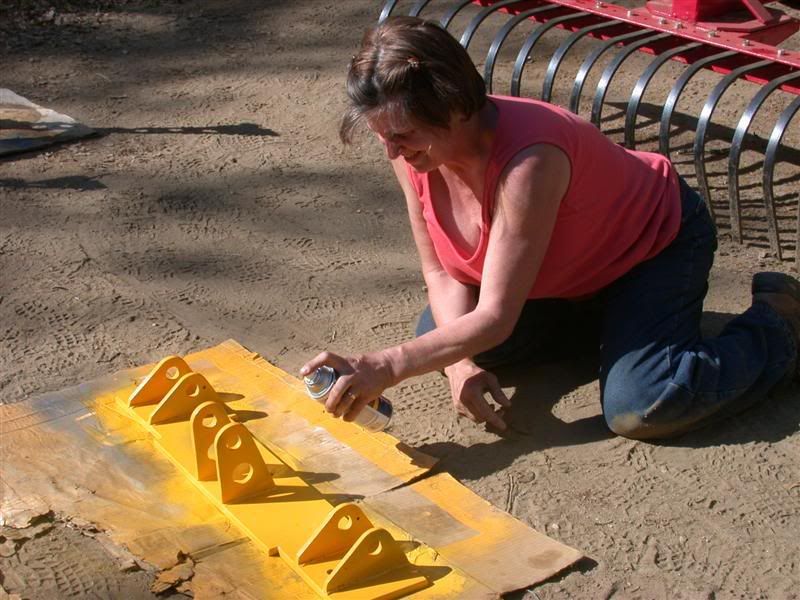
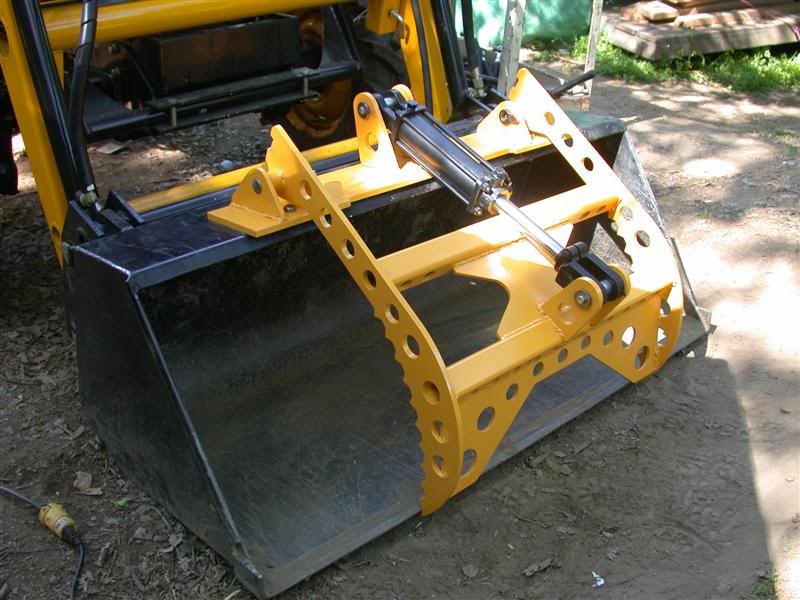
The last visit up was to get the hoses all plumbed, but I got a couple of them made too long and also with the wrong ends on them ... oh just great. So we need to go back next week to get that part fixed. The other thing we did was to weld the pivot mounts to the mounting plate. That part went a little better. We fit the grapples on and checked the lower and upper positions, then I welded them all up. They will bolt onto the top of her bucket. Here's Loretta staring to paint them.  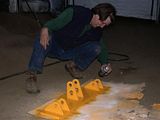 Of course I did all the fitting by memory since I forgot to bring a drawing up with me. I thought I got them in the right place but screwed that up too. I had to cut the plate into 3 sections and move the cylinder pivot back a half inch to be correct. CRAP!!!  So here is Loretta painting them AGAIN after I finished welding them back up. I blamed it all on having to meet with the builders several times about that darn log home project and I couldn't concentrate.  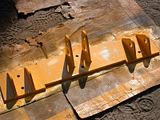 Rob- |
|
GuglioLS
Administrator
Jinma354 LE
Posts: 1,276
|
Post by GuglioLS on Apr 14, 2008 11:17:44 GMT -5
Hi Rob,
Is this turning out to be the grapple from hell? What did you use to slice through the 1/2" plate? did you do that at camp? looking at the jaw brackets, I am assuming they were welded on backwards making the jaw open and close geometry slightly off, is that correct? Bummer man, I would blame it on having to install the FEL valve backwards, then forward, then backward, then back again. Sooner or later it will all come together.
Larry
|
|
3RRL
Administrator
Huge Kama
Posts: 2,027
|
Post by 3RRL on Apr 14, 2008 11:41:56 GMT -5
Ha...grapples from Hell ... that's a good one!
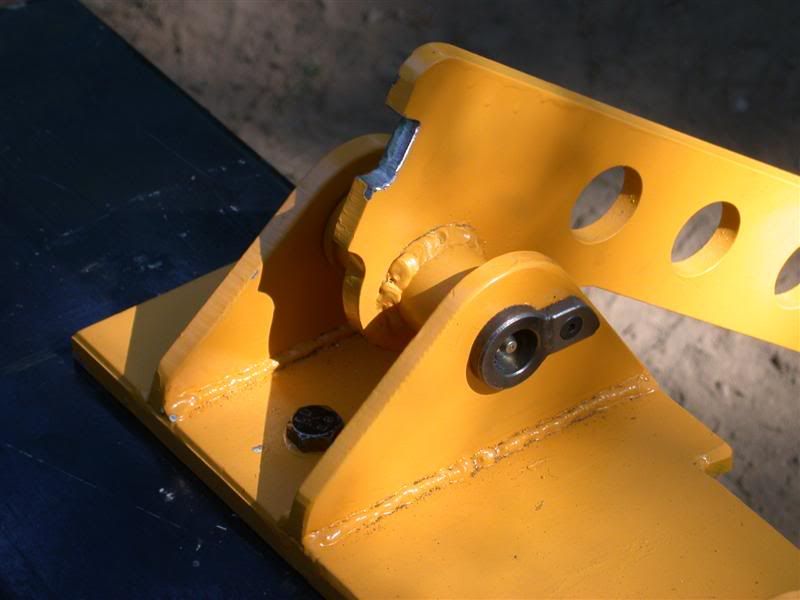
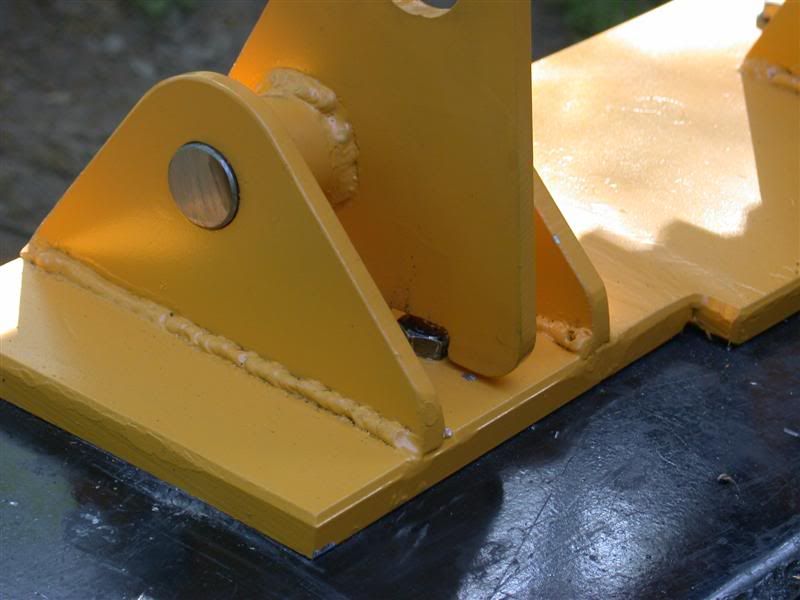
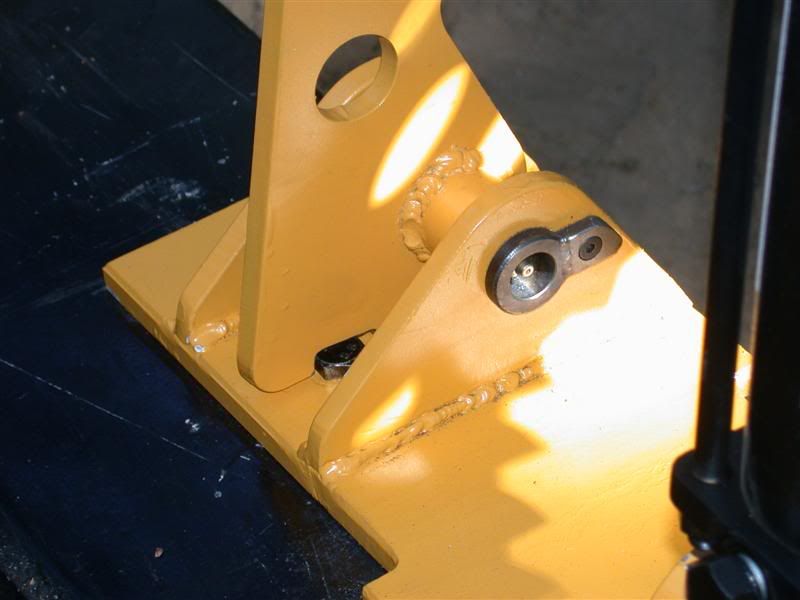
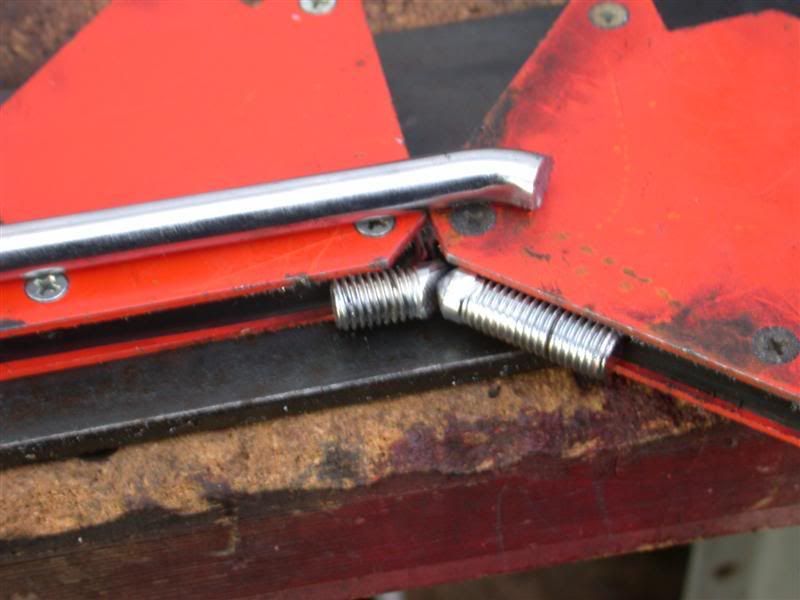
What happened is on the design for Ken's bucket and Loretta's bucket, the top lip is wider than 6". Ken brought me 6" wide plates and I took it for granted they were the correct width ... NOT! It should have been 6-½" wide.
So the key is to line up the 2 jaw brackets and the center hyd cyl bracket to the rear of the plate ... which I did, but the plate was only 6" wide. I needed to scoot the center hyd cyl bracket back a half inch because the cylinder was hitting the rear cross brace bar.
At first I thought I got the wrong cylinder because it should have cleared that cross brace bar. Then when I figured it out, I realized the distance between pivots was incorrect by a half inch. Then, I couldn't use my little bandsaw because the steel plate didn't fit between the throat. I had to use a saws-all to make all those cuts on the 1/2" thick plate! That took a long time to make straight cuts, but I did it.
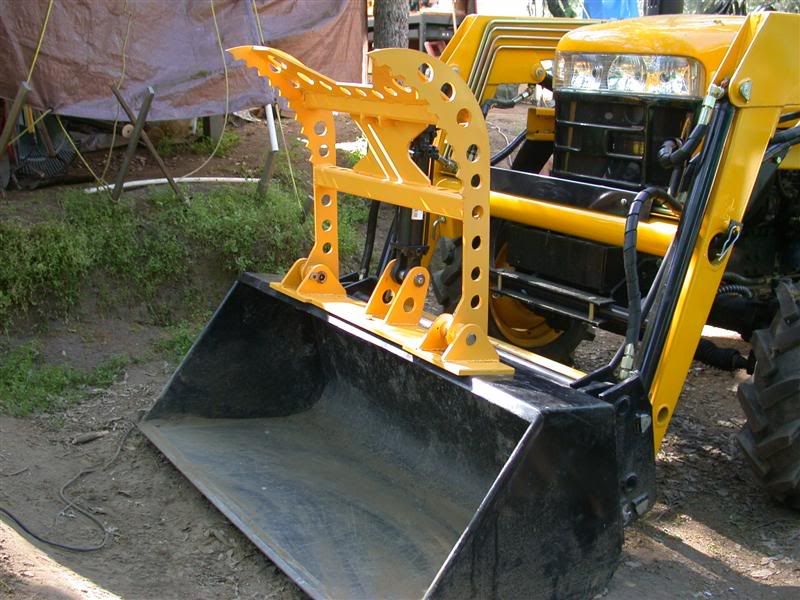
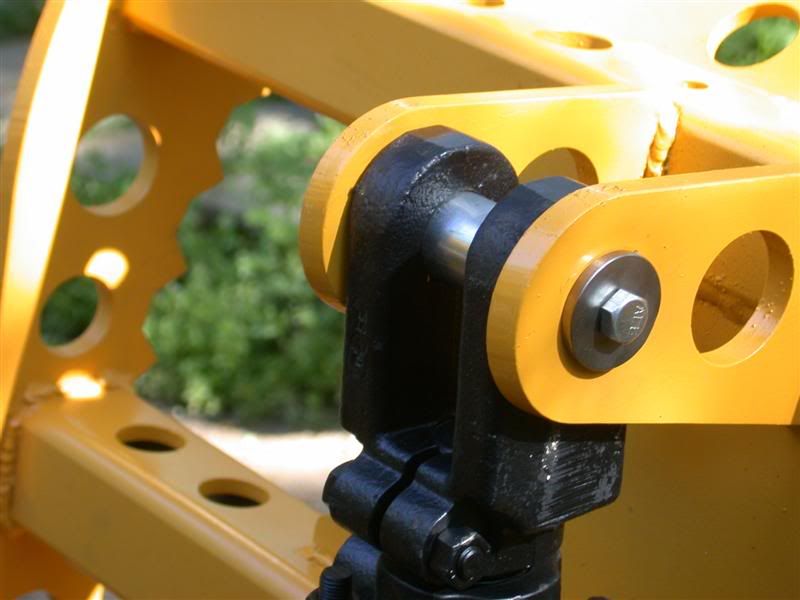
The bolt on idea is cool too, because now Loretta can take the grapples off the bucket. We are buying Scott's fork lift attachment and will bolt the grapple on it for clearing brush. I just need to make a mount for the fork lift attachment is all. She has a quick attach bucket on her 284.
Rob-
|
|
3RRL
Administrator
Huge Kama
Posts: 2,027
|
Post by 3RRL on Apr 18, 2008 11:00:25 GMT -5
|
|
3RRL
Administrator
Huge Kama
Posts: 2,027
|
Post by 3RRL on Apr 18, 2008 11:05:46 GMT -5
|
|
3RRL
Administrator
Huge Kama
Posts: 2,027
|
Post by 3RRL on Apr 18, 2008 11:17:09 GMT -5
|
|
3RRL
Administrator
Huge Kama
Posts: 2,027
|
Post by 3RRL on Apr 18, 2008 11:24:23 GMT -5
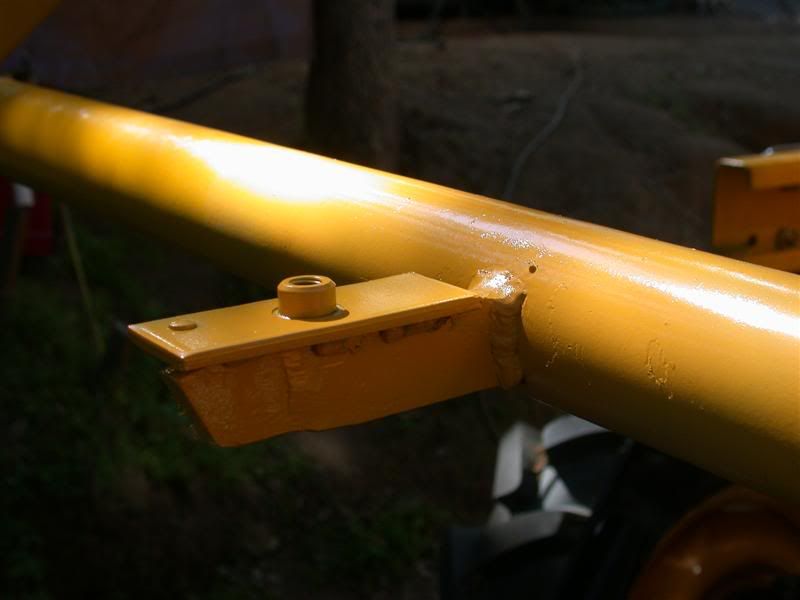
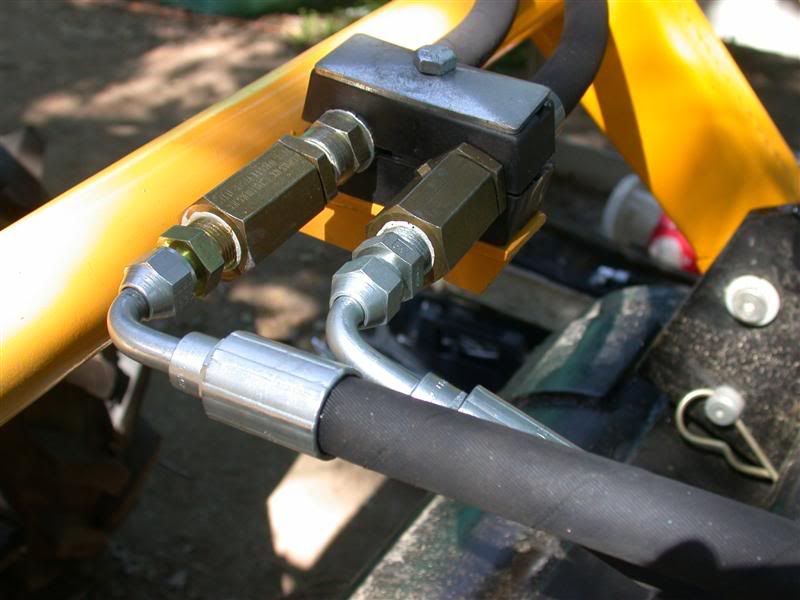
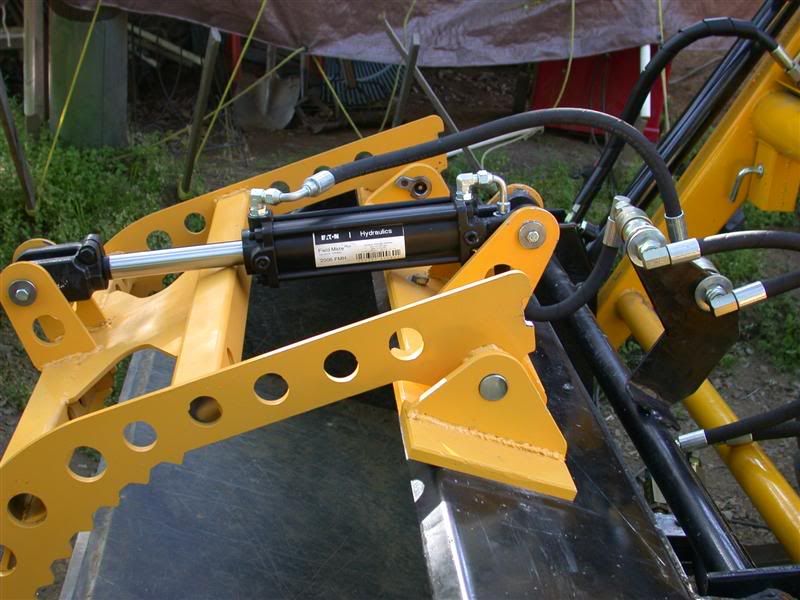
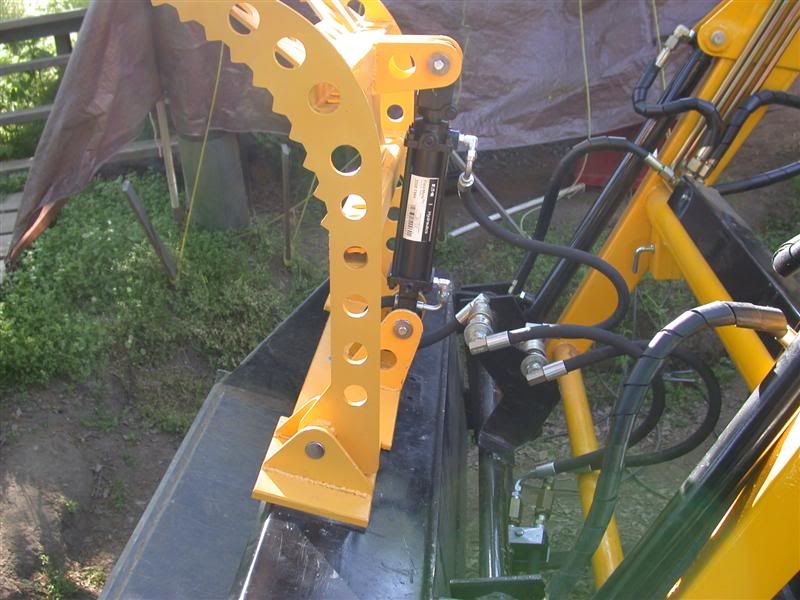
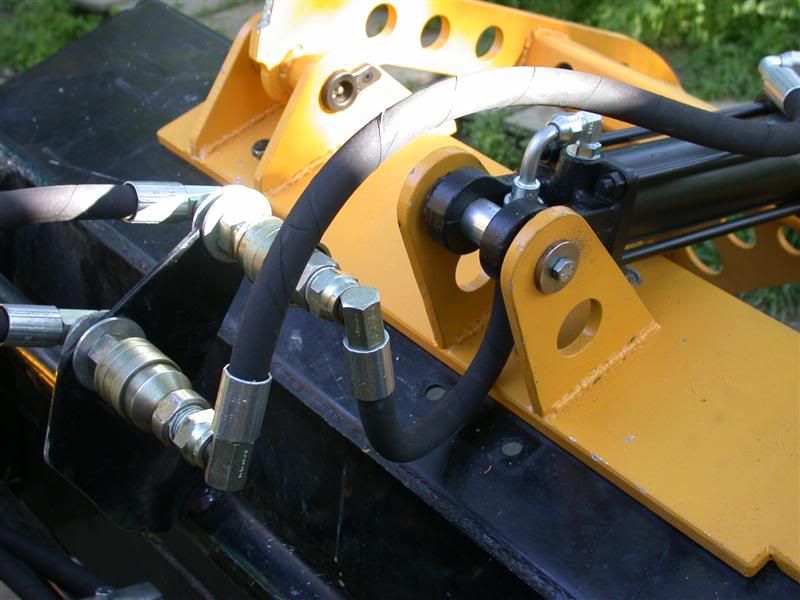
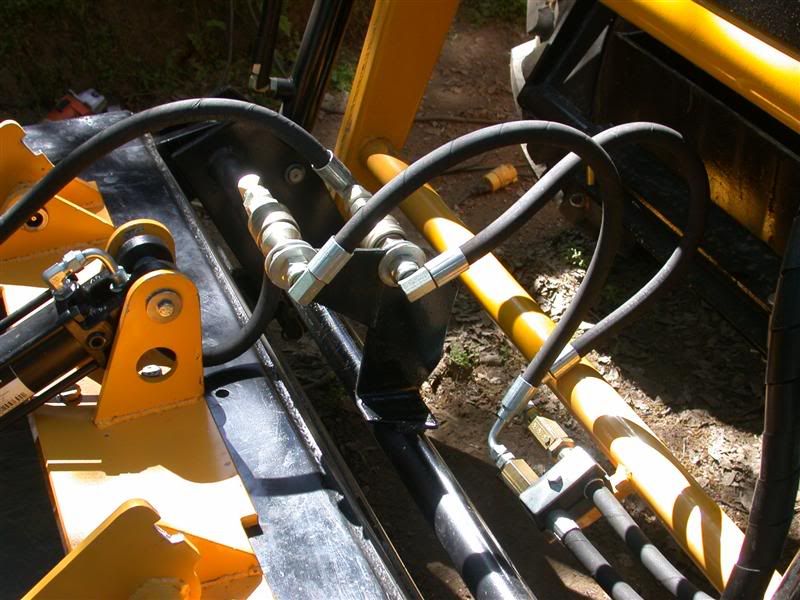
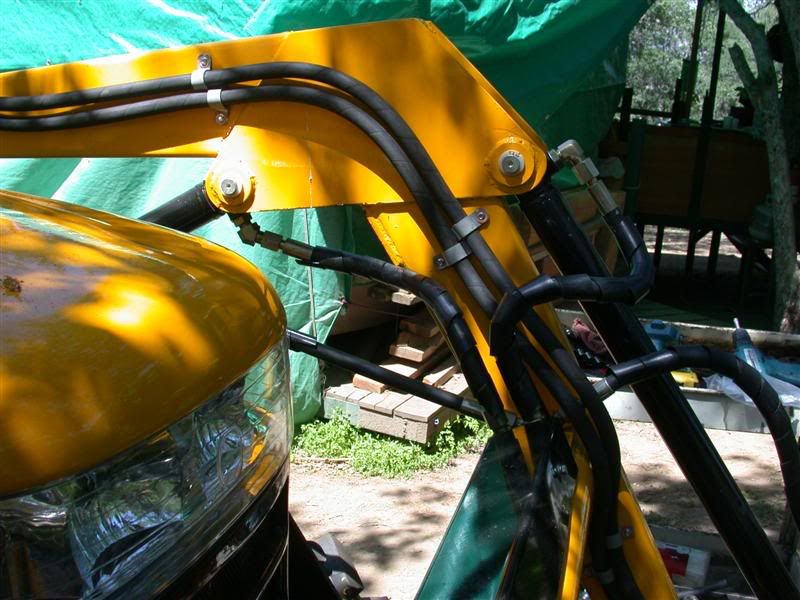
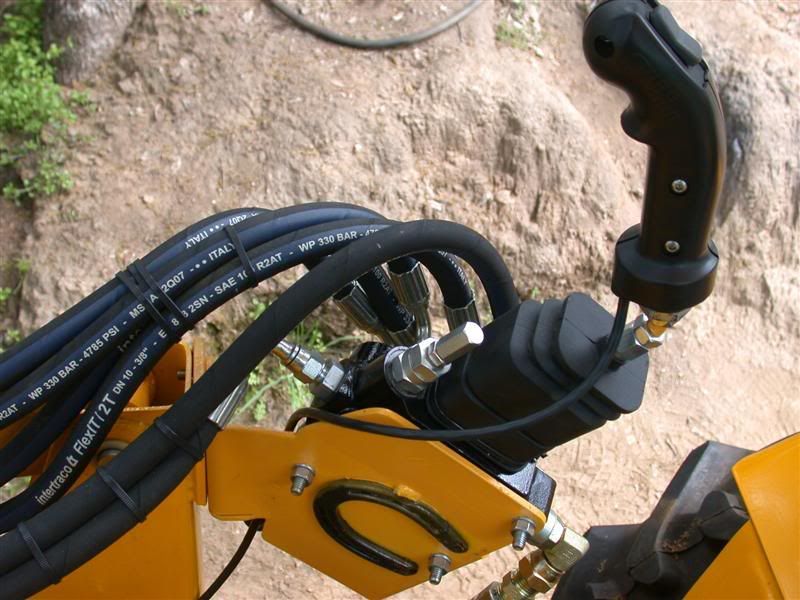
So pretty much, we got all the plumbing to the grapple cylinder completed. We tried out the fully raised and fully dumped positions to be sure there is enough length for all the hoses. We also got the rest of the hoses routed and fastened to the FEL arms in the manner we wanted. They are now connected to the electric over hydraulic solenoid valve. They are connected via QC's there, so if she ever takes the loader off they can disconnect right there. The valve stays on the tractor and the FEL and all those hoses go with it. It all came out pretty clean for a do it yourself job at camp.   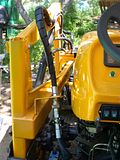 |
|
3RRL
Administrator
Huge Kama
Posts: 2,027
|
Post by 3RRL on Apr 18, 2008 11:43:46 GMT -5
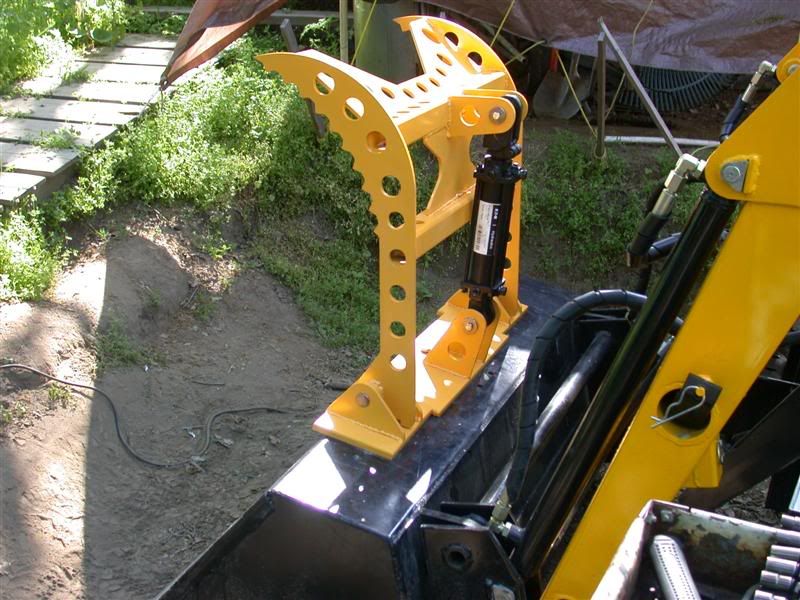
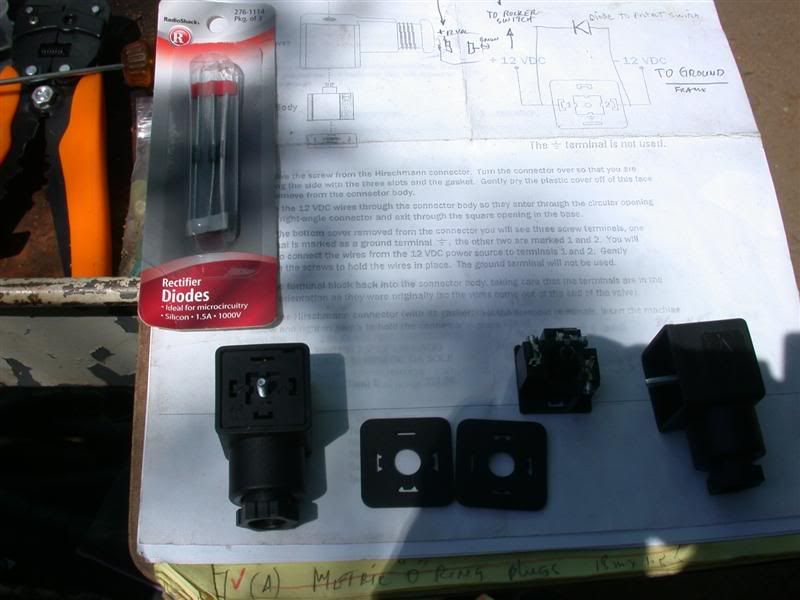
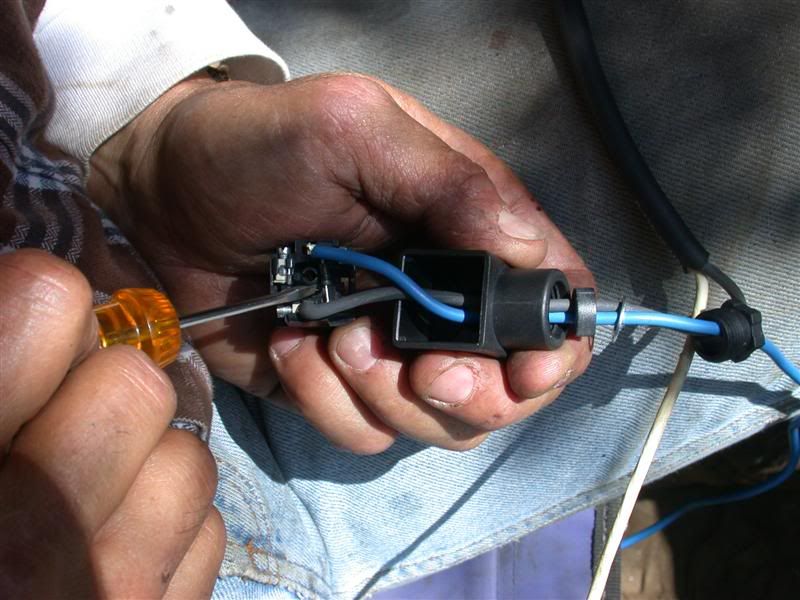
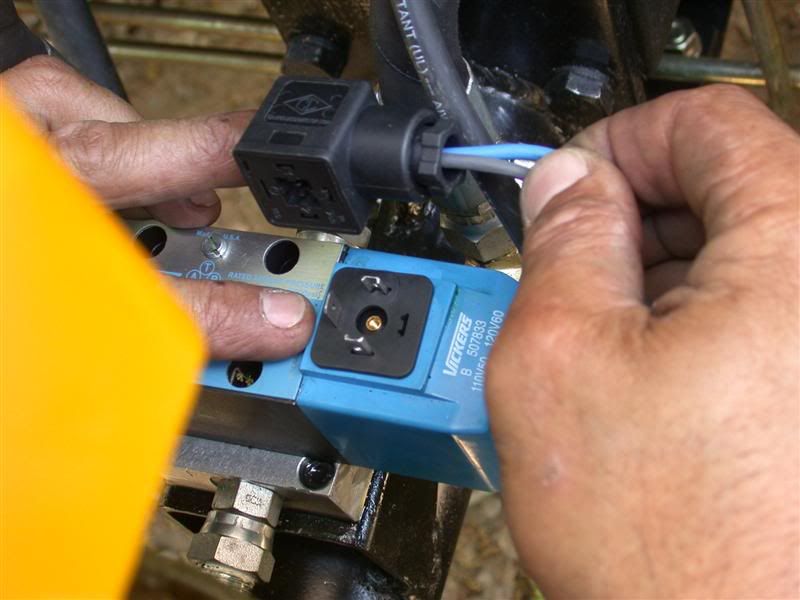
The last thing we did before returning home was to wire up the solenoid valve to the Scorpion rocker switch. In these photos below, you can see how to wire the Hirschman connectors which are needed for the Vickers valve. Scorpion recommends adding a diode across the (+) and (-) terminals to protect the switch and make it last longer. You can see it where I have the screwdriver pointed. Make sure the band is on the (+) terminal. Then you can plug the Hirschman connectors to the top of the solenoids.    Make the other connections to ground and to positive as described in the instructions for both solenoid valve and handle switch. Unfortunately, I must not have it correct because I couldn't get it to work. We only had a couple minutes left so we will chase that down next visit up. It should all work if I got the electrical connections right. I'll have to see when I take it apart again. Rob- |
|
GuglioLS
Administrator
Jinma354 LE
Posts: 1,276
|
Post by GuglioLS on Apr 18, 2008 16:40:11 GMT -5
Rob,
Super sano grapple install, man it looks great. I wonder what the deal is with the electrical? One side of the solenoid goes to ground, the other to the switch, the center of the scorpion rocker switch goes to + from the battery or + from the starter switch.
Larry
|
|
3RRL
Administrator
Huge Kama
Posts: 2,027
|
Post by 3RRL on Apr 18, 2008 19:34:04 GMT -5
Rob, Super sano grapple install, man it looks great. I wonder what the deal is with the electrical? One side of the solenoid goes to ground, the other to the switch, the center of the scorpion rocker switch goes to + from the battery or + from the starter switch. Larry Right... I have one wire of the rocker switch (+) going to the battery (hot) and the other switch wire going to the (+) terminal of the solenoid. The other side of the solenoid (-) goes to ground... so that should complete the circuit ... But nothing?? Do you think it could be the diodes? I put the band to the (+) side of the solenoid terminals. Perhaps my ground or some other connection is not solid? But I'm positive the wiring is in the correct place. I'll check the connections to see if they are faulty next week. Maybe solder them instead of clip them. Thanks about the grapple set up itself. I'm pretty pleased with how it came out for Loretta. She is happy too...if I can get it to work. ;D Rob- |
|
GuglioLS
Administrator
Jinma354 LE
Posts: 1,276
|
Post by GuglioLS on Apr 18, 2008 21:35:47 GMT -5
Do you think it could be the diodes? I put the band to the (+) side of the solenoid terminals.
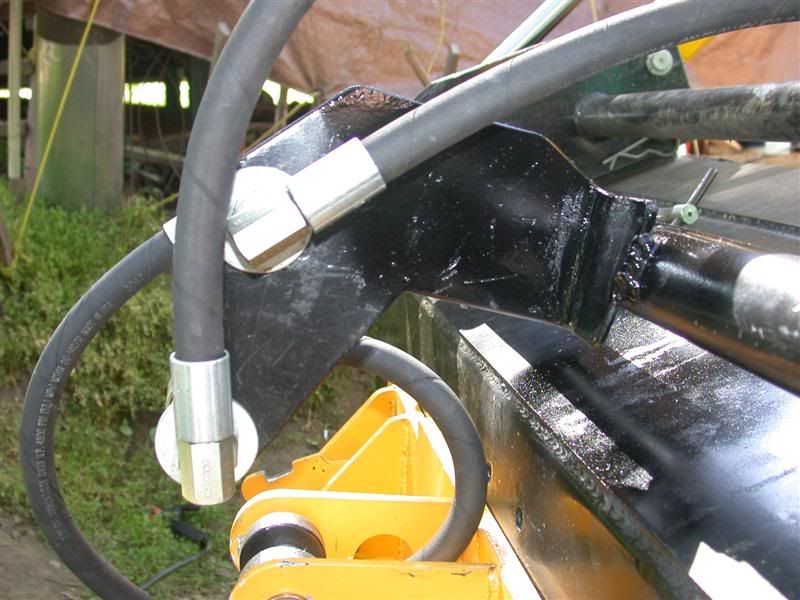
Rob, seems you have the diodes installed correctly, if not, the smoke they put in them would have leaked out immediately. It's got to be a lousy connection somewhere, or the switch is somehow mis-wired? Maybe get out your 99 cent Harbor Freight volt meter and check the continuity of the rocker switch? I'm sure you'll figure it out next trip. I'm impressed with the hose routing and live swivels, I used live swivels on mine, it makes a world of difference by eliminating hose strain from twisting.
Larry
|
|
3RRL
Administrator
Huge Kama
Posts: 2,027
|
Post by 3RRL on Apr 18, 2008 23:15:15 GMT -5
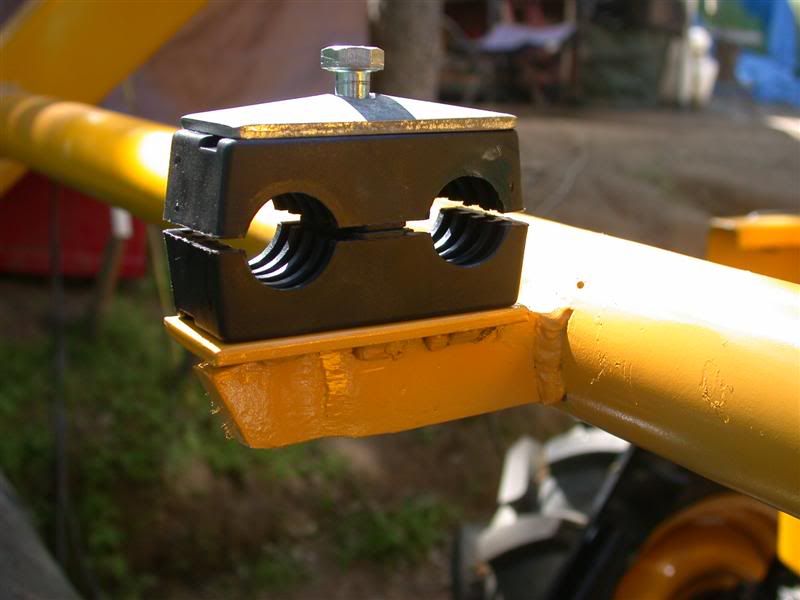
Thanks again Larry. Yeah, those live swivels are the bomb! Loretta's hoses pivot making a tighter loop, but they don't twist or strain. They are clean looking too. Back to the wiring, it's probably a bad connection. You know my luck with bad connections, right? ;D I might need a buddy to come over and help with this now that it's Spring and 80°F here. I'd pay big money to that guy. One thing I didn't mention is when I had the first set of hose made up leading to her hydraulic cylinder, I got the ends which go into the cylinder made with 3/8NPT live swivels ... expensive. Here is the link to the cylinder I purchased from Surplus Center. Fieldmate Hyd CylinderNotice it says it has 3/8NPT ports right on the specs. Not only that, but I called their tech desk to confirm this. The reason is when I removed the plugs, they had "O" rings around the plug threads ... a #6 ORB. So I called to verify. Turns out the damn things ARE #6 ORB fittings after all... fuck. Another 30 bucks a piece down the drain! I had to get new ones made since cutting them off would be too short. I had them fit perfectly! Crap! Not only that, but the hydraulic store does not have an ORB live swivel elbow. so I had to get an elbow (ORB) to #6 JIC and then another JIC elbow on the hoses. That made it awkward, but it works. So KEN, if you're reading this and are EVER going to do your grapple, if you bought this cylinder, the ports are #6 ORB!!! Rob- |
|


 J/K
J/K